


These Thanksgiving appetizers are great for entertaining before the big meal, from baked brie to pumpkin hummus! The easy recipes feature fall flavors like apple, pear, and cranberry.

Need finger foods ideas for before the big meal? There’s nothing more fun than munching on a few snacks before the main event. Over the years, I’ve learned the best Thanksgiving appetizers are the ones I can easily prep and have ready once friends and family arrive.
After almost a decade of hosting this holiday, here are my absolute favorite Thanksgiving appetizers that go over well with a crowd, from creamy dips to sweet breads and crunchy crostini! Most take 30 minutes or less, many can be prepped the night before, and all of them are built around the flavors of the season, like pumpkin, apple, fig, cranberry, and pear.
My top Thanksgiving appetizers

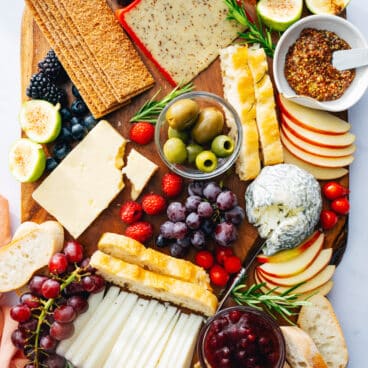
At the top of my easy Thanksgiving appetizers is a festive cheese board! Cheese boards are ,y go-to for entertaining: they’re simple to put together, easy to customize for various diets, and look beautiful. Here's how to arrange the ultimate cheese board!

Need a simple appetizer to wow at parties? Try this easy cranberry cream cheese dip! The homemade sauce bursts with sweet and tart cranberries, orange juice, and if you’d like, a little jalapeno for a tang. Spoon it over cream cheese and it’s perfect for dipping crackers or even apple slices.

There could not be an easier appetizer recipe than baked brie! The toppings are versatile depending on your preferences, and you can make a beautiful platter with little effort. Try honey, cranberry sauce, apricot jam, or pomegranate seeds.
Step it up: Make it a platter with sliced pears and apples, grapes, crackers, and nuts.

You won’t believe this caramel apple dip recipe until you taste it! Stir just 4 ingredients into a glossy peanut butter caramel that’s vegan and gluten-free. It’s so simple and I've made it for many parties: everyone always loves it.

This cranberry salsa is a fun Thanksgiving appetizer that's all about the flavors of the season! Use fresh or frozen cranberries here, then whiz them up with jalapeño, lime and honey. Serve with pita chips or crusty bread.

Ready for the coziest Thanksgiving appetizer? This easy Pumpkin Dip tastes like everything you love about the season: pumpkin, maple, cinnamon, ginger, and nutmeg. It takes only 5 minutes to stir together: serve with apple slices, pretzels or ginger cookies.

Everyone loves these stuffed mushrooms! These little bites are savory, meaty, and herby, with a tender exterior and a crunch in each bite. Even better, this recipe is simpler than most: no need to sauté filling ingredients. Chop them up, fill, and bake!

For a quick and easy Thanksgiving appetizer, this spread is perfect for parties, pairing the flavors of cranberry, pistachio and fresh rosemary with a log of tangy goat cheese. Drizzle honey over the top before serving for a sweet pop. It’s ideal for snack tables, scooped up with crackers or crostini.

Who doesn't love a great spinach artichoke dip? This tangy, creamy dip recipe is such a crowd pleaser that it might interfere with the conversation when you serve it (sorry!). Serve with pita chips or crostini. Also try my Vegan Spinach Artichoke Dip.

I'll admit, pumpkin hummus sounds a little unusual at first: but trust me on this one! It's creamy and savory with subtle fall undertones that complement the chickpeas. It comes together in just 10 minutes in the food processor, making it perfect for parties.

An antipasto platter is ideal for Thanksgiving entertaining! Pile a board with Italian antipasti like cheeses, cured meats, olives, marinated vegetables, and more. I love adding fruit and nut crisp crackers for a hearty crunch.

A good pinwheels recipe is classic in an appetizer spread! This recipe is full of Italian-style flavors: mozzarella, sundried tomatoes, spinach, and a blend of spices. They're easy to make ahead and look absolutely stunning on a platter.

Fougasse bread is a traditional French bread with a leaf-like shape that's delicious and impressive to bake at home. It's fluffy and flavored with Parmesan, rosemary, and flaky salt. It’s the perfect appetizer or side dish: everyone who’s tried it has raved: and then asked me for the recipe!

Here are all my top ideas for a next level party veggie tray! These tasty dips and vegetables go beyond the ordinary carrots and celery to make a colorful, flavorful tray that will impress everyone. Try the veggies with favorites like dill dip, spicy hummus, and more.

Want a sweet Thanksgiving appetizer? This cranberry orange bread is citrusy, moist, and studded with tangy berries, then drizzled with a simple sweet glaze. Whenever I serve it, people keep returning to the loaf.

A fun classic party appetizer is the cheese ball, which has 1970's vibes but will never go out of style, in my opinion. My recipe freshens up the classic with cheddar, green onion, Worcestershire, garlic powder and smoked paprika for a creamy, savory punch.

Need a fun, creamy dip that’s simple to whip up for guests? Homemade French onion dip takes the classic flavors to a new level. It's fresh, savory, rich and tangy: ideal for drowning salty potato chips or crunchy veggies.

This no knead olive bread recipe tastes like it’s from a bakery but it’s so easy to make at home! It has a crispy crust, soft and chewy interior, and a developed, savory flavor. Every time I make it, people can’t stop eating it!

Here's a fun party snack with a crunchy, candy-like coating that makes the nuts irresistible. They’re spiced with cinnamon, chili powder and bit of cayenne for an intriguing mix of sweet, savory and spicy.

This apple nachos recipe turns the fruit into a healthy snack that kids and adults crave! This 10-minute recipe makes snacking fun with a creamy yogurt drizzle and crunchy almonds.
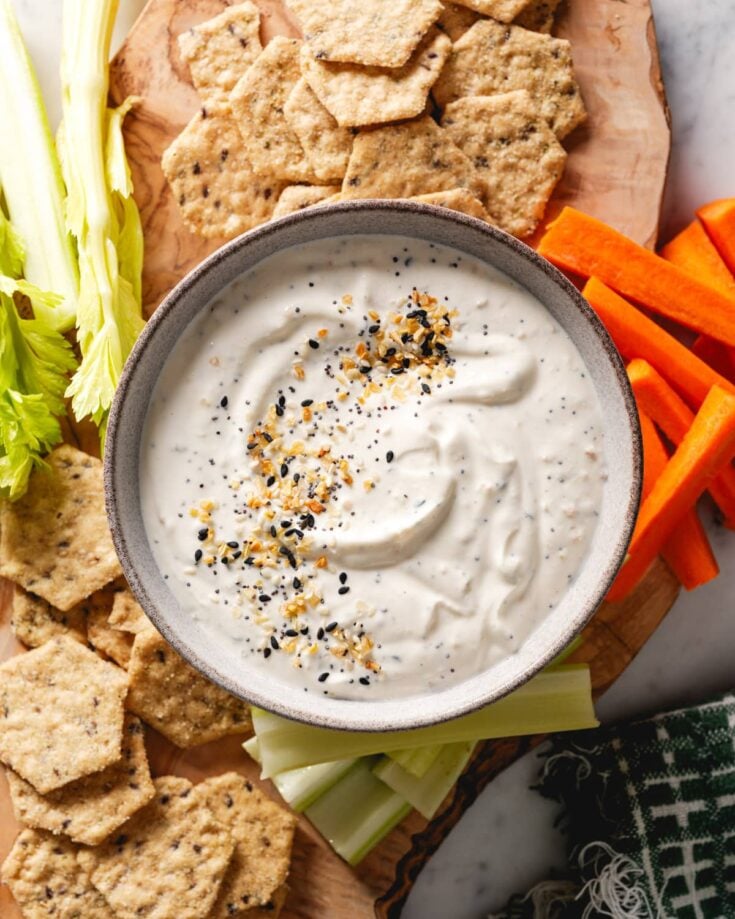
This Everything Bagel dip made with Greek yogurt is perfect for parties and entertaining or simple snacking! Everyone loves this easy appetizer recipe and it takes only 5 minutes to mix up. I make it often and it's perfect for holidays where you don't want to stress about buying too many ingredients.
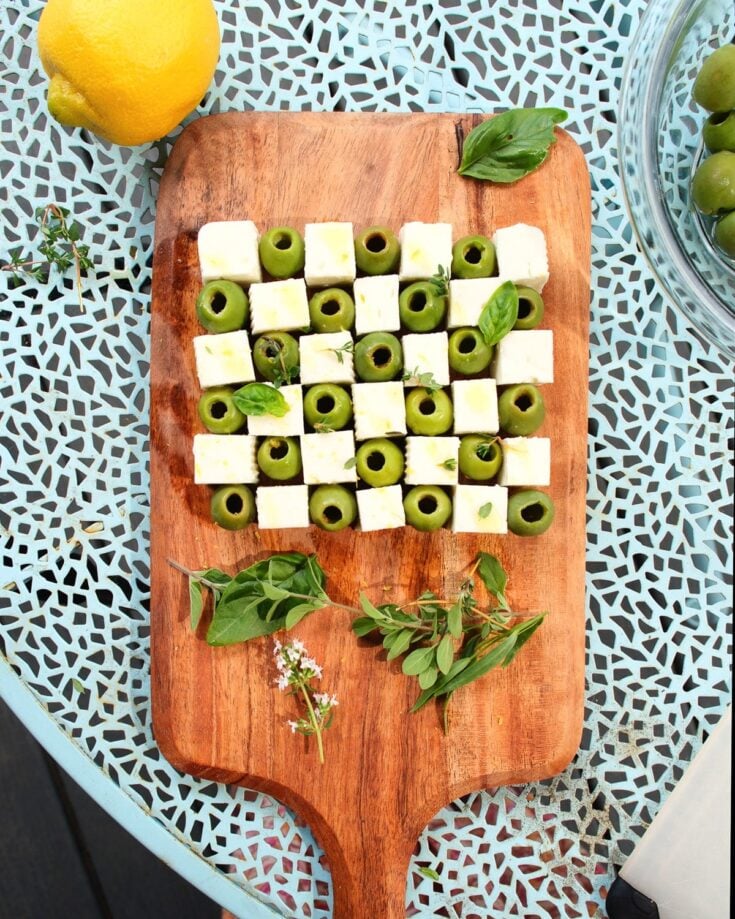
This stunning olive and feta party appetizer looks fancy but takes just a few minutes to assemble! It's only 4 ingredients arranged in an eye-catching checkerboard pattern and so simple to whip up before the main meal.

This sun dried tomato pesto is bursting with zippy flavor. Dip it with with toasted or grilled bread or crackers, and it’s a burst of savory, sweet, tangy, and herby all at once. All you need are a handful of ingredients to whip up a batch.

This quick bread is great for a Thanksgiving appetizer spread! Sweet potato bread is an alterative to pumpkin bread that's even more fun than the classic: incredibly moist and sweetly spiced with cinnamon. It makes a tall, fluffy loaf that looks impressive.

Got 5 minutes? Then you've got time for whipped ricotta! The pairing of fluffy, savory cheese and gooey golden honey will have everyone licking their plates. It’s creamy, salty sweet perfection scooped up with some warm bread.

This dish will make an olive lover out of anyone. Using the right type of olives here results in smooth, rich flavor: not briny or overly salty, with garlic, lemon and herbs. Every time we make these and set them out on the table, people go crazy for them.

These deviled eggs are totally classic with a a twist: Greek yogurt in the filling along with the mayo. Along with both yellow and Dijon mustard, it adds the perfect flavoring to these eggs without being overly rich!

This Thanksgiving appetizer idea could not be easier: honestly, it’s more an idea than a recipe. Bake up some homemade crostini, top with goat cheese and honey, and you’ve got the most delicious sweet and savory taste treat.

Why buy one of those sub-par trays from the grocery store when you can make an incredible version of shrimp cocktail at home? Homemade is always the best (in my opinion), and this recipe really shines: with juicy, plump shrimp and a zingy cocktail sauce.

Last up in my favorite Thanksgiving appetizers: stuffed dates! The sweet caramel chewiness of Medjool dates with tangy, fluffy goat cheese makes a sweet-savory combo that's out of this world good!
Tips for Thanksgiving Appetizer Success
After hosting Thanksgiving for a few years, here’s what I’ve learned about making the appetizer hour run smoothly. First, I try to prepare at least two appetizers the night before: things like marinated olives, apple dip, or cheese balls that taste better after the flavors meld overnight.
I also think about contrasts: in ingredients, colors and textures. For example, have something warm and comforting like baked brie, something cool and fresh like a veggie tray, and crunchy like spiced nuts.
When it comes to special diets, I try to include at least two or three options that are vegan appetizers or gluten-free appetizers so everyone feels included. Many of the recipes in the list above fit these diets!
Make-Ahead Ideas
You can make things like cranberry cream cheese dip, marinated olives, cheese balls, and spiced nuts up to two days ahead.
Quick breads like sweet potato bread and cranberry orange bread can be baked a day or two early, wrapped tightly, and stored at room temperature. Just slice them right before serving for that fresh-baked look.
Even things that need to be baked day of, like stuffed mushrooms, can be assembled the night before. I prep them completely, cover with plastic wrap, and refrigerate overnight (or put them outside if the weather is cold enough!). Then just pop them in the oven while guests start arriving.
30 Thanksgiving Appetizers: Holiday Cheese Board
5 Stars 4 Stars 3 Stars 2 Stars 1 Star
5 from 1 review
These Thanksgiving appetizers are ideal for grazing before the main meal! Choose from baked brie, cranberry salsa, and more.
- Author: Sonja Overhiser
- Prep Time: 0 minutes
- Cook Time: 15 minutes
- Total Time: 15 minutes
- Yield: 8
- Category: Appetizer
- Method: Baked
- Cuisine: American
- Diet: Vegetarian
Ingredients
Instructions
- Preheat the oven to 375°F. Place the brie in a baking dish or on a parchment-lined baking sheet. Bake for 15 minutes until soft and warm: it’s done when you touch the center with your finger and it feels very liquid inside.
- Top with honey or jam, crushed pistachios, and a bit of flaky sea salt. Surround with crackers or crostini, grapes, apple, pear, etc.
More Thanksgiving Recipes
- 40 Best Thanksgiving Cocktails
- 45 Thanksgiving Side Dishes
- 60 Favorite Thanksgiving Recipes
- 40 Crazy Delicious Thanksgiving Desserts
- 20 Thanksgiving Salad Recipes


from A Couple Cooks https://ift.tt/REcQ5hk


