This Ooni pizza dough recipe has the best chewy texture and flavor! Use it when cooking with any outdoor pizza oven.
Got a pizza oven and want to fire it up? Try my Ooni pizza dough recipe, which works with any type of outdoor pizza oven! This dough makes the perfect supple crust that’s ideal for firing at high temperatures.
Alex and I are cookbook authors and homemade pizza experts who have spent the last decade perfecting how to make pizza at home. This is our tried and tested pizza oven dough recipe—it comes out light and chewy on the inside and charred on the outside, with the perfect hydration ratio for cooking at high heat!
What makes the best Ooni pizza dough?
The best pizza you can make at home, in my opinion, is pizza in an outdoor pizza oven! There are many great pizza ovens on the market these days. Alex and I own and have extensive experience with both the Ooni pizza oven and the ROCCBOX. This recipe works perfectly with both pizza ovens. Here’s what we’ve learned after researching what makes the best Ooni pizza dough recipe:
Use a dough with 62% hydration for hot temperatures. This gets a little nerdy, but this recipe has a slightly lower hydration than our classic pizza dough recipe. Hydration is the ratio of water to flour in a dough. Lower hydration dough works better in the high temperatures of a pizza oven, and it’s a bit easer to work with (not as sticky).
If possible, use Tipo 00 flour. Tipo 00 flour is the type of Italian flour that Neapolitan pizza restaurants use. It makes a supple and fluffy dough that’s a notch above all purpose flour. Tipo 00 is becoming easy to find at your local grocery or online. Substitute all purpose flour if it’s all you have, but it’s worth seeking out the good stuff.
Tips for how to make Ooni pizza dough
This Ooni pizza dough recipe is straightforward, but it does take some practice. Here’s what to expect in the dough making process:
Measure using a food scale. Measuring by weight with a food scale is more accurate than measuring with cups, and accounts for environmental changes.
Knead the dough by hand or using a stand mixer. A stand mixer is totally hands off, but you can get your hands dirty, too. In both cases, it takes just 8 minutes.
Rest the dough for 45 minutes. This is also called “proofing” and lets the dough rise, allowing it get to the perfect fluffy texture.
Or, make the dough up to 3 days in advance. The flavor actually gets better over time! For best results refrigerate the dough for 2 to 3 days, which imparts a nuanced, nutty undertone.
How to stretch the dough
Stretching the dough is the trickiest part of the Ooni pizza dough process—outside of cooking it, of course! You’ll need to stretch it into an 11-inch circle. For best results, watch our video for How to Stretch Pizza Dough. Follow these tips:
Dust the pizza peel with cornmeal or semolina flour. This helps the dough to slide right onto the stone. We prefer semolina flour.
First pat the dough into a circle. Place it on a lightly floured surface and gently press it into a circle, flipping several times and adding a pinch of flour if it is too sticky.
Gently stretch the dough over your knuckles. Once you have about an 8-inch circle, pick up the dough and gently drape it over the knuckles on both of your hands. Slowly rotate it around, allowing gravity to stretch it into a circle about 11 inches in diameter. If the dough starts to resist stretching, put it down and allow it to rest for a few minutes, at which point it will stretch more easily.
Important pizza peel tips
Alex has been making Ooni pizza dough for years and has a slightly different method for the pizza peel. He noticed that cornmeal or semolina on the bottom can tend to burn slightly in a pizza oven.
So, he prepares and tops the pizza dough first on this conveyor Super Pizza Peel (so he can avoid using semolina). Then he uses the conveyor to place the dough onto the stainless steel pizza peel that comes with the oven. It’s a bit of a workaround, but it’s our best practice! You can still use cornmeal and semolina with good results.
Another tip: We use this ROCCBOX turning peel to rotate the pizza while it cooks in the oven, which is very helpful. You can use the nonstick peel for transfer (which comes with the oven).
My favorite pizza ovens
Alex and I are a bit pizza oven obsessed. We’ve owned an Ooni pizza oven for several years and just added a Gozney ROCCBOX to the family. Here’s my two cents on the best pizza oven after years of experience:
Open-front propane ovens are best for easy cooking. We recommend this Ooni Koda 12 or the ROCCBOX. This type is a definite upgrade from our previous wood fired Ooni, which was more finicky in the cooking process.
Ooni and ROCCBOX are comparable. We decided on the ROCCBOX for extra insulation and our personal preference of dough cooking, but both are comparable. Try the Ooni Koda 16 if you prefer a larger pizza.
Pizza topping ideas for outdoor ovens
What are the best pizza toppings? In my opinion, anything with our easy red pizza sauce recipe can’t be beat. Here are a few of my top ideas for pizza recipes to make in an Ooni pizza oven:
Mix the dough: Combine the flour, salt, and yeast in a bowl or the bowl of your stand mixer. Stir to combine. Add the water and olive oil and stir until a raggy dough forms. Turn the dough out onto a floured surface.
Knead the dough: Knead the dough by pushing with the base of your palm, then reforming it into a ball. Continue kneading for 8 minutes until the dough feels pillowy and has a smooth, stretchy exterior. If the dough is very sticky, add a small amount of flour while kneading. Alternatively: attach the dough hook to a stand mixer and start the mixer on medium-low speed, then allow the mixer to knead for 8 minutes.
Rest the dough: After the kneading is finished, divide the dough into 3 equal pieces. Using floured hands, gently shape each half into a boule (ball shape) by folding the dough under itself. Set each boule on a floured surface and dab the dough with a bit of olive oil to keep it moist. Cover all boules with a damp towel and allow them to rise until doubled in size, about 45 minutes to 1 hour.
Optional: chill up to 3 days: The dough can be used immediately. However for the BEST flavor, transfer the dough to separate sealed containers, large enough for the dough to double in size again, and store in the refrigerator for 2 to 3 days. (We don’t always do this, but we try when possible because it makes for a noticeably nutty, unique flavor that truly is the best homemade pizza dough you’ve ever had.) You can also freeze pizza dough you don’t plan to use the day of.
**If you’re using the dough after refrigerating: The day of serving, remove the dough from the containers, place it on a lightly floured surface covered with a towel, and allow it to come to room temperature before stretching, 30 to 45 minutes.
Preheat: Preheat the pizza oven.
Stretch the dough: When the oven is ready, dust the stainless steel pizza peel with cornmeal or semolina flour. To stretch the dough, place it on a lightly floured surface and gently press it into a circle, flipping several times and adding a pinch of flour if it is too sticky. Once you have about an 8-inch circle, pick up the dough and gently drape it over the knuckles on both of your hands. Slowly rotate it around, allowing gravity to stretch it into a circle about 11 inches in diameter. Do not overwork or fold the dough. If the dough starts to resist stretching, put it down and allow it to rest for a few minutes, at which point it will stretch more easily. Gently place the dough onto the pizza peel.
Top the pizza: Top the pizza according to the pizza recipe you’re using.
Bake the pizza: Use the pizza peel to carefully transfer the pizza to the pizza oven. Bake the pizza until the cheese is melted and the crust is lightly charred, about 1 to 2 minutes in a pizza oven (follow the specific instructions that accompany your oven). Allow the pizza to cool for a minute, then slice into pieces and serve immediately.
from A Couple Cooks https://ift.tt/VEg2rSL
These artisan sandwich rolls are homemade sub sandwich bread with a crispy crust and chewy interior! Using just 5 ingredients and an overnight rest, this easy sub rolls recipe makes mini baguettes that taste like they’re from a French bakery.
You’ve absolutely got to try this delicious recipe inspired by my son’s love of great bread! We recently traveled to France as a family and my son fell in love with those ham and butter sandwiches sold at every corner café. Back home, I tried recreating it with grocery store sub rolls, but the bread was all wrong—too soft and sweet, with a slightly artificial aftertaste.
So Alex spent weeks recipe testing to recreate the magic of that French bread! The final sandwich rolls recipe came out perfect—crisp on the outside, soft inside, with just enough chew to hold up to any filling. The rolls are a great no knead bread for sub sandwiches or French or Italian-inspired sandwiches (like this Italian eggplant sandwich). They’re also so easy to make, with only a few ingredients and no special equipment required!
Sandwich rolls recipe overview
Here’s the basic outline of the tasks for this sandwich rolls recipe. The process requires an overnight rest of the bread and about 2 hours day of, so keep that in mind when planning. It’s a no knead bread recipe—which makes it so easy! Here’s an outline of what you’ll have to do:
Mix the dough
10 minutes active
Proof overnight
12 to 18 hours, hands off
Form boules
10 minutes active
Rest boules
45 minutes, hands off
Form the baguettes
5 minutes active
Rest baguettes
30 minutes, hands off
Bake
19 minutes
Tools and ingredient notes
This sandwich rolls recipe is easy to whip up: no kneading required! This means you don’t need a stand mixer or any fancy equipment. Here are the ingredients and tools you need:
Bread flour: Bread flour is required for the best soft, supple texture. Don’t substitute all-purpose flour here: it won’t be nearly as good.
Whole wheat flour: Adding a bit of whole wheat flour makes for a robust, nutty flavor essence.
Active dry yeast and salt: Yeast acts as the leavener to make the bread fluffy.
Apple cider vinegar: Vinegar adds a nice subtle tang to the flavor.
Pizza stone: A pizza stone is required for a crispy exterior (here’s the pizza stone we use)
Parchment paper
Sharp knife
How to make sandwich rolls—step by step
The only part of this sub rolls recipe that involves some technique is shaping the rolls. The best way to learn is to watch the video tutorial below! Or, here are the basic steps with photos:
Mix the dough and allow it to rest overnight (see the recipe below).
2. Form the dough into boules: Gently stretch the edges of the dough and fold them toward the center, rotating the piece as you work around it. Flip the dough seam-side down and cup your hands around it. Using gentle circular motions, roll the dough to create surface tension and form a smooth, tight ball. Allow to rest 45 minutes.
3. Form the rolls: Flour a countertop. Take each ball and gently roll it back and forth on the counter with your palms to form a 6-inch oval. Then using the sides of your hands, lightly press and taper the ends to create a baguette shape. Place on parchment and allow to rest 30 minutes.
3. Bake: Preheat the oven to 450°F with a pizza oven in the center rack. Brush the top of each roll with water. Add water to the blade of a sharp knife, then cut four diagonal slits into each roll. Use a cookie sheet to slide onto the preheated pizza stone and bake for 19 minutes.
Make ahead and storage instructions
Storage is important when it comes to homemade bread! These sandwich rolls are best immediately, but you can store the bread at room temperature for 2 days wrapped in a clean towel.
For a softer bread, 3 to 5 days wrapped in plastic (we use an old store bought bread bag). The bread can also be frozen, sliced into pieces and wrapped in plastic, for 3 months.
Ways to serve it
These sandwich rolls are next level in flavor! You can serve them in so many ways: they work both for sandwiches and as a bread for serving with appetizers! Here are some ideas:
Use them as a sub sandwich bread for your favorite meats and cheeses
These artisan sandwich rolls are homemade sub sandwich bread with a crispy crust and chewy interior! Using just 5 ingredients and an overnight rest, this easy sub rolls recipe makes mini baguettes that taste like they’re from a French bakery.
Mix the dough: Combine the bread flour, whole wheat flour, yeast, and kosher salt in a bowl. Stir to combine. Add the water and vinegar and stir until a shaggy dough forms. Using wet hands, turn the dough onto a lightly floured countertop. Gently knead to form the dough into a ball, about 30 seconds. Return the dough to the bowl and cover tightly with foil or plastic wrap.
Rest overnight (12 to 18 hours): Allow the dough to rest overnight at room temperature, 12 to 18 hours.
Form the dough into balls (boules): The next day, the dough should be very bubbly. Turn the dough onto a lightly floured counter and use a bench scraper to form into 4 equal pieces. Working with one piece at a time, gently stretch the edges of the dough and fold them toward the center, rotating the piece as you work around it. Flip the dough seam-side down and cup your hands around it. Using gentle circular motions, roll the dough to create surface tension and form a smooth, tight ball.
Rest the boules (45 minutes): Place the balls back on the counter and cover with the inverted bowl. Rest for 45 minutes.
Preheat: Preheat the oven to 450°F, with a pizza stone on the center rack and a rimmed sheet pan on the rack below.
Form the rolls into a baguette shape: After the 45 minute rest, prepare a piece of parchment paper the size of your pizza stone. Spread a thin layer of flour on a clean countertop. Take each ball and gently roll it back and forth on the counter with your palms to form a 6-inch oval. Then using the sides of your hands, lightly press and taper the ends to create a baguette shape, then place it on the parchment paper. Repeat with all four rolls — it’s ok if they are touching slightly on the parchment.
Rest the rolls (30 minutes): Cover with a clean tea towel and rest for 30 minutes.
Create slits: After the 30 minute rest, brush the top of each roll with water. Add water to the blade of a sharp knife, then cut four diagonal slits into each roll.
Bake: Slide a cookie sheet or pizza peel under the parchment and transfer the rolls to the hot pizza stone. Very carefully, pour 1 cup of water onto the hot baking sheet to create steam (stand back to avoid any steam). Bake for 19 minutes, until browned and hollow when tapped. Cool fully on a rack, then use a serrated knife to cut apart the 4 rolls into individual rolls.
Enjoy immediately or store the bread at room temperature for 2 days wrapped in a clean towel, or for a softer bread, 3 to 5 days wrapped in plastic (we use an old store bought bread bag). The bread can also be frozen, sliced into pieces and wrapped in plastic, for 3 months.
Notes
Serving ideas:
Use them as a sub sandwich bread for your favorite meats and cheeses
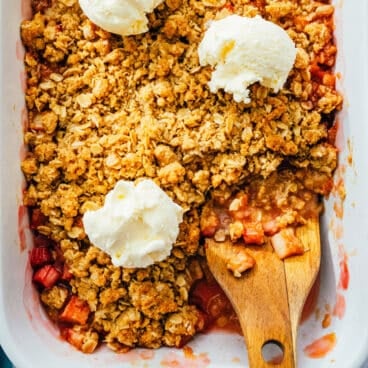
This nostalgic strawberry rhubarb crisp delivers the perfect balance of tangy fruit and buttery oat topping! It’s the ultimate summer dessert that tastes like childhood memories. (Gluten-free and vegan options included.)
Growing up, my family had a backyard rhubarb plant—massive leaves shading pink-green stalks. Every year, would harvest the pink-green stalks and make a rhubarb crisp. That first bite was pure magic—intensely sweet-tart (like a Jolly Rancher!) bubbling under golden crumbles.
This recipe is my love letter to those memories, refined through years of testing. I’ve discovered the perfect strawberry-to-rhubarb ratio and a secret ingredient that makes everything pop. The result tastes like the best parts of a strawberry lemonade transformed into a warm, comforting dessert.
Keys to the perfect strawberry rhubarb crisp
This strawberry rhubarb crisp is very delicious, with just the right tangy flavor from the rhubarb and buttery crumble topping. It’s such a fun nostalgic dessert for summer evenings on the patio, topped with vanilla ice cream or fluffy whipped cream. There are also several ingredients you can modify to make it work for different diets. Here are the keys to what makes this summer dessert special:
It’s perfectly sweetened. Some strawberry rhubarb crisp recipes call for loads of sugar. This one uses just enough to get the right sweet tart flavor.
Orange zest adds a zing. This is the secret ingredient: trust us! It brings out the best citrusy flavor.
The buttery crumbles have the best texture. Oats, flour, brown sugar and butter make the best crumbly texture that’s not too crispy.
Baking tips for crisp success
The right dish matters
A 9×9 or 7×11 inch dish gives the ideal fruit-to-topping ratio: typically I like a 7 x 11 dish, but a round 9″ pie plate also works (which you’ll see in the photos). You can use ceramic, glass, or metal.
The cooling conundrum
I know it’s torture, but make sure to let this crisp cool 30 minutes minimum—but preferably 1 hour. The filling needs time to set, and serving it slightly warm (not hot) lets you taste all the flavors better.
Customization for every diet
This strawberry rhubarb crisp works very well as a gluten free dessert or vegan / dairy free dessert, because the crumble topping tastes very similar with these simple swaps:
Use almond flour for gluten-free. Using almond flour is a simple swap that makes a crunchy gluten-free topping.
Use vegan butter or coconut oil for vegan. I prefer vegan butter for the best flavor, but you can also use refined coconut oil to turn it into a vegan dessert.
Flavor variations to try
This recipe results in a straightforward strawberry rhubarb crisp, with a sweet tart flavor and a crunchy crumble. If you’re looking for ways to customize it even further, try these flavor boosters:
Fresh ginger: Add 1 tablespoon finely minced fresh ginger root for a spicy flair
Cardamom: Add ¼ teaspoon ground cardamom to the crumble
Berries: Use blackberries or mixed berries instead of strawberries (or try our blackberry crisp or mixed berry crisp). I once had a pie with mixed berries and rhubarb that was fantastic!
Storing leftovers
Here are a few tips for storing a fruit crisp:
Room temperature: store for 1 day. You can leave your strawberry rhubarb crisp on the counter for up to 1 day (cover it at night). This way, the crumbly topping will stay crisp.
Refrigerated: Day 2-3. After 1 day at room temperature, refrigerate any leftovers. They’ll stay good for about 3 days.
The bottom line: We hope this strawberry rhubarb crisp recipe will bring back nostalgic memories if you grew up eating rhubarb too! There’s something magical about this weed-like plant. And eating it in a crumble is one of the best sweet treats.
Dietary notes
This strawberry rhubarb crisp recipe is vegetarian. For gluten-free, use almond flour. For vegan, plant-based, and dairy-free, use coconut oil instead of butter.
8 tablespoons cold salted butter (or coconut oil or vegan butter for vegan)
Instructions
Preheat the oven to 350 degrees Fahrenheit.
Make the filling: Chop the rhubarb into 1/2-inch pieces. Slice the strawberries. In a medium bowl, mix the strawberries and rhubarb with the sugar, cornstarch, vanilla, and orange zest (optional).
Make the topping: In a medium bowl, mix together the oats, flour, sugar, cinnamon, and kosher salt. Cut the butter into small pieces and then use your hands to mix it into the oats until fully distributed and a crumbly dough forms. It may take a while so be patient; you can also use a fork or pastry cutter if you prefer. (If using coconut oil, it can be room temperature; use the same method to add it.)
Pour the filling into a 9 x 9 inch baking dish or 7 x 11 baking dish. Pour the crumble on top and smooth it into an even layer with your fingers.
Bake for 45 to 50 minutes until the top is evenly lightly browned and the filling is bubbly (this will vary based on your oven and berries: it may be shorter or longer so keep an eye on it). Cool for 30 minutes to 1 hour, then serve. You can leave out your strawberry rhubarb crisp on the counter for up to 1 day (covered, at night) so the topping can stay crisp. After 1 day, refrigerate any leftovers.
Notes
*Almond flour results in the best crunchy crumble for gluten-free, but oat flour works here too.
Other rhubarb recipes to try
Love rhubarb? Here are some of our favorite rhubarb recipes to try when it’s in season, like breads, muffins and more: