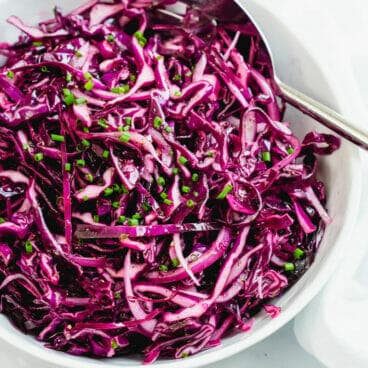
This vibrant red cabbage slaw recipe is the perfect balance of creamy, tangy, and sweet in 15 minutes with a short ingredient list! My easy recipe makes a fresh side dish using mostly pantry ingredients.

I originally created this red cabbage slaw recipe because I was tired of buying both red and green cabbage for my classic coleslaw recipe. The first time I served it for a family gathering, I was asked for the recipe multiple times! Now it’s become a go-to side dish for everything from fish tacos to grilled chicken.
What I love most about this red cabbage slaw is how it transforms one simple head of cabbage (plus an onion!) into something extraordinary. My traditional coleslaw recipe requires both red and green cabbage varieties, but here you only need the one! The dressing has the perfect combination of savory, tangy, sweet and creamy and takes the crunchy cabbage strands to new heights.
5 star reader comments
“Great recipe. Very enjoyable slaw which I definitely will make again. The dressing is just perfect. So easy and delicious.” -Joan
“Perfect balance of creamy, tangy, and a touch of sweet. I made this exactly as written. It’s a real keeper!” -Anonymous
Why red cabbage makes for a good slaw
I often choose red cabbage over green because it holds its crunch longer and has that gorgeous deep purple color.
In my experience, red cabbage stays crisp for days in the refrigerator, while green cabbage can get soggy or brown faster. This makes red cabbage slaw perfect for meal prep or when you’re entertaining.
How to shred cabbage for slaw
The hardest part of making red cabbage slaw is shredding the cabbage. I used to hack at a cabbage and end up with all sorts of weird uneven pieces—until I figured out this trick! Here’s how to cut cabbage so that you end up with bite-sized shreds perfect for slaw:
- Remove any outer layers of the cabbage that seem tough or are not fresh, and discard them.
- With a large chef’s knife, slice off the root of the cabbage.
- Slice the cabbage in half through the stem, then slice it into quarters.
- Remove the root of the cabbage by cutting it out diagonally.
- Thinly slice the cabbage in the short direction, using a circular motion with the knife.
My secrets to the best coleslaw dressing
The dressing is where this red cabbage slaw really shines. I’ve tested dozens of variations, and this combination hits every flavor note.
- It uses less mayonnaise than the standard coleslaw. The base starts with mayo, but I use less than most traditional recipes—just enough to create creaminess without overwhelming the fresh cabbage flavor. Here’s why I love it:
- Apple cider vinegar provides the tangy element I prefer ACV over white vinegar because it has a more complex, slightly fruity taste.
- The dried dill and celery seeds are my secret weapons. They add an herbaceous note that makes people wonder what makes this slaw taste so special.
Storage and make ahead tips
I personally like this red cabbage slaw served immediately, but you can make it ahead and refrigerate until serving. The cabbage softens slightly while still maintaining its crunch, and all the flavors meld together. But keep in mind, you may need to refresh the flavor with a little more vinegar or salt, because the flavors can dull over time.
Store leftovers in an airtight container in the refrigerator for up to 4 days. If you notice any excess liquid after a day or two, you can drain it off—the slaw will still taste fantastic.
Ways I like to serve it
This red cabbage slaw is great with grilled dinners like grilled salmon or grilled shrimp, or with a collection of salads at a cookout like potato salad and bean salad.
Dietary notes
This red cabbage slaw recipe is vegetarian, gluten-free, vegan, plant-based, and dairy-free (using vegan mayo).
Easy Red Cabbage Slaw
5 Stars 4 Stars 3 Stars 2 Stars 1 Star
5 from 11 reviews
This vibrant red cabbage slaw recipe is the perfect balance of creamy, tangy, and sweet in 15 minutes with a short ingredient list! My easy recipe makes a fresh side dish using mostly pantry ingredients.
- Author: Sonja Overhiser
- Prep Time: 15 minutes
- Cook Time: 0 minutes
- Total Time: 15 minutes
- Yield: 8
- Category: Side Dish
- Method: Raw
- Cuisine: American
- Diet: Vegan
Ingredients
- 8 cups thinly sliced red cabbage (1 medium cabbage, about 2 1/2 pounds)
- ¼ red onion
- ½ cup mayonnaise (or vegan mayo)
- 2 tablespoons apple cider vinegar
- 2 tablespoons sugar or maple syrup
- ½ teaspoon dried dill
- ½ teaspoon celery seeds
- 1 teaspoon kosher salt
- Fresh ground black pepper
Instructions
- Thinly slice the red cabbage. Thinly slice the onion into slivers.
- In a large bowl, whisk together the mayonnaise, apple cider vinegar, sugar, dried dill, celery seeds, kosher salt, and fresh ground black pepper.
- Add the cabbage and red onion and toss to combine. Serve immediately or refrigerate until serving. Store refrigerated for up to 4 days.
Other slaw recipes you might enjoy
There are lots of spins on coleslaw! We love this red cabbage slaw for its simplicity, but here are a few other variations you can use depending on the ingredients you have on hand:


from A Couple Cooks https://ift.tt/7FbY5vp