Pakistani dishes in Usa
  • Home
  • About us
  • New
  • Featured
    • Lifestyle
    • Sports Group
      • Category 1
      • Category 2
      • Category 3
      • Category 4
      • Category 5
    • Sub Menu 3
    • Sub Menu 4
  • Contact Us

This classic Old Fashioned recipe is easy to make at home with simple ingredients. Learn how to mix a perfectly balanced, timeless drink everyone loves.

Old Fashioned

The Old Fashioned is barely a cocktail recipe at all: just lightly sweetened booze with bitters. But it’s become one of the most famous of all classic drinks! The recipe dates back to the early 1800’s, before the words classic and cocktail were even said next to each other.

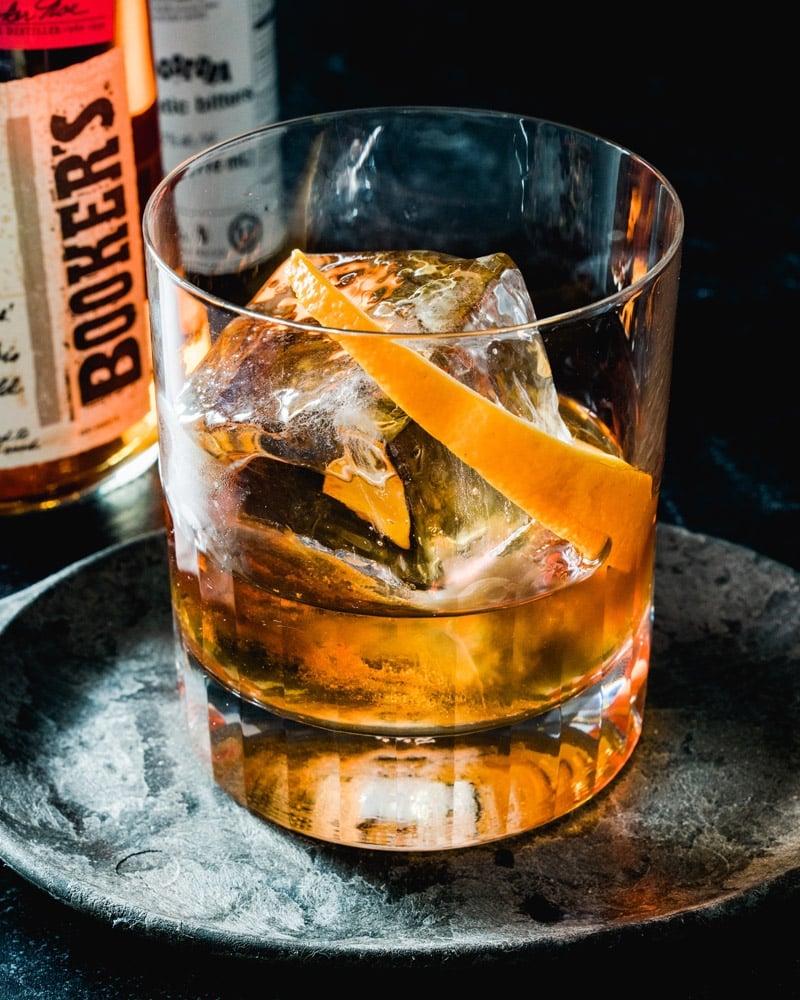
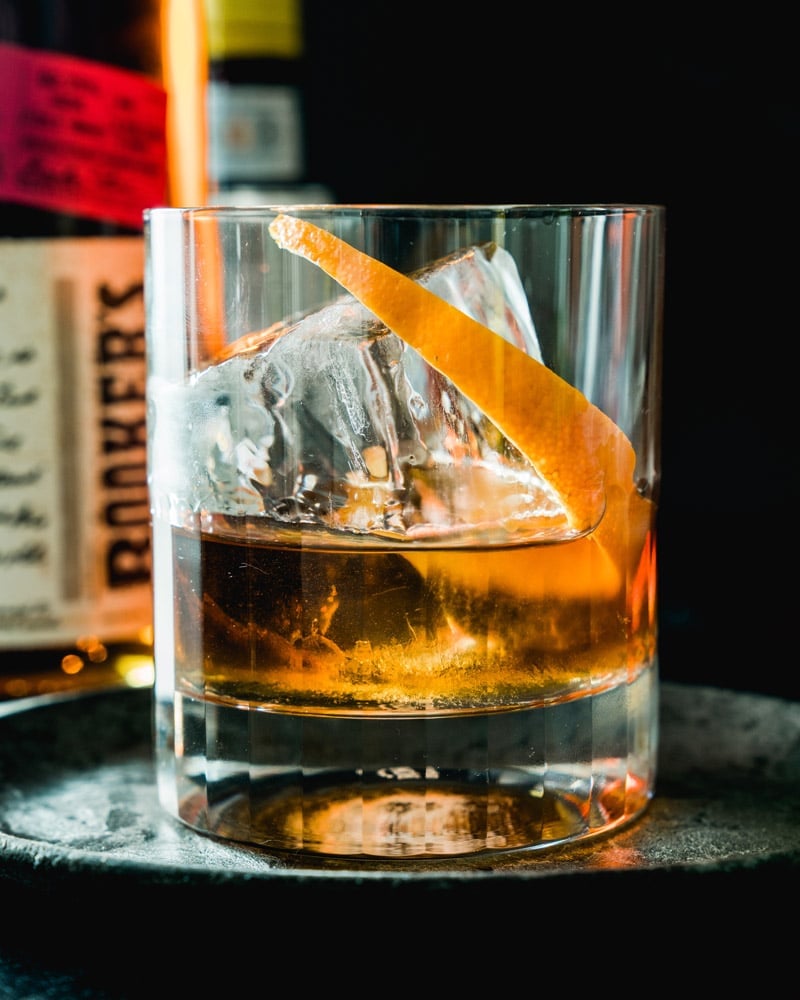
Everyone has their own spin on an Old Fashioned drink recipe, but I think this one’s pretty perfect: just a fat square of ice, a ribbon of orange peel, and whiskey that tastes like the best version of itself. Here are a few tricks to making this cocktail so the whiskey shines!

Why You’ll Love This Old Fashioned Recipe

  • Minimal ingredients. Just 5 ingredients are needed for this satisfying classic cocktail.
  • Ready in five minutes. No shaker, no strainer! Just stir and sip.
  • Crowd-pleasing in the best way. It’s the kind of whiskey cocktail you can serve when you want to look like you know what you’re doing.

Ingredients You’ll Need

The Old Fashioned gets its name because it started as literally the cocktail. That’s right: the first cocktail in existence! The definition of the word cocktail was first documented in 1806 in a New York paper The Balance and Columbian Repository, calling it a “concoction of spirits, bitters, water, and sugar,” essentially a recipe for an Old Fashioned.

Once more cocktails came along in the 1880’s, they needed a name for that original whiskey cocktail. The “Old Fashioned” was born. The ingredients in an Old Fashioned are:

  • Bourbon or rye whiskey: The base spirit. See my tips on choosing the right whiskey below!
  • Sugar cube: I prefer a sugar cube for its slow, nuanced sweetness. As a swap, simple syrup works too and tastes a bit smoother.
  • Water: Just a small splash helps dissolve the sugar.
  • Angostura bitters: The aromatic backbone; all you need are a few dashes for a nuanced flavor.
  • Orange peel: The essential garnish that adds fragrant citrus oils into the drink.
Old Fashioned Ingredients

Bourbon vs. Rye

Should an Old Fashioned have bourbon or rye whiskey? It’s up to you! I personally prefer bourbon for its rounder flavor, but if you’re a rye fan by all means: go with it. Here’s the difference:

Bourbon whiskey is sweeter and rounder, with vanilla, caramel, and oak notes. If you’re newer to whiskey or like smoother drinks, bourbon is your go-to. I like Bulleit Bourbon: it’s mid-priced and tastes great.

Rye whiskey is spicier and drier, with a peppery finish. It’s a good choice if you want your old fashioned to be a little edgier.

How to Make an Old Fashioned

The Old Fashioned recipe is perhaps one of the easiest great cocktails there is! It’s almost 100% whiskey, so you’ve got to love the stuff to drink this one. (If you’re not a whiskey afficionado, a whiskey sour is more up your alley.) The classic method for how to make an Old Fashioned is:

  • Shake 4 dashes bitters on 1 sugar cube, then muddle it with ½ teaspoon water. This is the traditional method, though many recipes these days call for simple syrup since it dissolves better. We like the nuanced sweetness of the sugar cube best: it really lets the whiskey shine. Don’t worry if it doesn’t dissolve all the way.
  • Add 2 ounces whiskey. Bourbon is sweet with hints of vanilla and oak, or use rye whiskey for a spicier finish.
  • Add ice, orange peel, and optional cherry. Add a large ice cube and an orange peel, making sure to squeeze it over the drink to release the oils. If desired, add a cocktail cherry.
Old Fashioned recipe

How to Serve It

Both the orange peel and cocktail cherry are listed as the garnish in the official IBA definition of an Old Fashioned. Here are a few notes on the garnish:

  • Orange peel: Squeeze it over the drink first, which releases the oils and gives it a strong orange perfume. Then run the orange peel around the rim of the glass to give an even more citrusy first sip.
  • Cocktail cherry: The cherry adds a nuanced sweetness to this cocktail. Determine if you’d like your Old Fashioned on the sweeter side.
  • Lemon peel: A lemon peel is a lesser known option which is especially nice with rye whiskey; use it on its own or along with the orange peel.
  • Glassware: a rocks glass or lowball glass is traditional. You want something heavy-bottomed with enough room for that large ice cube to sit comfortably.
  • Ice: For a next level Old Fashioned, make a batch of clear ice! Clear ice is perfectly clear artisan style ice like you’d see in a fancy bar, instead of cloudy cubes from an ice tray. It not only looks beautiful, but allows you to cut a large square to fill the entire glass. See my tutorial, How To Make Clear Ice.

Easy Swaps & Variations

Once you’ve made the classic, it’s fun to start tweaking. Here are a few swaps I’ve tried:

  • Simple syrup instead of sugar cube. Easier to dissolve and you might already have it on hand. Use ½ teaspoon to start.
  • Orange bitters instead of (or with) Angostura. A dash or two of orange bitters adds brightness and lifts the drink.
  • Maple syrup for a warmer sweetness. Try my Maple Old Fashioned, which is great in fall or winter. You can also make an Apple Cider Old Fashioned.
  • Demerara syrup in place of sugar gives the cocktail a richer flavor: try my homemade Demerara Syrup.
  • Mezcal for a smoky twist. Try the Oaxaca Old Fashioned, which uses mezcal and chocolate bitters.
  • Brandy for a Wisconsin spin. The Wisconsin Old Fashioned uses brandy and a splash of soda.
  • Make it smoked. For true drama, make a Smoked Old Fashioned!
  • Other liquors: Try my Jagermeister Old Fashioned, Fireball Old Fashioned or Skrewball Old Fashioned.
How to make an Old Fashioned

Frequently Asked Questions

What is the secret to a good Old Fashioned?

The secret is respecting the whiskey. This cocktail is almost entirely spirit, so use a bottle you actually enjoy drinking neat. Beyond that: express your orange peel properly (don’t skip squeezing it over the glass), use a large ice cube to control dilution, and resist the urge to over-sweeten.

How do you make simple syrup for an Old Fashioned?

Simple syrup is just equal parts sugar and water, heated until the sugar dissolves. See my tutorial, How to Make Simple Syrup. Use ½ teaspoon in place of a sugar cube in this recipe. For a richer version, use demerara sugar instead of granulated sugar, which makes a syrup with more flavor and body.

What’s the difference between a Manhattan and an Old Fashioned?

Both are whiskey cocktails. An Old Fashioned uses whiskey, sugar, bitters, and a citrus garnish. A Manhattan uses sweet vermouth instead of sugar and adds a dash of bitters, resulting in something smoother more complex. See my guide, Manhattan vs. Old Fashioned.

Print

Old Fashioned Recipe

Old Fashioned
Pin Recipe
Print Recipe

5 Stars 4 Stars 3 Stars 2 Stars 1 Star

5 from 2 reviews

This classic Old Fashioned recipe is easy to make at home with simple ingredients. Learn how to mix a perfectly balanced, timeless drink everyone loves.

  • Author: Sonja Overhiser
  • Prep Time: 5 minutes
  • Cook Time: 0 minutes
  • Total Time: 5 minutes
  • Yield: 1 drink 1x
  • Category: Drinks
  • Method: Stirred
  • Cuisine: Cocktails
  • Diet: Vegan

Ingredients

  • 1 sugar cube (1 teaspoon sugar)
  • 4 dashes Angostura bitters
  • ½ teaspoon water
  • 2 ounces (4 tablespoons) bourbon or rye whiskey
  • Orange peel
  • Cocktail cherry, for garnish (optional)
  • Large clear ice cube, for serving

Instructions

  1. Place the sugar cube in a lowball glass and add the bitters. Add the water and mash and swirl it with a muddler or wooden spoon until the sugar is mostly dissolved.
  2. Add the whiskey and swirl to combine. Add a large ice cube.
  3. Use a knife to remove a 1″ wide strip of the orange peel. Squeeze the orange peel into the drink to release the oils. Gently run the peel around the edge of the glass, then place it in the glass. If desired, garnish with a cocktail cherry for additional sweetness.

Did you love this recipe?

Get our free newsletter with all of our best recipes!

More Whiskey Cocktails to Try

Some of my favorite whiskey cocktails and bourbon cocktails are:

  • Best Whiskey Sour
  • Whiskey Smash
  • Boulevardier
  • Sazerac 
  • Toronto
  • Manhattan


from A Couple Cooks https://ift.tt/slBNJkU

These healthy chocolate muffins are made with oats, banana, and Greek yogurt: no flour, refined sugar, or mixer required! Just blend, bake, and enjoy a delicious treat that feels good to eat.

Healthy Chocolate Muffins

OK, I’ve made so many healthy muffin recipes that my job title should probably be the “healthy muffin queen!” I’m here with a new spin on my healthy oatmeal muffins that I know you will absolutely love: these healthy chocolate muffins.

This recipe feels like magic: these muffins are all whole food ingredients like rolled oats and Greek yogurt. Whiz it up in a blender and it comes out impossibly fluffy and dark chocolaty. My recipe testers agreed a handful of dark chocolate chips would enhance these, but they’re not needed for flavor if you want to keep it extra healthy. My kids are constantly requesting these!

5 Star Reader Reviews

“They were delicious and so easy! They were filling so I found just one was satisfying! Definitely making again.” -Carla

“I did add a few dark chocolate chips to the top with the sugar, perfection! So, so, so delicious!” -Renata

Why You’ll Love This Recipe

  • Made with real, wholesome ingredients like rolled oats instead of flour, maple syrup, banana, olive oil, and Greek yogurt.
  • Tastes like a treat. It’s actually delicious: not like those recipes that are “healthy” but taste suspiciously off.
  • So easy to make in a blender! No mixer, no whisking: all you need is a few minutes for dumping and blending.

Ingredients You’ll Need

There’s no all-purpose flour, no refined white sugar, and no stand mixer required! Try to stick to the ingredients listed because each one is important:

  • Old-fashioned rolled oats: Blended into a fine flour in the blender, keeping these muffins naturally gluten-free (use certified GF oats if needed).
  • Very ripe banana: Use those soft, dark, sweet bananas that are blackening on your counter. will be.
  • Greek yogurt: This is actually key to the texture here: it smooths it out. For a dairy-free version, plain coconut yogurt works well (I like the brand Cocojune).
  • Pure maple syrup: Grade A Dark Color Robust Flavor is what I call: it has a deeper, more caramel-like flavor.
  • Dutch-process (dark) cocoa powder: This is the most important ingredient! It’s key to that deep chocolate flavor. Don’t skip buying it (then you can make my healthy chocolate dip, too).
  • Olive oil: A healthy oil that keeps things moist.
  • Turbinado sugar: Just a sprinkle on top adds a sparkly crunch with little added sugar. Or, you can add dark chocolate chips!

Pro Tip: Know Your Cocoa Powder

Dutch-process or dark cocoa powder has been alkalized: this mellows its acidity and gives it a richer, darker flavor than natural cocoa, which tastes more fruity. You can see a color difference, too.

This ingredient is often used in baked recipes to bring a deep chocolate flavor. If you’ve never used it before, it’s the key ingredient to many of my chocolate recipes like healthy chocolate pudding and flourless chocolate cake. There are so many ways to use it!

Healthy Chocolate Muffins in muffin tin

How to Make Healthy Chocolate Muffins

Here’s the basic flow for this healthy chocolate muffins recipe (or jump to the recipe for the quantities):

  1. Blend the oats first. Give them a full blitz until they’re a fine flour.
  2. Blend everything else. Add everything else (except the turbinado sugar and chocolate chips) and blend on high for 1 to 2 minutes until completely smooth.
  3. Fold in or top with chocolate chips. If you’re using them, you can either fold them in with a spatula or reserve them to sprinkle on the tops of each muffin.
  4. Fill and bake. Line your muffin tin with 12 paper liners, divide the batter evenly, and sprinkle turbinado sugar on top. Bake at 350°F for 28–30 minutes.
  5. Let them cool completely. This step solidifies the texture and flavor — no cheating!

Chocolate Chips, Or Not?

If you want something a little more decadent, you can add some dark chocolate chips to this recipe. Personally I like feeding these to my kids, so on the regular I don’t add chocolate so I can even let them eat them for breakfast.

But when I’m looking for something a little more special, I like to add just a sprinkle of dark chocolate chips to the top. It definitely makes them more like a traditional chocolate muffin.

I asked my testers this question and 75% of my recipe testers thought chocolate chips were a must!

Healthy Chocolate Muffins close up on texture

Variations Worth Trying

Here are a few fun variations to this recipe you can use:

  • More banana-y: Increase the mashed banana to 1½ cups for a more pronounced banana flavor.
  • Peanut butter: Swap 2 tablespoons of olive oil for 2 tablespoons of peanut butter or almond butter for more nutty flavor.
  • Warm spices: Add ½ teaspoon of cinnamon.
  • Dairy-free: Swap the Greek yogurt for plain coconut yogurt. My favorite brand is Cocojune.

Storage Notes

These muffins store well — here’s what I do:

  • Room temperature: Up to 5 days in an airtight container (they stay more moist this way)
  • Refrigerated: Up to 10 days (they keep longer this way)
  • Frozen: Up to 3 months (I have not tried this but I’m fairly certain it will work)

More Healthy Muffins

My healthy muffins are some of my most popular recipes! Here are the top flavors:

  • Healthy Banana Muffins
  • Healthy Carrot Cake Muffins
  • Healthy Apple Muffins
  • Healthy Blueberry Muffins
  • Pumpkin Oatmeal Muffins

Healthy Muffin Recipes

Healthy banana muffinsHealthy Banana MuffinsHealthy carrot cake muffinsHealthy Carrot Cake MuffinsHealthy Apple MuffinsHealthy Apple MuffinsBanana blueberry muffinsHealthy Blueberry MuffinsPumpkin Oatmeal MuffinsPumpkin Oatmeal Muffins

Dietary Notes

These heathy chocolate muffins are vegetarian and gluten-free. For dairy-free, use plain vegan coconut yogurt (I like the brand Cocojune). The eggs are essential to this recipe, so I don’t have a vegan variation (though you could try flax eggs at your own risk).

Print

Healthy Chocolate Muffins (No Flour!)

Healthy Chocolate Muffins
Pin Recipe
Print Recipe

5 Stars 4 Stars 3 Stars 2 Stars 1 Star

No reviews

These healthy chocolate muffins are made with oats, banana, and Greek yogurt: no flour, refined sugar, or mixer required! Just blend, bake, and enjoy a delicious treat that feels good to eat.

  • Author: Sonja Overhiser

Ingredients

  • 2 cups old-fashioned rolled oats
  • 1 cup mashed very ripe banana
  • 2 large eggs
  • ½ cup Greek yogurt
  • ½ cup pure maple syrup (use Grade A: Dark Color Robust Flavor)
  • ⅓ cup Dutch-process cocoa powder
  • ¼ cup olive oil
  • 1 teaspoon baking soda
  • 1 teaspoon baking powder
  • 1 teaspoon pure vanilla extract
  • ¼ teaspoon kosher salt
  • 1 tablespoon turbinado sugar
  • 1/3 to ½ cup dark chocolate chips (optional; see Notes)

Instructions

  1. Preheat the oven to 350°F.
  2. Place the oats in a blender and blend until fully processed. Add all remaining ingredients except for the turbinado sugar and chocolate chips in a blender. Blend on high for 1 to 2 minutes until a smooth batter forms, stopping to scrape down the sides as needed. If using chocolate chips, you can fold them in with a spatula or use them to top the muffins. 
  3. Line a muffin tin with 12 paper liners and divide the batter evenly between the cups. Sprinkle the tops with turbinado sugar (or chocolate chips, if using).
  4. Bake for 28 to 30 minutes, until a toothpick inserted in the center comes out clean. Remove the muffins from the tin, then cool completely before tasting. Store at room temperature for up to 5 days, refrigerated for up to 10 days, or frozen for up to 3 months. 

Notes

  • For dairy-free: Swap the Greek yogurt for a dairy-free alternative, such as plain coconut yogurt (I like the brand Cocojune). 
  • Nut butter: Swap in 2 tablespoons peanut butter for 2 tablespoons of the olive oil. 
  • More banana: Use 1 ½ cups of mashed banana for a more pronounced banana flavor: the riper the banana, the sweeter and more fragrant the muffins will be.
  • Warm spices: Add ½ teaspoon of cinnamon to add a subtle warmth.

Did you love this recipe?

Get our free newsletter with all of our best recipes!


from A Couple Cooks https://ift.tt/snV4hZS

These air fryer chicken thighs are cooked to juicy perfection with bold seasoning and a browned crust: all in 15 minutes! It’s the weeknight dinner you’ll keep coming back to.

Air Fryer Chicken Thighs

Hello and welcome to my favorite weeknight trick: air fryer chicken thighs! I am not lying when I say this is on my menu at least once a week. Alex and I make this on repeat and simply throw the warm sliced chicken over a salad or grain bowl. Dinner, solved!

The simple spice blend here is so irresistible (with a secret ingredient!), and they come out so delicious and juicy. Usually we add them to a made up creation or a bowl meal like chicken rice bowls, chicken Caesar salad, or Greek chicken bowls. Here’s how to do it!

Why You’ll Love This Recipe

  • So fast and hands off: It takes just 20 minutes and there’s no need to watch a skillet
  • It’s extremely flavorful: Chicken thighs come out juicy every time and seasoned to perfection (they’re more forgiving than breasts)
  • It’s versatile: It works in tacos, bowls, salads, or as a protein with sides

Ingredients You’ll Need

Here’s what you’ll need when it comes to ingredients: my spice blend really

  • Boneless chicken thighs: I like using boneless skinless here: it cooks quickly and is easy to work with.
  • My secret spice blend: If you’ve made one of my recipes, these savory spices will be familiar: garlic powder, onion powder, smoked paprika, and cumin. The secret spice for this one is curry powder: just enough to make it taste interesting without making it taste like curry. Alex tried this one evening and I immediately asked him, “What did you put in this?” You’ve got to try it!
  • Olive oil: Just a hint of olive oil helps the spice rub cling to the chicken and make them brown to perfection.
Air Fryer Chicken Thighs

How to Make Air Fryer Chicken Thighs

The method here is so simple! Here’s is the basic idea (or jump to the recipe below for ingredient quantities):

  1. Preheat the air fryer to 400°F.
  2. Season the chicken. Toss the chicken thighs with all the spices and olive oil (see below).
  3. Arrange in the basket. Place the thighs in a single layer in the air fryer basket: they will be snug.
  4. Cook for 13 to 15 minutes, until the chicken is browned and an instant-read thermometer inserted into the thickest part reads at least 170°F.
  5. Rest for 5 minutes before slicing (the rest makes for the juiciest chicken).

⭐ Air fryer recommendation: I use this air fryer, which has a very large basket so you can cook large quantities at once. I love it for this recipe, my air fryer salmon bites, air fryer chicken breast, air fryer sweet potatoes, and air fryer tofu.

Pro Tip on Air Fryer Size

In this recipe, I’ve called for 2 pounds of chicken, enough for 4 servings. You’ll need at least a 6.5 qt air fryer to fit 8 thighs comfortably in a single layer. If you have a smaller basket, cook in two batches for best results. Crowding the basket leads to steaming rather than browning.

How To Serve

This recipe is so versatile, it’s basically part of my meal plan these days. What’s for dinner? Air fryer chicken thighs! You can pair them with anything — here’s some of what I do:

  • Over a simple grain or pasta: Serve over rice, farro, couscous, or orzo with a squeeze of lemon
  • As part of a bowl: Pair with grains, a sauce, and some greens for an easy weeknight bowl. I love Green Goddess chicken rice bowls, Greek chicken bowls, and farro bowls.
  • Sliced over salads: This warm spiced chicken is perfect on salads to make a main dish, like chicken Caesar salad or grilled chicken salad.
  • In tacos: Slice and stuff into chicken tacos with your favorite toppings.
  • Alongside dense salads like Mediterranean chickpea salad or Mediterranean quinoa salad.

Storage and Reheating

Leftovers store airtight in the fridge for up to 4 days. For reheating, reheat in the air fryer for a few minutes at 350°F.

Cooked chicken also freezes for up to 3 months. Let it cool completely, then transfer to a sealed container.

Dietary Notes

This air fryer chicken thighs recipe is dairy-free and gluten-free. It also fits the Mediterranean diet.

Print

Air Fryer Chicken Thighs (Perfectly Seasoned!)

Air Fryer Chicken Thighs
Pin Recipe
Print Recipe

5 Stars 4 Stars 3 Stars 2 Stars 1 Star

No reviews

These air fryer chicken thighs are cooked to juicy perfection with bold seasoning and a browned crust: all in 15 minutes! It’s the weeknight dinner you’ll keep coming back to.

  • Author: Sonja Overhiser
  • Prep Time: 5 minutes
  • Cook Time: 15 minutes
  • Total Time: 20 minutes
  • Yield: 4 1x
  • Category: Dinner, Main Dish
  • Method: air fryer
  • Cuisine: American
  • Diet: Dairy Free, Gluten Free, Mediterranean Diet

Ingredients

  • 8 large boneless chicken thighs (about 2 pounds), skin optional, excess fat removed
  • 1 ½ teaspoon kosher salt
  • 1 teaspoon garlic powder
  • 1 teaspoon onion powder
  • 1 teaspoon smoked paprika
  • 1 teaspoon cumin
  • ½ teaspoon curry powder
  • ½ tablespoon olive oil

Instructions

  1. Preheat the air fryer to 400°F.
  2. In a medium bowl, combine the chicken thighs with the kosher salt, garlic powder, onion powder, smoked paprika, cumin, curry powder, and olive oil. Toss until the chicken is evenly coated.
  3. Arrange the chicken thighs in a single layer in the air fryer basket. It’s okay if they’re snug. (For this quantity, you’ll want an air fryer that’s at least 6.5 QT capacity.)
  4. Cook for 13 to 15 minutes, until the chicken is browned and an instant-read thermometer inserted into the thickest part reads at least 170°F. (If you want less blackening you can flip halfway through, but I like it blackened.)
  5. Let the chicken rest for 5 minutes before slicing, if desired.

Did you love this recipe?

Get our free newsletter with all of our best recipes!

More Chicken Thigh Recipes to Try

  • Easy Chicken Thighs
  • Grilled Chicken Thighs
  • Baked Chicken Thighs
  • Honey Garlic Chicken Thighs
  • 40 Easy Chicken Dinner Ideas


from A Couple Cooks https://ift.tt/fLrkeVA

This cabbage soup recipe is easy with big, bold flavor! Cozy up to a bowl of this veggie-packed healthy soup.

Cabbage soup

Confession: I love cabbage. It’s really not the most popular of vegetables, but it makes incredibly satisfying dishes dressed up as sauteed cabbage or coleslaw. One of my other favorite ways is to eat it is my easy cabbage soup recipe!

Here it makes a hearty, satisfying soup, packed with veggies that swim in a savory-spiced broth of fire roasted tomatoes. I love how it tastes zesty and satisfying but is made with all healthy ingredients.

5 Star Reader Review

“Soooo yummy! And easy! Will definitely make again. My 12 year old just ate a huge bowl!🫶 Thank you for all your fabulous recipes!” -Heidi

Ingredients You’ll Need

This cabbage soup recipe is hearty and healthy, featuring white beans, loads of veggies, and a super flavorful broth. It’s a great way to use up green cabbage, and makes a warm bowl for cozying up to during soup season.

While I’m 100% passionate about cabbage soup, I don’t recommend it as part of the cabbage soup diet: a fat diet that encourages unsustainable weight loss. I like to eat this cabbage soup simply because it’s delicious and nutrient-packed! Here’s what you’ll need for this cabbage soup recipe:

  • Butter or olive oil
  • Yellow onion
  • Carrots
  • Celery
  • Garlic
  • Green cabbage
  • Canned white beans
  • Fire roasted tomatoes
  • Vegetable broth
  • Sugar
  • Salt
Cabbage soup recipe

Tip: Use Fire Roasted Tomatoes

The best way to pack flavor into the broth of this cabbage soup recipe? Fire roasted tomatoes make the best flavor. This type of tomato is roasted over an open flame before canning, which makes a sweet and smoky flavor right out of the can.

Can’t find fire roasted tomatoes? Substitute the best quality crushed tomatoes you can find. If you’d like, you can mimic the flavor by adding an extra 1 teaspoon sugar and ½ teaspoon smoked paprika to the broth.

Cabbage soup

The Best Way to Cut Cabbage

The one part of this cabbage soup recipe that requires a little technique? Shredding the cabbage! A large head of cabbage can be tricky to cut into thin shreds. But we’ve got a trick that makes quick work of it. Here’s how to cut cabbage:

  1. Slice off the root: Remove any outer layers of the cabbage that seem tough or are not fresh, and discard them. With a large chef’s knife, slice off the root of the cabbage.
  2. Quarter it: Slice the cabbage in half through the stem. Then cut it into quarters.
  3. Slice out the root: Remove the root by cutting it out with two diagonal slices.
  4. Slice crosswise: Thinly slice the cabbage in the short direction, using a circular motion with the knife.

What To Serve With Cabbage Soup

This cabbage soup recipe is a hearty soup that can work as a meal in itself. However, you’ll probably want to pair it with a salad or sandwich for a filling meal. Here are some ideas for what to serve with cabbage soup:

  • Grilled cheese like Gourmet Grilled Cheese or Grilled Cheese in the Oven
  • Salad like Arugula Salad, Watercress Salad, Goat Cheese Salad, Brussels Sprout Salad or Pear Salad
  • Crackers and cheese like smoked gouda or Havarti
  • Toast with goat cheese
  • Muffins like Classic Cornbread Muffins or Popovers
Cabbage soup recipe

Storing Leftovers

This cabbage soup is great as leftovers! It saves for up to 4 days refrigerated, or you can freeze it for up to 3 months. A reader contacted me about freezing this soup and said it worked beautifully!

Dietary Notes

This cabbage soup recipe is vegetarian, vegan, plant-based, dairy-free, and gluten-free.

Print

Easy Cabbage Soup

Cabbage soup
Pin Recipe
Print Recipe

5 Stars 4 Stars 3 Stars 2 Stars 1 Star

4.9 from 7 reviews

This cabbage soup recipe is easy with big, bold flavor! Cozy up to a bowl of this veggie-packed healthy soup.

  • Author: Sonja Overhiser
  • Prep Time: 15 minutes
  • Cook Time: 20 minutes
  • Total Time: 35 minutes
  • Yield: 4 1x
  • Category: Soup
  • Method: Stovetop
  • Cuisine: American
  • Diet: Vegan

Ingredients

  • 2 tablespoons butter or olive oil
  • 1 medium yellow onion, small diced
  • 2 medium carrots, small diced
  • 2 celery ribs, small diced
  • 4 garlic cloves, minced
  • 2 teaspoons each garlic powder and dried basil
  • 1 teaspoon each dried oregano and dried thyme
  • 1/2 medium green cabbage, shredded (6 to 7 cups)
  • 15-ounce can white beans 
  • 28-ounce can crushed fire roasted tomatoes* (or best quality crushed tomatoes)
  • 1 quart vegetable broth
  • 1 ¼ teaspoons kosher salt
  • ½ teaspoon sugar
  • Chopped Italian parsley, for garnish

Instructions

  1. In a large pot or Dutch oven, heat the butter or olive oil over medium high heat. Add the onion, carrot and celery, and cook, stirring occasionally, for about 8 to 10 minutes, until the celery is tender and the vegetables have released their juices.
  2. Add the garlic, garlic powder, basil, oregano, and thyme and cook for 1 minute. Add the cabbage, white beans, crushed tomatoes, vegetable broth, salt, and sugar. Bring to a simmer and simmer 10 to 15 minutes until the cabbage is tender. Serve immediately, garnished with parsley. Store leftovers 3 to 4 days refrigerated or up to 3 months frozen.

Notes

*Can’t find fire roasted tomatoes? Substitute the best quality crushed tomatoes you can find. If you’d like, add an extra 1 teaspoon sugar and ½ teaspoon smoked paprika to the broth.

Did you love this recipe?

Get our free newsletter with all of our best recipes!

More Cabbage Recipes To Try

Got a big head of green cabbage and not sure what to do with it? Cabbage is a healthy cruciferous vegetable that’s very versatile for using in the kitchen. Here are a few cabbage recipes to try:

  • Go for Sauteed Cabbage or Boiled Cabbage
  • Opt for Steamed Cabbage
  • Make a fresh Cabbage Salad, or add creamy dressing for our Best Coleslaw Recipe
  • Fire up the grill for Grilled Cabbage Wedges
  • Learn How to Make Sauerkraut


from A Couple Cooks https://ift.tt/KYEWVUR
Newer Posts Older Posts Home

POPULAR POSTS

  • Classic Italian Salad
  • Carrot Cake Baked Oatmeal
  • Air Fryer Taquitos
  • 300+ Popular Cocktail Names & Recipes!
  • Blue Long Island Iced Tea
  • How to Boil Asparagus (Quick and Easy)
  • 15 Upscale Drinks That Impress
  • Air Fryer Salmon Bites
  • Healthy Breakfast Cookies
  • Peanut Butter Dip
Powered by Blogger

Recipe, Healthy meal

  • A Couple Cooks
  • A Couple Cooks
  • Pakistanfoodinusa

About Me

Traditional Pakistani Food in USA
View my complete profile

Hearty Farro Salad

By Traditional Pakistani Food in USA Published at April 10, 2026
Image

About Blog


Food stylist & photographer. Loves nature and healthy food, and good coffee. Don’t hesitate to come for say a small “hello!”

A

Popular Posts

Classic Italian Salad

Image

Carrot Cake Baked Oatmeal

Image

Air Fryer Taquitos

Image