Pakistani dishes in Usa
  • Home
  • About us
  • New
  • Featured
    • Lifestyle
    • Sports Group
      • Category 1
      • Category 2
      • Category 3
      • Category 4
      • Category 5
    • Sub Menu 3
    • Sub Menu 4
  • Contact Us

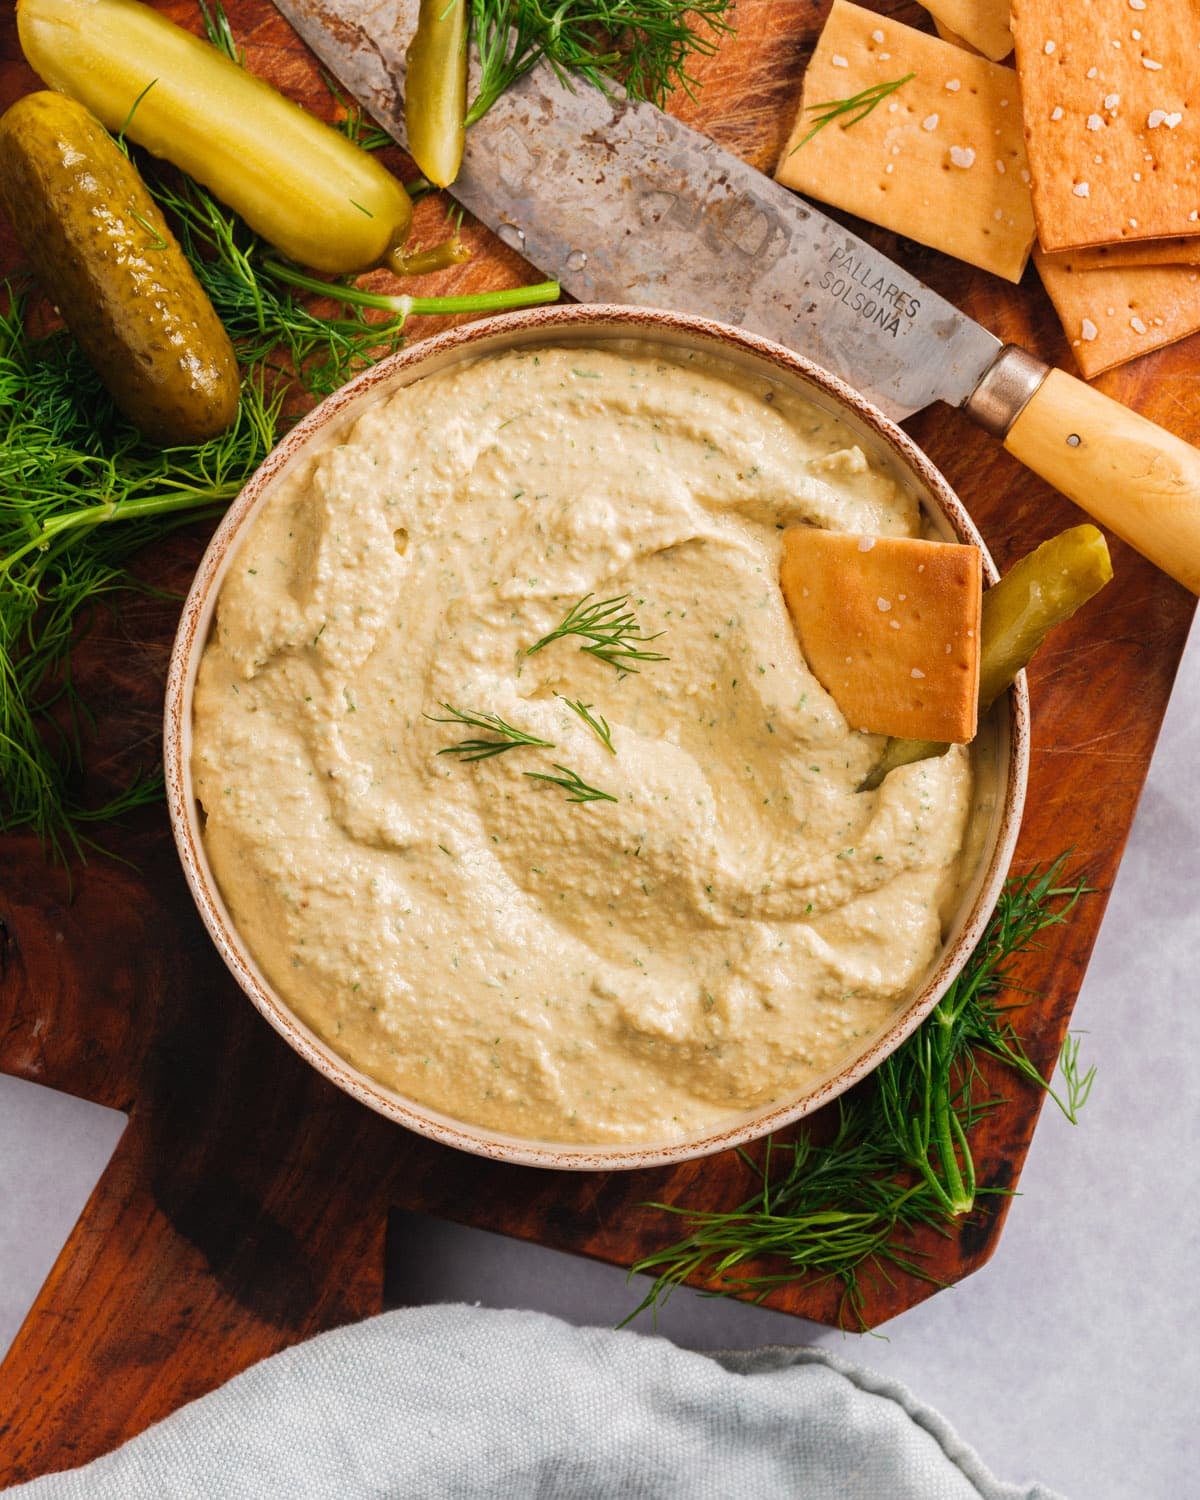
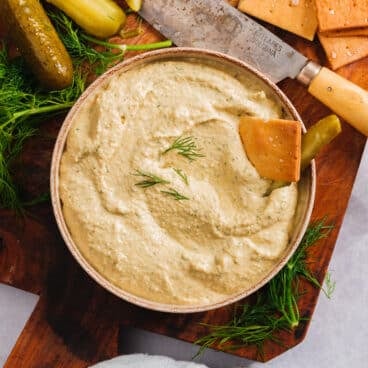
This dill pickle hummus is tangy, creamy, and loaded with fresh dill and pickle flavor! It’s made in minutes using a food processor: the best snack for pickle lovers!

Dill pickle hummus

Over the years, I’ve converted from a pickle hater to a 100% pickle afficionado. I love dill pickle dip and dill pickle pasta salad and dill pickle chicken salad. So when a reader mentioned to me she loved store-bought dill pickle hummus, I knew I needed to create a recipe!

I love making my own hummus, and turns out if you add pickles, pickle juice, and fresh dill to my classic hummus recipe it tastes even better! It’s bright, pickle-y (is that a work?), and absolutely delicious. If you need a healthy snack or a fun healthy dip to serve at a party, this is it.

Why You’ll Love Recipe

  • Ready in 5 minutes. Everything goes into a food processor: whiz it up and you’re done!
  • Bold, unique flavor. It uses real dill pickles, fresh dill, and pickle brine for real flavor: nothing artificial.
  • Naturally vegan and gluten-free. It fits many diets and is a great healthy dip for snacks and parties.

Ingredients You’ll Need

Here’s what goes into this dill pickle hummus:

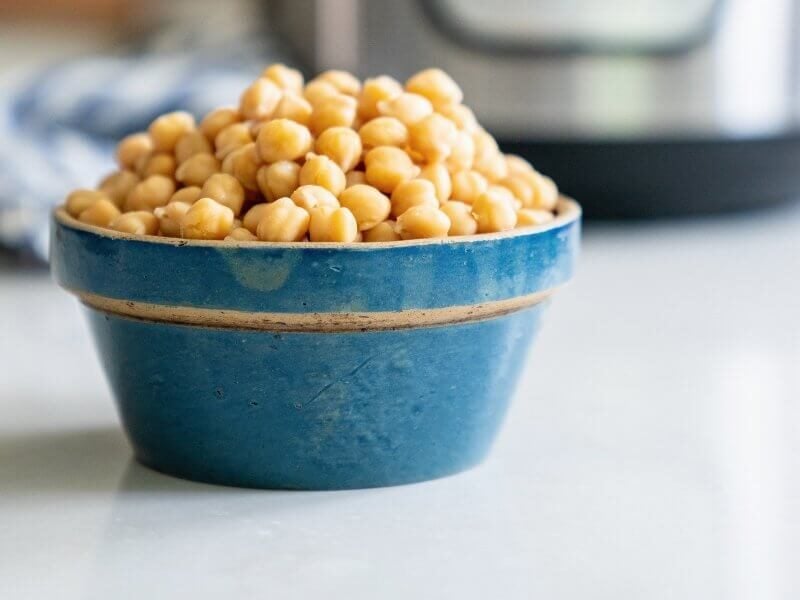
  • Chickpeas: You’ll use both the chickpeas and the liquid, called aquafaba, which is the secret weapon for adjusting texture.
  • Tahini: This is the classic ingredient that gives hummus its rich, nutty body.
  • Diced dill pickles: These add real pickle flavor throughout! I like using dill pickles but in theory you could use other types.
  • Pickle juice: This is what infuses another pop of pickle flavor. The key is not adding too much to water down the texture.
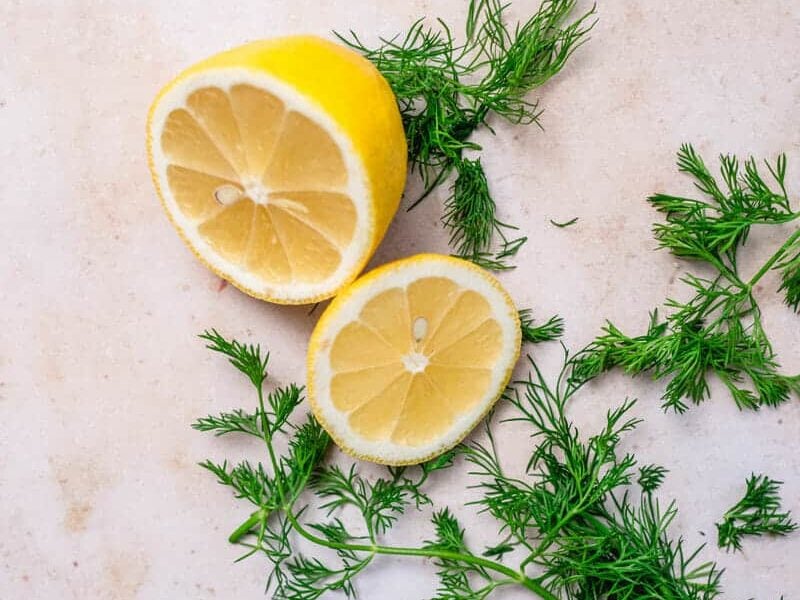
  • Lemon juice: The pickle juice adds most of the brightness to the flavor, but in my recipe testing lemon juice is also needed to make it taste like true hummus.
  • Garlic: The key to any great pickles and hummus? Fresh garlic.
  • Fresh dill: Fresh dill is everything in this recipe: try not to substitute dried dill because it doesn’t have the same flavor punch.
Chickpeas

Tips For The Best Dill Pickle Hummus

Making this dill pickle hummus takes about 5 minutes with a food processor. Here are a few tips:

  • Process until fully creamy. Run the food processor for 1 to 2 minutes, stopping to scrape down the sides as needed. The longer you run it, the smoother the texture.
  • Adjust consistency. If the hummus feels too thick, add 1 tablespoon of the reserved chickpea liquid (aquafaba) and process again. The trick with this hummus is not adding too much pickles or pickle brine because it can make the texture of the hummus more watery, so you likely will not need the aquafaba.
  • Add dill at the end if you want more pop. You can always add more dill if you’d like an even stronger dill flavor!
  • Taste and adjust. Of course you can add more salt, dill, or pickle juice depending on how bold you want the flavor.
Lemon dill

Ways to Serve It

I love serving healthy dips as snacks or at parties for an option that brings everyone together! If you’ve got fellow dill pickle lovers, they’ll run right to the bowl. I like it as a healthier alternative to my dill pickle dip, which is sour cream based. Here are a few ideas:

  • As a dip: Serve with raw veggies: I like carrots, celery, cucumber slices, bell pepper strips. It’s also great with homemade pita chips.
  • In a hummus bowl: Try it in a quick hummus bowl for a fast lunch or dinner.
  • As a sandwich spread: It would be fun on a grilled vegetable sandwich or a veggie wrap.
  • On a dips board: Pair it alongside classic baba ganoush, whipped feta dip, olives, and focaccia bread for an amazing appetizer spread.
  • As a sauce or dressing: Thin it with a little water and drizzle over grain bowls, falafel, or roasted vegetables, like my favorite hummus dressing!

Storage Information

Store leftover dill pickle hummus refrigerated for up to 5 days. The flavor improves over time, so it’s a nice make-ahead option for parties or meal prep.

You can actually freeze hummus (though I don’t do it often). See my How to Freeze Hummus instructions.

Dietary Notes

This dill pickle hummus recipe is vegetarian, vegan, plant-based, gluten-free, and dairy-free.

Print

Dill Pickle Hummus

Dill pickle hummus
Pin Recipe
Print Recipe

5 Stars 4 Stars 3 Stars 2 Stars 1 Star

No reviews

This dill pickle hummus is tangy, creamy, and loaded with fresh dill and real pickle flavor: all in minutes using a food processor. It’s the best snack for pickle lovers!

  • Author: Sonja Overhiser
  • Prep Time: 10 minutes
  • Cook Time: 0 minutes
  • Total Time: 10 minutes
  • Yield: 1 ½ cups 1x
  • Category: Appetizer
  • Method: No Cook
  • Cuisine: American, Mediterranean
  • Diet: Gluten-Free, Mediterranean Diet, Vegan, Vegetarian

Ingredients

  • 1 medium garlic clove, peeled
  • 1 15-­ounce can chickpeas, drained and liquid reserved
  • ⅓ cup tahini
  • ¾ cup diced dill pickles
  • ¼ cup pickle juice (from the jar)
  • 1 tablespoon lemon juice
  • ½ teaspoon kosher salt
  • 2 large handfuls fresh dill, plus more to taste
  • Fresh ground black pepper, to taste

Instructions

  1. Add the garlic and lemon juice to the bowl of a food processor and process until finely chopped. Add everything else and process until creamy, 1 to 2 minutes. Add 1 tablespoon aquafaba to thin the texture if needed. 
  2. Serve with veggies, pita bread, or pita chips. Store refrigerated for 5 days.

Did you love this recipe?

Get our free newsletter with all of our best recipes!

More Dip and Hummus Recipes

  • Spicy Hummus
  • Black Bean Hummus
  • Beet Hummus
  • Chocolate Hummus
  • What to Eat with Hummus
  • 15 Healthy Dip Recipes


from A Couple Cooks https://ift.tt/HVBtkQx

This Mediterranean salmon recipe is a delicious easy healthy dinner ready in 30 minutes! With tomatoes, olives, capers, and savory spices, it’s bold and weeknight-friendly.

Mediterranean Salmon recipe

Who wouldn’t love a recipe with vibes of coastal living and sun-drenched tables? After traveling throughout the Mediterranean region the past few years, I am a bit of a super fan of this lifestyle (and the Mediterranean diet)! With this recipe, I wanted to create an easy healthy salmon dinner with vibes of that region, and I think I nailed it (I hope you’ll agree).

Tomatoes, olives, red onion, and lemon slices roast under the fish and collapse into a sort of sauce after baking. The salmon is rubbed with smoked paprika, garlic powder, onion powder, and cumin, which make the savory notes pop. It’s a dinner that truly tastes like you put in a lot more effort than you did!

Why You’ll Love This Recipe

  • Big Mediterranean flavor. Kalamata olives, capers, garlic, and lemon slices bring flavor that makes you feel like you’re eating with a view of blue water.
  • Done in under 30 minutes. It’s weeknight-fast: about 10 minutes of prep, 15–20 minutes in the oven.
  • Healthy dinner that tastes satisfying. Salmon is packed with omega-3s and protein, and makes a full meal with a whole grain. One of my favorite healthy dinner ideas to date!

Ingredients You’ll Need

This recipe uses common Mediterranean ingredients to make a delicious baked fish recipe. While it’s not a traditional or authentic recipe, it reminds me a lot of the type of fish recipes I’ve eaten in Greece. Here’s what you’ll need:

  • Cherry tomatoes: I love using a mix of red and yellow here when I can find them. They roast down into a jammy sort of sauce that mixes with the veggies.
  • Olives: These add deep, briny flavor. I like using a mix of Kalamata olives and Castelvetrano olives, my favorite mild green variety.
  • Capers: These add a punchy, pickled pop: a total Mediterranean diet power move!
  • Spices: If you’ve made a lot of my recipes, you’ll know this spice combo: garlic powder, onion powder, smoked paprika, and cumin. The smoked paprika adds a vaguely smoky hint that ties everything together.
  • Lemon slices: Roasting everything with lemon slices adds a nice pop of brightness.
  • Fresh parsley or dill: Don’t skip the fresh herb at the end: Mediterranean style cooking is all about fresh herbs to add complexity and freshness.
Mediterranean Salmon

How to Make Mediterranean Baked Salmon

The method here is simple enough to memorize after one or two tries:

  • While the oven heats, take your salmon out of the fridge. Letting it sit at room temperature for even 10 to 15 minutes makes a real difference in how evenly it cooks. You can also brine the salmon, which helps to reduce albumin or the white stuff that sometimes appears on the surface after baking. See the Notes in the recipe below for how I do that!
  • Toss the veggies with a bit of olive oil, a pinch of salt, and freshly ground black pepper directly in the baking dish.
  • Pat the salmon dry, which is important so the spice rub stays on. Rub the fillets with olive oil and salt, lay them on top of the vegetables, then sprinkle with the seasonings. Scatter the capers over the top.
  • Roast for 15 to 20 minutes depending on thickness. Cook until the temperature is 130°F at the thickest part or flesh that flakes easily when pressed with a fork. Finish with a fresh parsley or dill.

Tips for Perfectly Cooked Salmon

  • Buy skin-on fillets. The skin acts as a buffer against the heat from the bottom of the pan, keeping the fish moist.
  • Use a food thermometer. The temperature of 130°F is the sweet spot! A $15 instant-read thermometer is worth it. For more, see my guide of How to Know When Salmon is Done.
  • Don’t skip drying the fish. Patting it dry with paper towels before seasoning helps the spices stick.

What to Serve Alongside

I love adding a quick whole grain as a side for this tasty Mediterranean salmon! Here’s how I like to accessorize it:

  • Whole grain like seasoned quinoa, farro, or lemon rice is a perfect pairing
  • A quick pasta like Israeli couscous (pearl couscous) or my easy orzo recipe are super fast and perfect for a quick meal
  • Turn it into a bowl like a Mediterranean rice bowl or a salad like Greek salmon salad
  • Add a green salad like my simple arugula salad or crisp apple salad
  • Simple crusty bread like artisan bread or sourdough bread

Storage and Leftovers

Leftover Mediterranean salmon stores airtight in the refrigerator for up to 3 days. I personally don’t love leftover salmon, but I’ve found because this one has veggies alongside I was more willing to eat it in the next day (ha!).

Reheat gently in a covered skillet over low heat with a small splash of water.

Dietary Notes

This Mediterranean salmon recipe is gluten-free, dairy-free, pescatarian, and Mediterranean diet friendly.

Print

Mediterranean Salmon

Mediterranean Salmon
Pin Recipe
Print Recipe

5 Stars 4 Stars 3 Stars 2 Stars 1 Star

No reviews

This Mediterranean salmon recipe is a delicious easy dinner ready in 30 minutes! With tomatoes, olives, capers, and savory spices, it’s bold and weeknight-friendly.

  • Author: Sonja Overhiser
  • Prep Time: 15 minutes
  • Cook Time: 15 to 20 minutes
  • Total Time: 0 hours
  • Yield: 4 1x
  • Category: Main Dish
  • Method: Baked, Baking
  • Cuisine: Mediterranean, Mediterranean Diet
  • Diet: Dairy-Free, Gluten-Free, Mediterranean Diet, Pescatarian

Ingredients

  • 1 pint cherry tomatoes, sliced in half (yellow and red if possible)
  • ¼ cup olives, halved (Kalamata or a mix of Kalamata and a mild green olive like Castelvetrano)
  • ½ red onion, thinly sliced
  • 3 garlic cloves, minced
  • 2 tablespoons drained capers
  • 1 small lemon, thinly sliced into rings
  • 2 tablespoons olive oil, divided
  • 1 ¼ teaspoon kosher salt
  • 1 1/2 pounds salmon fillets
  • 1 teaspoon smoked paprika
  • 1 teaspoon garlic powder
  • ½ teaspoon onion powder
  • ¼ tsp cumin
  • Finely chopped fresh parsley or dill, for garnish
  • Fresh ground black pepper

Instructions

  1. Preheat the oven to 425°F. Let the fish sit at room temperature while preheating (or brine it; see Notes).
  2. Place the chopped vegetables and lemon slices in the bottom of a 9 x 13″ baking dish. Mix with 1 tablespoon olive oil, ¼ teaspoon salt, and fresh ground black pepper.
  3. Pat the salmon dry. Rub it with 1 tablespoon olive oil and 1 teaspoon kosher salt (see Notes0 split between the filets. Place it on top of the vegetables in the pan. Mix the smoked paprika, garlic powder, onion powder, and cumin together, then sprinkle the fillets with the seasonings. Sprinkle the capers over the top.
  4. Place the pan in the oven and bake for 15 to 20 minutes (depending on the thickness of the fish), until the fish is flaky and the internal temperature is 130 degrees Fahrenheit when measured with a food thermometer. Garnish with chopped parsley and remove the lemon slices when serving (or eat them if you like!).

Notes

  • Brining the salmon can help to avoid the “white stuff” or albumin that rises to the surface. To do so, in a shallow dish, whisk together 4 cups room temperature water and 3 tablespoons kosher salt until it dissolves. Place the salmon in the water and wait for 15 minutes. Then pat the salmon dry and season with ½ teaspoon salt instead of 1 teaspoon.

Did you love this recipe?

Get our free newsletter with all of our best recipes!

More Salmon Recipes to Try

  • 35 Easy Salmon Recipes
  • Easy Baked Salmon
  • Cajun Salmon
  • Honey Glazed Salmon
  • Salmon Caesar Salad
  • Salmon Tacos with Avocado Sauce


from A Couple Cooks https://ift.tt/KPx0zuU

This hearty farro salad is ready in 30 minutes and perfect as a side dish or satisfying lunch salad! It combines chewy whole grain farro with fresh vegetables, earthy mushrooms, and a bright lemon vinaigrette.

Farro Salad

Are you a farro fan like I am? Here’s a recipe that works as either a side dish or lunch salad: my hearty farro salad! Farro is an ancient grain with a chewy texture and nutty flavor that’s getting more and more popular (consider me its biggest fan!). It’s ideal for making as a side dish or turning into grain salads like this one.

This is my new favorite grain salad, which pairs the whole grain with juicy tomatoes, earthy mushrooms, feathery arugula, savory pops of cheese, and a zingy vinaigrette. It’s so yummy, I can’t stop making it!

5 Star Reader Review

⭐⭐⭐⭐⭐”Absolutely love this salad. Have made it three times and always gets rave reviews. Still great on day two (if not better).” -Julie

Ingredients You Need

This farro salad is fresh and veggie-packed, perfect as a side dish for dinner or as a lunch salad. The flavor is Mediterranean-style, with a beautiful rainbow of jumbled vegetables. Here are the main ingredients you’ll need:

  • Farro: Use pearled or semi-pearled farro (see the section below on farro types).
  • Shallot and garlic: These add savory depth to the salad.
  • Cherry tomatoes and carrots: I love rainbow cherry tomatoes here for the variation in color. Out of season, look for greenhouse or hydroponic options. Carrots add a nice crunch.
  • Button or cremini mushrooms: Thinly sliced raw mushrooms add a unique element to this salad. They’re surprisingly good! Carrot adds color and nice texture crunch.
  • Fresh herbs: Chives, mint, or basil all work well. Use whatever you have on hand or looks best at the store.
  • Baby arugula: The key word here is baby: standard arugula is too peppery and will overwhelm the salad.
  • Manchego cheese: This Spanish cheese has a fruity, slightly nutty flavor that’s perfect in this salad.
  • Lemon vinaigrette: A simple whisk of lemon juice, Dijon mustard, dried oregano, and olive oil makes a bright and tangy dressing!
Farro Salad

Understanding Farro Types

Farro is a whole grain that’s plump and chewy, with a texture similar to barley. It’s been a staple in Italian cuisine for centuries and recently spread to global popularity. Farro can be boiled on the stovetop, cooked in a rice cooker, or in a pressure cooker (Instant Pot). There are a few types you can find in American grocery stores:

  • Pearled farro has all of the bran removed from the grain, making it quicker to cook but removing some fiber. The cook time is 15 to 20 minutes.
  • Semi-pearled farro has part of the bran removed, retaining some additional fiber. The cook time is 25 to 30 minutes.
  • Whole farro is the whole grain and takes the longest to cook, but it’s harder to find in grocery stores (in the US). So this farro salad works with pearled or semi pearled!

Keep in mind: the labeling of this grain in the grocery store can be confusing. Many packages don’t contain the words pearled or semi-pearled (looking at you, Bob’s Red Mill). Check the cook time on the package as a guide.

Farro

Substitutions and Variations

This farro salad is flexible. Here are a few ideas to make it your own:

  • No mushrooms? Omit them or swap in thinly sliced raw zucchini for a similar texture. You can also use sauteed mushrooms if you prefer not eating them raw.
  • Sweet potatoes: I love adding air fryer sweet potatoes or roasted sweet potatoes to make it more hearty.
  • Different greens: Baby spinach or baby kale both work in place of baby arugula — just thinly slice them (and stem the kale).
  • Switch the cheese: Parmesan shavings are the easiest Manchego substitute. Fontina is also delicious (like I use in my Farro with Roasted Vegetables). For vegan, simply leave the cheese out.
  • Seasonal swaps: In fall, try this salad with roasted butternut squash or apples — similar to my Autumn Salad with Farro & Apple.
Farro Salad

How to Serve This Farro Salad

This farro salad is so versatile and works with many different meal concepts. Here are some ideas:

  • Side dish for fish like salmon, baked cod, shrimp, tilapia or scallops
  • Side dish for pizza (try these pizza recipes)
  • With vegetarian or vegan mains like Easy Baked Tofu or Power Bowls
  • Lunch salad for a healthy lunch idea
  • Picnic salad
  • Salad for a potluck or barbecue

Storage

Store this farro salad airtight in the refrigerator for up to 4 days. The arugula will wilt but the salad stays flavorful. Taste and add a pinch or two of extra salt before serving, as refrigeration can mellow the seasoning.

Dietary Notes

This farro salad recipe is vegetarian. For vegan, plant-based and dairy-free, omit the cheese.

Print

Hearty Farro Salad

Farro Salad
Pin Recipe
Print Recipe

5 Stars 4 Stars 3 Stars 2 Stars 1 Star

5 from 3 reviews

This hearty farro salad is ready in 30 minutes and perfect as a side dish or satisfying lunch salad! It combines chewy whole grain farro with fresh vegetables, earthy mushrooms, and a bright lemon vinaigrette.

  • Author: Sonja Overhiser
  • Prep Time: 10 minutes
  • Cook Time: 20 minutes
  • Total Time: 30 minutes
  • Yield: 6 1x
  • Category: Side Dish
  • Method: Salad
  • Cuisine: Salad
  • Diet: Vegetarian

Ingredients

  • 1 cup dry farro (pearled or semi pearled)
  • 1 teaspoon kosher salt, divided
  • 1 shallot, minced
  • 1 small garlic clove, minced
  • 1 cup cherry tomatoes, halved or quartered
  • 4 ounces button or cremini mushrooms, thinly sliced (see Notes)
  • 1 carrot, peeled and thinly sliced
  • ¼ cup chopped fresh herbs (like fresh chives, mint or basil)
  • 2 cups baby arugula (or other baby greens)
  • ½ cup Manchego cheese, sliced into chunks (or Parmesan shavings or fontina cheese; omit for vegan)
  • 2 tablespoons lemon juice
  • 1 teaspoon Dijon mustard
  • ½ teaspoon dried oregano
  • 3 tablespoons olive oil

Instructions

  1. Cook the farro: Rinse the farro under cold water in a fine mesh strainer. In a large saucepan, place the farro, 3 cups water and ½ teaspoon of the kosher salt and bring it to a boil. Reduce the heat to a simmer, cover, and cook until the grains are tender, about 15 to 20 minutes for pearled farro and 25 to 30 minutes for semi-pearled farro. Taste test a grain to see if it is tender (if the package is unmarked, just cook until tender). Drain any excess water. Stir in the additional ¼ teaspoon salt. Place on a baking sheet in a single layer and place in the freezer for 3 minutes until room temperature. (This step can be completed up to 2 days in advance; refrigerate the farro until making the salad.)
  2. Prep the veggies: Meanwhile, chop the shallot, garlic, cherry tomatoes, mushrooms, carrot, and fresh herbs as noted in the ingredient list above. Place the veggies in a large bowl, then add the baby arugula, cheese, and farro. 
  3. Make the dressing: In a medium bowl, whisk together the lemon juice, Dijon mustard, oregano, and ¼ teaspoon kosher salt. Gradually whisk in the olive oil 1 tablespoon at a time, until creamy. 
  4. Serve: Add the dressing to the bowl with farro and vegetables and toss. Taste and add another pinch or two of salt if desired. (Stores up to 4 days refrigerated; you may need to add a pinch or two more salt after refrigeration since it can dull the flavors.)

Notes

  • Mushrooms: It is safe to consume small quantities of common store-bought varieties of mushrooms raw. However if you prefer, you can make sauteed mushrooms for this salad and it’s just as delicious (or leave them out). 

Did you love this recipe?

Get our free newsletter with all of our best recipes!

More Farro Recipes to Try

  • How to Cook Farro
  • Instant Pot Farro
  • Farro with Mushrooms & Parmesan
  • Farro & Brussels Sprouts Soup
  • Farro Bowls


from A Couple Cooks https://ift.tt/l6aLdy2

Make authentic pizza marinara at home with tomato sauce, oregano, garlic, and olive oil. This classic Neapolitan pizza is simple and naturally dairy-free.

Pizza marinara

My formative pizza experience was in Naples, Italy, the birthplace of pizza, at a famous generations-old pizzeria called Da Michaele. Here they serve only two flavors, the most classic of all Neapolitan pizza: Pizza Margherita with mozzarella, tomatoes and basil, and Pizza Marinara, which has tomatoes only, with no cheese.

My oh my, was it epic! Here I’ve recreated a Pizza Marinara recipe that tastes like what like I had in Naples. Getting this pizza right at home is an exercise in ingredient quality and technique, but once you taste it: you’ll become an instant convert!

Pizza marinara

What Is Pizza Marinara?

Pizza marinara is the simplest of classic Neapolitan pizza: that is, pizza in the style that originates from Naples, Italy. This pizza has simple toppings, a dough that’s thin in the middle and puffy on the outside, usually baked in a wood-fired oven at super high temperatures.

Pizza marinara has no cheese: just tomato sauce, thinly sliced garlic, and oregano. It’s similar to pizza margherita, but without the cheese. As you can imagine, with only a handful of ingredients, the flavor of pizza marinara depends on the quality of the ingredients.

Pizza sauce

Ingredients You’ll Need

For the dough: Use one ball of my homemade pizza dough for the best result. Alex and I have spent over a decade researching our pizza dough recipes and this is the absolute perfect dough. If you want a thinner base, the thin crust pizza dough also works wonderfully here. In a pinch, store-bought dough is fine — just bring it to room temperature before stretching.

For the tomato sauce: The tomatoes are everything in a pizza marinara! Traditional Neapolitan pizza is made with San Marzano tomatoes, a variety grown in a specific region of Italy. They’re becoming more popular here in the US and are available under many different brands.

After lots of recipe testing, I’ve also found that fire roasted tomatoes give an even sweeter, more complex result right out of the can. My homemade pizza sauce recipe uses just fire roasted tomatoes, garlic, olive oil, dried oregano, and salt, blended until smooth. It’s so simple that I have it memorized!

For the toppings: All you need here is a thinly sliced garlic clove, fresh oregano, salt and olive oil.

Equipment You’ll Need

In order to make the most authentic pizza marinara, you’ll need a pizza stone for baking it. Classic Neapolitan pizza ovens reach up to 1000°F and cook the pizzas in just a minute or two. Your standard oven can only get up to 500°F. The pizza stone helps to get heat under the pizza itself; it makes it crispy on the bottom but soft on the inside. Here are the tools you’ll need:

  • Pizza stone: Here’s my favorite pizza stone, and a few tips about how to use a pizza stone.
  • Pizza peel: This is a paddle used to slide the pizza onto the hot pizza stone in the oven. We recommend this Standard pizza peel or this Conveyor pizza peel.
  • Pizza oven (optional): If you want to step up your pizza game, traditional artisan pizza is cooked at temperatures way hotter than your standard oven can achieve. We’ve found a relatively inexpensive pizza oven that heats to 1000°F in just 10 minutes! Here’s more about how to use an Ooni pizza oven.
Pizza marinara

How to Make Pizza Marinara

Here are the basic steps, or you can jump to the recipe below:

Step 1: Make the dough. The dough needs about 15 minutes to come together and 45 minutes to rest at room temperature. (Or use my Ooni pizza dough recipe for a pizza oven.)

Step 2: Make the pizza sauce. Blend all sauce ingredients together until smooth.

Step 3: Preheat. Place a pizza stone or baking stone in the oven and preheat to 500°F for 30 to 45 minutes so it’s fully hot before the pizza goes on. If you have a pizza oven like the Ooni, preheat until it reaches 800–950°F, which only takes about 10–15 minutes.

Step 4: Stretch the dough. Use your hands to gently stretch the ball of dough into a circle: check out how to stretch pizza dough for a full guide.

Step 5: Top and bake. Dust a pizza peel generously with semolina or cornmeal: this lets the dough slide cleanly onto the stone. Place the dough on the peel. Spoon the pizza sauce in a thin, even layer, spreading it with the back of a spoon. Top with thinly sliced garlic. Slide the pizza onto the preheated stone and bake for 5 to 7 minutes in a home oven, or about 60 to 90 seconds in a pizza oven, until the crust is nicely charred.

Step 6: Garnish and serve. Remove from the oven and top with fresh oregano, a pinch of kosher salt, and a good drizzle of extra virgin olive oil. Slice and serve.

What to Serve With It

Pizza marinara is a meal on its own, but a few simple sides round out the experience beautifully:

  • A simple arugula salad with lemon and parmesan
  • A Caprese salad
  • Marinated olives or am antipasti platter
  • A glass of Chianti or Italian white wine
Pizza marinara

Storage and Make Ahead Tips

Leftover pizza keeps in the refrigerator for up to 3 days in an airtight container. To reheat, instead, place slices in a dry skillet over medium heat and cover with a lid for 2–3 minutes. You can also reheat in an air fryer (the best method) or a 375°F oven directly on the rack.

Pizza dough freezes well: see how to freeze pizza dough.

Dietary Notes

This pizza marinara recipe is vegetarian and vegan.

Print

Pizza Marinara

Pizza marinara
Pin Recipe
Print Recipe

5 Stars 4 Stars 3 Stars 2 Stars 1 Star

4 from 2 reviews

Make authentic pizza marinara at home with tomato sauce, oregano, garlic, and olive oil. This classic Neapolitan pizza is simple and naturally dairy-free.

  • Author: Sonja Overhiser
  • Prep Time: 1 hour
  • Cook Time: 10 minutes
  • Total Time: 1 hour 10 minutes
  • Yield: 8 slices 1x
  • Category: Main Dish
  • Method: Baked
  • Cuisine: Italian

Ingredients

  • 1 ball Best Pizza Dough (or Food Processor Dough or Thin Crust Dough)
  • ½ cup Easy Pizza Sauce
  • 1 garlic clove
  • 1 handful fresh oregano
  • Semolina flour or cornmeal, for dusting the pizza peel
  • Kosher salt
  • Extra virgin olive oil, for drizzling

Instructions

  1. Make the pizza dough: Follow the Best Pizza Dough recipe to prepare the dough. (This takes about 15 minutes to make and 45 minutes to rest.)
  2. Place a pizza stone in the oven and preheat to 500°F. OR preheat your pizza oven (here’s the pizza oven we use).
  3. Make the pizza sauce: Make the Easy Pizza Sauce.
  4. Prepare the toppings: Thinly slice the garlic clove. Chop the oregano leaves.
  5. Bake the pizza: When the oven is ready, dust a pizza peel with cornmeal or semolina flour. (If you don’t have a pizza peel, you can use a rimless baking sheet or the back of a rimmed baking sheet. But a pizza peel is well worth the investment!) Stretch the dough into a circle; see How to Stretch Pizza Dough for instructions. Then gently place the dough onto the pizza peel.
  6. Spread the pizza sauce over the dough using the back of a spoon to create a thin layer. Top with thinly sliced garlic.
  7. Use the pizza peel to carefully transfer the pizza onto the preheated pizza stone. Bake the pizza until the cheese and crust are nicely browned, about 5 to 7 minutes in the oven (or 1 minute in a pizza oven).
  8. Remove from the oven. Garnish with a drizzle of olive oil, a few pinches of kosher salt, and the fresh oreagno. Slice into pieces and serve immediately.

Did you love this recipe?

Get our free newsletter with all of our best recipes!

Looking for more pizza recipes?

Outside of this truffle pizza recipe, here are some of our favorite pizza recipes:

  • Best Margherita Pizza Recipe
  • Perfect Neapolitan Pizza
  • Best Ever Taco Pizza
  • Classic Burrata Pizza
  • Incredible Jalapeno Pizza
  • Truffle Pizza
  • Mushroom Pizza with Fresh Herbs
  • Spinach Artichoke Pizza
  • Pesto Pizza
  • Italian Pizza with Pesto
  • Tomato Pizza with Artichokes
  • Veggie Supreme Pizza
  • Loaded Mexican Pizza
  • Our Best Vegan Pizza
  • All Homemade Pizza Recipes!


from A Couple Cooks https://ift.tt/BLlvCkK
Newer Posts Older Posts Home

POPULAR POSTS

  • Classic Italian Salad
  • Carrot Cake Baked Oatmeal
  • Veggie Protein Bowls
  • How to Make an Americano
  • Healthy Breakfast Cookies
  • How to Season Quinoa
  • Blue Long Island Iced Tea
  • Air Fryer Taquitos
  • Cranberry Aperol Spritz
  • 300+ Popular Cocktail Names & Recipes!
Powered by Blogger

Recipe, Healthy meal

  • A Couple Cooks
  • A Couple Cooks
  • Pakistanfoodinusa

About Me

Traditional Pakistani Food in USA
View my complete profile

My Top Healthy Muffin Recipes

By Traditional Pakistani Food in USA Published at April 15, 2026
Image

About Blog


Food stylist & photographer. Loves nature and healthy food, and good coffee. Don’t hesitate to come for say a small “hello!”

A

Popular Posts

Classic Italian Salad

Image

Carrot Cake Baked Oatmeal

Image

Veggie Protein Bowls

Image