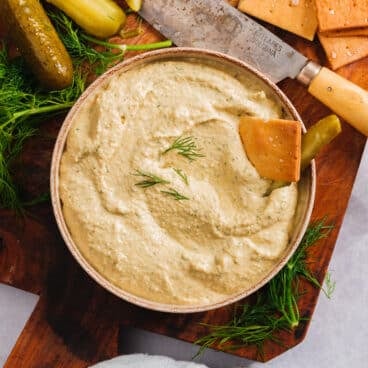
This Peach Martini is fruity, smooth, and easy to shake up, with a secret ingredient that gives a pop of bold flavor!

Love the juicy flavor of peaches? Then you’ll love this fruity peach martini! Usually when I make a fruity martini, I use the fresh fruit. But here, you’ll use a specialty ingredient to bring in that signature flavor: peach schnapps!
I created this recipe with leftover peach schnapps from making a Fuzzy Navel. Turns out, it’s just the right way to infuse peachy flavor into a drink!
5 Star Reader Reviews
 “This was a winner! I was trying to use up Peach Schnapps but this recipe made me want to always have it on hand. Delicious balance of orange and lime really let the peach shine through.” -Darma
Fabulous! You WON’T be disappointed!” -John
What’s in a Peach Martini?
The Peach Martini is a spin on the flavored vodka martini. The classic martini is ultra dry and uses only two ingredients: gin and dry vermouth. But vodka martinis are the exact opposite: fruity, sweet, and brightly colored. These developed as a spin off on the dry martini and become very popular in the 1990’s.
Two vodka martinis that are so well-known, they made the list of the International Bartender’s Association IBA official cocktails: the lemon drop martini and espresso martini. Most other vodka martinis are up to the bartender to make their own spin. Here’s what you’ll need for my Peach Martini:
- Peach schnapps
- Vodka
- Orange juice
- Triple sec
- Lime juice

The Case for Peach Schnapps
Why not use fresh peaches in a Peach Martini? You can, but peach schnapps has an incredibly strong peach flavor that’s even more powerful than the real thing.
Peach schnapps is a type of schnapps made by adding peach flavoring to a clear grain spirit. It was introduced in 1984 by DeKuyper, and quickly became the top selling schnapps in America. The flavor is intensely fruity and peachy. A little goes a long way!
I tried this drink with fresh peaches, and it didn’t have the right flavor. Peach schnapps is the way to go! You can also use it in other peach schnapps cocktails like the Fuzzy Navel, Peach Bourbon Cocktail, or Georgia Peach. You can even add it to enhance the flavor in fresh peach cocktails like the Bellini or Peach Sangria.
Why Orange Juice? (The Secret Ingredient)
There’s another secret ingredient in this Peach Martini…orange juice! Yes, no peach juice needed. Why use orange juice here? Well, some peach martini recipes use peach nectar, but that’s even more of a specialty ingredient.
The orange juice brings a beautiful peach hue to the drink without adding an orange flavor. Don’t worry: it doesn’t taste like oranges! It’s a genius move that keeps the drink accessible and delicious (thanks Alex!).

How to Make a Peach Martini
Once you’ve collected the ingredients for this Peach Martini, it’s a breeze to make! It’s a simple matter of shake and strain. Here’s what to do:
- Shake: Add all ingredients to a cocktail shaker. Add 2 handfuls ice and shake until cold. Don’t have a cocktail shaker? Use a mason jar with top.
- Strain: Strain into a martini glass. It’s nice to have a fresh peach to use as a garnish, if you have access to the fresh variety!
Tip For Adding Fresh Peaches
You can make this using fresh peaches you like! If it’s peach season and you happen to have very ripe, juicy peaches on hand, you can add them to this drink. Use the peach slices in place of the orange juice. Here’s what to do:
- Slice the peach into slices. Place 5 to 6 slices in a cocktail shaker.
- Muddle the peach slices with a cocktail muddler or wooden spoon. This releases their juices.
- Add all ingredients and shake. Continue with the remainder of the cocktail recipe!

When to Serve a Peach Martini
The peach martini recipe is fun and fruity, and great for entertaining! It’s great in summer, but it works in any season. Serve it as a:
- Summer drink
- Happy hour drink
- Signature drink
- Girls or guys night drink
- Cocktail hour drink
Perfect Peach Martini

5 Stars 4 Stars 3 Stars 2 Stars 1 Star
5 from 3 reviews
This Peach Martini is fruity, smooth, and easy to shake up, with a secret ingredient that gives a pop of bold flavor!
- Author: Sonja Overhiser
- Prep Time: 5 minutes
- Cook Time: 0 minutes
- Total Time: 5 minutes
- Yield: 1 drink 1x
- Category: Drink
- Method: Shaken
- Cuisine: Cocktails
- Diet: Vegan
Ingredients
- 1 ounce* peach schnapps
- 1 ounces vodka
- 1 ounce orange juice or 6 peach slices**
- ½ ounce triple sec
- ½ ounce lime juice
- For the garnish: fresh peach slice (optional)
Instructions
- Place the peach schnapps, vodka, orange juice, triple sec, and lime juice in a cocktail shaker. Add 2 handfuls of ice and shake until cold.
- Strain the drink into a cocktail glass. Garnish with a peach slice if desired.
Notes
*To convert to tablespoons, 1 ounce = 2 tablespoons.
**Have fresh ripe peaches on hand and want to use them instead of orange juice? Slice them and muddle 5 to 6 slices in a cocktail shaker. They must be ripe, in season peaches for this to work!
More Vodka Martinis to Try
- Try a dessert martini! Go for Coffee Martini, Chocolate Martini or Key Lime Martini.
- Love citrus? Try a Lemon Drop Martini, Limoncello Martini, or Blood Orange Martini.
- Go fruity with a Raspberry Martini, Watermelon Martini, Pomegranate Martini or French Martini.
- Opt for a unique Ginger Martini or Cucumber Martini
from A Couple Cooks https://ift.tt/9b2aIZY