Pakistani dishes in Usa
  • Home
  • About us
  • New
  • Featured
    • Lifestyle
    • Sports Group
      • Category 1
      • Category 2
      • Category 3
      • Category 4
      • Category 5
    • Sub Menu 3
    • Sub Menu 4
  • Contact Us

Here’s how to make fresh limeade with just limes and sugar for a bright, refreshing drink that’s better than any bottled version! My homemade limeade recipe uses less sugar than store-bought and has the ideal sweet-tart balance.

Limeade

Want a way to beat the heat? Try my homemade limeade recipe. This refreshing lime drink has a tangy pop and is a perfect summer drink for parties, or for making a big pitcher to drink off of all week.

Homemade limeade from real limes is infinitely tastier than store-bought. You use less sugar to get even more real, sweet-tart flavor. The finish to the sip almost feels like you’re drinking a margarita, but it’s just limes, sugar, and water. A friend of mine brought some over recently, and it made my night!

5 Star Reader Review

⭐⭐⭐⭐⭐ “So easy to make and such a great balance of citrus and sweet. I had a bunch of limes leftover from a party and still have enough to make another pitcher.” -Amy

Ingredients You Need

Limeade is a drink that’s made with limes, sugar, and water. It’s like lemonade, but made with limes! It’s popular in the United States, tropical countries like Guyana and Trinidad, and in Southeast Asian countries like Thailand. What you’ll find in many of those places is likely less sweet than the American version, though.

All you need are 2 ingredients for limeade, plus water:

  • Limes: To make a full pitcher of 8 servings, you need about 10 limes. There are 2 tablespoons of lime juice in the average lime, and you’ll need 20 tablespoons for the recipe. If you want to make limeade by the glass, I’ll have some tips in a bit.
  • Sugar: The best sugar to use here is plain old granulated sugar. This type of sugar makes for the best green limeade color. You can use other sugars like cane sugar or coconut sugar, but the color will be darker. If you prefer alternative sweeteners, try this limeade with honey or maple syrup.
Limeade recipe

How To Make Limeade (The Fast Way)

Many limeade recipes call for boiling a simple syrup on the stove. This is time-consuming and heats up the sugar. I decided to make my recipe even simpler. Here’s all you have to do for this limeade:

  • Juice the limes. This is the most time-consuming part of the process…by far! If I have one essential tip for you here, it’s to get a good juicer. Then you don’t have to do the rolling on the table trick, or break your fingers trying to squeeze as hard as you can.
  • Mix the sugar with 1 cup of warm water. All you have to do is mix sugar into warm water, and it dissolves. There’s no need to heat it on the stove.
  • Add the cold water and lime juice, and some ice. Cool it back down by adding the water, lime juice, and some ice. Limeade is served!
Limes and limade

Limeade By The Glass

This recipe makes 8 to 9 cups of limeade, which is actually quite a bit. If you want to make this lime drink by the glass, here’s what to do:

  • Squeeze 2.5 tablespoons lime juice into a glass. That’s 1 large lime or 2 small ones.
  • Add 2 tablespoons of sugar and 2 tablespoons of warm water and stir until it dissolves.
  • Add 1 cup cold water and a handful of ice. Water it down more if necessary. Enjoy!

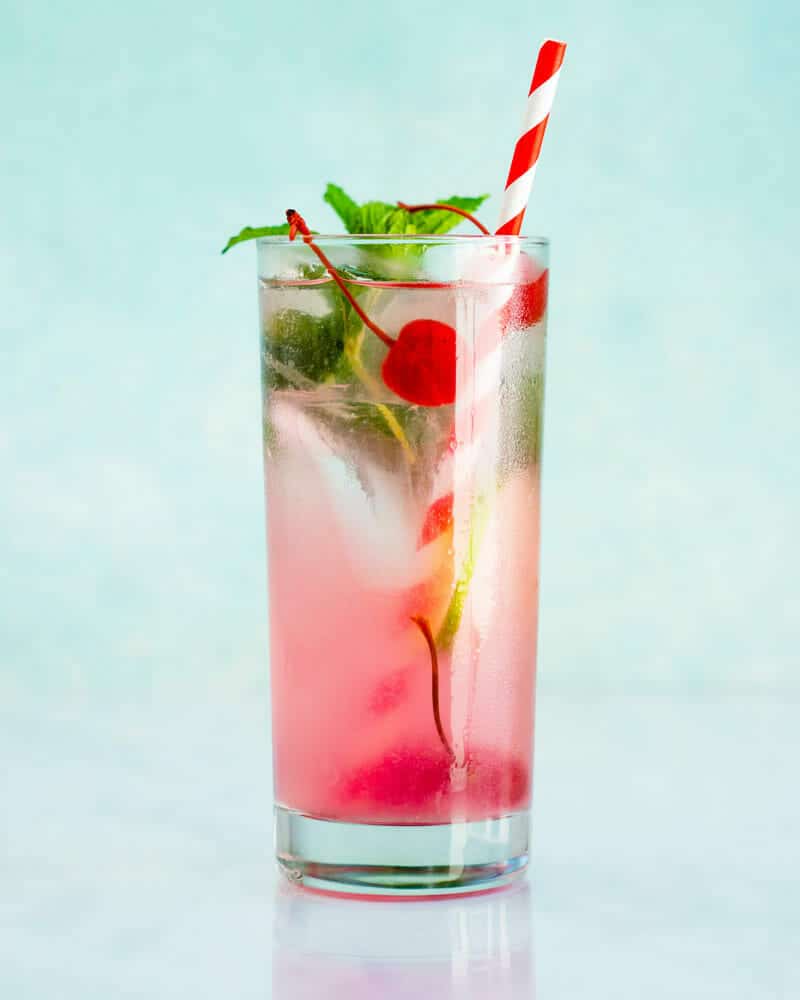
Variation: Cherry Limeade

The most famous spin on limeade is cherry limeade. These two fruits go hand-in-hand. The sweet and tart go perfectly together! You can use this limeade recipe and add cherry flavor using the juice from a jar or maraschino cherries for a fresh cherry limeade.

Cherry limeade

More Variations

The process of making lemonade is the same as this lime drink, but it uses lemons instead. You can also mix limeade or lemonade with booze for a fun cocktail idea! Here are some places to start:

  • Fresh Lemonade: Freshly squeezed lemons and sugar make an extraordinary sweet-tart flavor.
  • Bourbon Lemonade or Limeade: This is a perfect summer drink! Make fresh-squeezed lemonade or limeade and swirl in some whiskey for a spicy finish.
  • Spiked Lemonade or Limeade: Beat the heat with this fresh and boozy homemade lemonade, starring vodka and limoncello.
Easy limeade

Dietary Notes

This limeade recipe is vegetarian, vegan, plant-based, dairy-free, and gluten-free.

Print

Easy Limeade Recipe

Limeade
Pin Recipe
Print Recipe

5 Stars 4 Stars 3 Stars 2 Stars 1 Star

5 from 4 reviews

Here’s how to make fresh limeade with just limes and sugar for a tangy drink that’s better than any bottled version! My homemade limeade recipe uses less sugar than store-bought and has the ideal sweet-tart balance.

  • Author: Sonja Overhiser
  • Prep Time: 10 minutes
  • Cook Time: 0 minutes
  • Total Time: 10 minutes
  • Yield: 8 (8 to 9 cups) 1x
  • Category: Drink
  • Method: Squeezed
  • Cuisine: American
  • Diet: Vegan

Ingredients

  • 1 ¼ cups lime juice (9 to 10 limes)*
  • 1 cup granulated sugar
  • 7 cups water, divided
  • Ice
  • Fresh mint, for garnish (optional)

Instructions

  1. Juice the limes.
  2. Add the sugar and 1 cup warm water to a large pitcher and stir until it is dissolved.
  3. Add 6 cups cold water and lime juice.
  4. Add ice and serve.

Notes

*To make it by the glass: Squeeze 2.5 tablespoons lime juice into a glass (1 large lime or 2 small). Add 2 tablespoons sugar and 2 tablespoons warm water and stir until it dissolves. Add 1 cup cold water and a handful of ice. 

Did you love this recipe?

Get our free newsletter with all of our best recipes!

More Lime Recipes To Try

There are so many great things to do with extra limes! This zesty citrus adds a zing to anything it touches. Here are some of my favorite lime recipes:

  • Try Easy Lime Vinaigrette or Cilantro Lime Dressing, both fast to whip up.
  • You’ll want to bathe in my Cilantro Lime Crema or Cilantro Lime Ranch.
  • Go for Cilantro Lime Shrimp for an easy dinner in 10 minutes!
  • This Lime Water is healthy, looks beautiful, and tastes extraordinarily refreshing.
  • Mix up zingy Lime Curd to top cakes and waffles.


from A Couple Cooks https://ift.tt/w0tsbkN

This creamy Bushwacker drink recipe is a frozen cocktail that tastes like a chocolate milkshake meets piña colada! Here are my expert tips for the perfect consistency every time.

Bushwacker Drink in glass with cherry and chocolate shavings

If you love cocktails with sweet, chocolaty flavor, the Bushwacker is for you! This creamy drink is like the lovechild of a chocolate milkshake and a classic piña colada, with rich coffee and coconut notes that make it absolutely irresistible.

As a drink expert who’s tested countless cocktail recipes over the years, the Bushwacker is one of my favorite frozen drinks! It’s perfect for sipping poolside as a summer cocktail, or as a dessert drink any time you’re dreaming of sun.

5 Star Reader Review

⭐⭐⭐⭐⭐ “This is so delicious! I wanted something different than a variation of rum punch or with soda So glad to have tried this! Other recipes online used many other ingredients but this is simple and tastes even better.” -Isabella

What Is a Bushwacker?

The Bushwacker is a frozen cocktail made with rum, Kahlua, creme de cacao, cream of coconut, and milk, known for its creamy texture, sweet flavor, and boozy kick. Invented in the 1970’s in St. Thomas, US Virgin Islands, it has since become popular in Florida and the American South.

It belongs to a family of tropical frozen drinks alongside the Painkiller and Chi Chi, and it’s very popular in the Southern coastal states, especially Florida.

Bushwacker Ingredients

You’ll need a few specialty liqueurs but once you have them, you’ll be making Bushwackers on repeat! This frozen boozy milkshake relies on these ingredients blended to perfection with 3 cups of ice:

  • Rum (2 oz): I typically use aged rum for its subtle vanilla and caramel undertones, but white or dark rum work well too.
  • Kahlua (2 oz): The smooth sweetness of Mexican coffee liqueur Kahlua is perfect for this recipe. You can use leftovers in my classic Mudslide recipe.
  • Creme de cacao (2 oz): The popular chocolate liqueur creme de cacao is available in both white and dark varieties. The original Bushwacker had dark creme de cacao, but white is easier to find and what gives the drink its signature flavor.
  • Cream of coconut (2 oz): This is crucial—make sure you buy cream of coconut (the sweetened syrup for drinks), not coconut cream. It’s easy to find in squeeze bottles at liquor stores or online.
  • Milk: (2 oz): Any milk works here. I use 2%, but you can easily substitute oat milk or almond milk for a dairy-free version.

Tip: If you accidentally buy coconut cream, you can still save your Bushwhacker! Use 1 oz coconut cream and 1 oz simple syrup in place of the 2 oz cream of coconut.

Bushwacker Drink in glass with chocolate shavings and cherry

The Story Behind The Drink

The Bushwacker has a charming origin story. It was created in 1975 at the Ship’s Store Pub in St Thomas, U.S. Virgin Islands a tropical spin on the White Russian by bartender Angie Conigliaro and manager Tom Brokamp. Apparently they named it after a guest’s dog, an Afghan hound named Bushwack!

Tips for The Perfect Bushwacker

Once you’ve got your specialty liquors, mixing up the Bushwacker drink is a breeze! Here are a few tips:

  • Pour into a glass and garnish with a straw. Garnish with a maraschino cherry for a classic presentation.
  • Stir it with a straw if it separates. The drink tends to separate, which is normal: just stir it up with your straw while drinking!
  • It’s easily made dairy-free: There’s no dairy in any of the liqueurs in a Bushwacker drink, so it’s easy to convert it into a dairy free or vegan cocktail using any type of non-dairy milk, like oat milk or coconut milk.
Bushwacker Drink

Make-Ahead and Storage

The Bushwacker drink is definitely best fresh, but here are some tricks I’ve learned for planning ahead:

  • Store a blended Bushwacker in the freezer for up to 30 minutes before drinking: just give it a good stir before you dig in.
  • To make ahead, you can pre-measure all the liquid ingredients and store them in the refrigerator for up to 24 hours. Add ice and blend when ready to serve.
  • For parties, you can make double or triple batches; whatever fits in your blender!
  • Any leftover Bushwacker can be frozen in ice cube trays to use in future drinks.

Frequently Asked Questions

What does a Bushwacker taste like?

The dominant flavors are chocolate and coconut, with hints of coffee and rum. The creaminess adds a luxurious mouthfeel, and the overall taste is sweet and refreshing. It’s not a strong drink, but there’s enough alcohol that it should be enjoyed responsibly.

Is a Bushwacker similar to a Piña Colada?

While both are creamy and tropical, a Piña Colada features rum, pineapple juice, and cream of coconut. The Bushwacker adds coffee liqueur, dark crème de cacao, and skips the pineapple juice, resulting in a more chocolatey and coffee-forward flavor.

What kind of rum is best for a Bushwacker?

Dark rum is the traditional choice, offering a deeper flavor compared to lighter rums. You can also aged rum (anejo) with great results. White rum works but has a more straightforward flavor.

What is creme de cacao and what other drinks use it?

Creme de cacao is a chocolate liqueur. It’s possibly one of the first alcoholic beverages, made in the 1600’s by monks after cocoa beans were brought back to Europe from America (source).

Use it to make creme de cacao drinks like the Brandy Alexander, Chocolate Martini, or Grasshopper.

What is the difference between cream of coconut and coconut cream?

Cream of coconut is a sweetened syrup for drinks, made with coconut cream and sugar. You can use up leftovers in coconut cocktails like the Piña Colada, Chi Chi, Painkiller, or Coconut Martini.

Coconut cream is unsweetened, very thick, and has a strong coconut flavor. It’s typically sold in cans next to the coconut milk.

Read more at Cream of Coconut vs Coconut Cream.

What other drinks use Kahlua?

There are many Kahlua drinks! Try it in a Mudslide, Espresso Martini, B-52, Kahlua Coffee, Mind Eraser, Colorado Bulldog, Black Russian or White Russian.

Print

Classic Bushwacker

Bushwacker drink
Pin Recipe
Print Recipe

5 Stars 4 Stars 3 Stars 2 Stars 1 Star

4.7 from 11 reviews

This creamy Bushwacker drink recipe combines rum, Kahlua, and creme de cacao for a frozen cocktail that tastes like a chocolate milkshake meets piña colada! Here are my expert tips for the perfect consistency every time.

  • Author: Sonja Overhiser
  • Prep Time: 5 minutes
  • Cook Time: 0 minutes
  • Total Time: 5 minutes
  • Yield: 2 drinks 1x
  • Category: Drink
  • Method: Blender
  • Cuisine: Cocktails
  • Diet: Vegetarian

Ingredients

  • 2 ounces (¼ cup) aged, white or dark rum*
  • 2 ounces Kahlua
  • 2 ounces creme de cacao (white or dark; we used white)
  • 2 ounces cream of coconut
  • 2 ounces 2% milk
  • 3 cups ice
  • For the garnish: Shaved chocolate or grated nutmeg, cocktail cherry (optional)

Instructions

  1. Add all ingredients to a blender and blend until smooth.
  2. Garnish with shaved chocolate or grated nutmeg, if desired. Add straws and serve. (You can stir with the straw when the drink starts to separate.)

Notes

*We like using aged rum in this drink, since it brings oak and vanilla undertones. But either white or dark rum work as well. 

Did you love this recipe?

Get our free newsletter with all of our best recipes!

More Sweet Frozen Drinks

The Bushwacker is one in a family of sweet cocktails and frozen alcoholic drinks. Here are a few related drinks you might enjoy:

  • The Pina Colada, Painkiller and Chi Chi are variations using pineapple juice and cream of coconut.
  • The best Strawberry Daiquiri is homemade, made from frozen strawberries!
  • This Frozen Margarita is the icy version of everyone’s favorite, the margarita.
  • Try a Frozen Mojito for a minty frozen version of the Mojito.


from A Couple Cooks https://ift.tt/sxCPopQ

Here’s how to cook bulgur wheat with a simple soaking method: no stove required! This whole grain is ready in 15 minutes is perfect for salads, grain bowls, or as a healthy side dish.

How to cook bulgur

Are you looking to eat more whole grains? Well, look no further than bulgur wheat! It’s one of my favorite grains to cook because well, there’s really no cooking at all! With this grain, you can use a soaking method: simply boil water and then pour it over the grains in a bowl. Then simply wait for the grain to cook itself!

It plumps up in no time, and is easy to include in salads, grain bowls, and a healthy side dish. I’ve been cooking it for years, so here’s my easy method for how to cook bulgur.

Bulgur wheat

What Is Bulgur Wheat?

Bulgur wheat is a whole grain made of cracked wheat. It originates in Middle Eastern cuisine. Ever had tabbouleh at a Greek, Israeli or Lebanese restaurant? Yep, that’s bulgur wheat!

It’s also high in fiber, a good source of plant-based protein, and naturally low in fat. For anyone working to eat more whole grains, it’s a great place to start. Many mainstream groceries stock bulgur these days, especially in bulk bins. You can also buy it online.

Types of Bulgur (And Why It Matters)

Yes, and this affects the cook time, so listen up! Bulgur comes in different grind sizes:

  • Fine-grind (#1): Soaks in 7 minutes
  • Medium-grind (#2): Soaks in 15 minutes
  • Coarse grind (#3): Cooks on the stove in 20 minutes (cannot soak)
  • Extra coarse grind (#4): Cooks on the stove in 25 minutes (cannot soak)

As you can see, the fine and medium grind works with the soaking method. However, the coarse grind and extra coarse can only be cooked on the stovetop. These varieties are more difficult to find; it’s more likely that you’ll encounter fine and medium grind in the store or online.

What if the bulgur package is not marked? Several leading brands of bulgur wheat do not mark the grind size. (Not naming names, but we’d like to bend the ear of a certain whole grain company to clear this up!) If the package is not marked, it’s likely that it’s medium grind bulgur. You’ll have to experiment with the cook time and make sure that the grains are tender: adjust as necessary.

how to cook bulgur

How to Cook Bulgur Wheat (Step-by-Step)

So, there’s not much to how to cook bulgur! As I mentioned above, you’ll use the soaking method where you simply heat up water and then pour it over the grains. The biggest thing you need to know is how much water to use: and that’s even super simple.

What’s the bulgur to water ratio? 1:1, meaning 1 cup bulgur to 1 cup water.

OK, this literally could not get any easier, right? Here are the basic steps for how to cook bulgur (see the full recipe below):

  • Boil the water in a teapot.
  • Place the bulgur wheat in a bowl, then pour the water over it.
  • Let it stand for 7 minutes for fine-grind bulgur or 15 minutes for medium-grind bulgur.

As it sits, the grains absorb all the water and the grains become large and tender. That’s it! This is a great candidate for making a large batch to eat off of throughout the week.

Or, do you have an Instant Pot? You also can cook bulgur in a pressure cooker: see our Instant Pot Bulgur Wheat recipe.

Whole grains

Is Bulgur Gluten-Free?

Since bulgur is made from wheat (yes, it’s bulgur wheat), it is not gluten free. Make sure to stay away from bulgur if you have a gluten intolerance. What’s a gluten free substitute for bulgur? Use brown rice, millet, or quinoa.

How to Cook Bulgur in an Instant Pot

Got an Instant Pot? You can also whip up a batch of Instant Pot bulgur! It’s just as easy, and a fully hands off method. Just set it and go about making the rest of your meal!

Here are the basic steps on how to make Instant Pot bulgur wheat (go to the recipe for more):

  1. Place bulgur, water, garlic powder, oregano, and salt in the Instant Pot.
  2. Pressure cook on Low for 12 minutes (medium grind) or 7 minutes (fine grind).
  3. Quick release. Open the Instant Pot and fluff the bulgur with a fork.

Ways to Use It

Once you’ve got a big pot of bulgur wheat, there are so many ways to use it: in salads, grain bowls, soups, and more! Here are some of my favorite ideas:

  • Tabbouleh: The most popular way to eat bulgur is tabbouleh, with lots of fresh parsley, tomatoes, and garlic. Try my Mediterranean Bulgur Salad.
  • With veggies & fried egg: Make it a vegetarian main dish with beans and greens and topped with a fried egg. Try Bulgur Wheat Recipe with Fried Eggs.
  • As a side: Try it as a side dish for Baked Salmon or Stovetop Shrimp.
  • In a grain bowl: Try it in a Couscous Bowls with Tahini Sauce (instead of couscous) or Roasted Vegetable Bowl (instead of freekah).

Storage Instructions

Cooked bulgur stores well in the refrigerator for up to 5 days: which makes it great for meal prep. It can also be frozen for up to 3 months; thaw overnight in the refrigerator and reheat with a small splash of water.

Dietary Notes

Bulgur wheat is vegetarian, vegan, and dairy-free. It is not gluten-free as noted above.

Print

How to Cook Bulgur

How to cook bulgur
Pin Recipe
Print Recipe

5 Stars 4 Stars 3 Stars 2 Stars 1 Star

No reviews

Here’s how to cook bulgur wheat with a simple soaking method: no stove required! This whole grain is ready in 15 minutes is perfect for salads, grain bowls, or as a healthy side dish.

  • Author: Sonja Overhiser
  • Prep Time: 5 minutes
  • Cook Time: 10 minutes
  • Total Time: 15 minutes
  • Yield: About 2 ½ cups 1x
  • Category: Whole grain
  • Method: Stovetop
  • Cuisine: Mediterranean
  • Diet: Vegan

Ingredients

  • 1 cup boiling water
  • 1 cup fine- or medium-grind bulgur wheat*
  • ½ teaspoon kosher salt
  • Optional: ½ teaspoon garlic powder and ½ teaspoon dried oregano

Instructions

  1. Boil the water (I use an electric tea kettle).
  2. In a heatproof bowl, add the bulgur wheat and stir in the kosher salt and boiling water. (Optional: Spice it up by stirring in ½ teaspoon garlic powder, 1 teaspoon dried oregano.)
  3. Cover and allow to sit until tender: about 7 minutes for fine-grind and 15 minutes for medium-grind bulgur.

Notes

*Coarse or extra-coarse bulgur have different cooking instructions. Place 1 cup coarse or extra-coarse bulgur in a saucepan with 2 ¼ cups water. Bring the water to a boil, stir, and cover. Cook until tender, about 15 to 25 minutes depending on the type of bulgur, stirring occasionally. Drain excess water.

Did you love this recipe?

Get our free newsletter with all of our best recipes!


from A Couple Cooks https://ift.tt/syga5PL

These no-bake peanut butter oatmeal bars are chewy, sweet and ready in just 15 minutes with only 5 wholesome ingredients. The optional chocolate drizzle makes them irresistible!

Peanut butter oatmeal bars

These peanut butter oatmeal bars are everything you want in a healthy treat: irresistible sweet peanut-y flavor, chewy texture, and a little drizzle of chocolate on top! These no bake oatmeal bars are like our famous bliss bite cookies, but easier and healthier (if that’s possible).

My family can’t get enough of them! My son Larson often asks with a sly smile if he can have an oatmeal bar: and I’m happy to indulge him. This sweet treat optimizes whole grain oats while hitting it big in the sweet, salty and satisfying department.

5 Star Reader Review

⭐⭐⭐⭐⭐ “These bars were so good that I almost finished them before even putting them on the pan 😅. Thank you so much for this recipe, it flipped my day around for sure.” -Tony

Ingredients for Peanut Butter Oatmeal Bars

There are only 5 ingredients you’ll need for these peanut butter oatmeal bars…and two are in the recipe title! That’s the ultimate easy recipe, right there. I love these no bake oatmeal bars for treats, but they’re also great for snacks since they’re mostly just whole grain oats.

For breakfast bars, I prefer our straight up Oatmeal Bars: but you could also eat these for breakfast as well. Here’s what you’ll need for these babies:

  • Old Fashioned rolled oats: Use plain old oats here: not steel cut or instant oats!
  • Peanut butter: I like natural peanut butter with no added sugar or salt, but use your favorite brand.
  • Honey: Honey has the best warm flavor and sticky texture. See below for a few vegan options!
  • Cinnamon: This spice adds just the right nuance.
  • Dark chocolate: All you need is a 1 ounce of dark chocolate! Just the small amount of chocolate adds a great punch, but still keeps the treats on the healthy side: it’s just 8 calories per bar.
Peanut butter oatmeal bars

How to Make Peanut Butter Oatmeal Bars

The process is very simple; in fact, it’s a spin on my popular 4-ingredient oatmeal bars:

  1. Mix the peanut butter, honey, oats, salt, and cinnamon until a sticky dough forms.
  2. Line a 9×9″ pan with parchment paper and press the mixture into an even layer. Roll a small glass over the top to get it smooth and flat.
  3. Freeze for 10 minutes to set.
  4. Lift out using the parchment paper and cut into 20 rectangles (4 rows x 5 columns).
  5. Melt the dark chocolate in short microwave bursts (about 10 seconds at a time, stirring between each), then drizzle over the bars. Allow to set before serving — I like refrigerating for 1 hour before eating, but you can enjoy right away.

Tip: If you want to know my tricks for melting chocolate in the microwave without seizing it up, that technique post breaks it all down step by step.

Cutting & Serving Options

Serving size is helpful if you’re looking at making a healthy dessert. These peanut butter oatmeal bars have two size options depending on what you’re looking for:

  • Cut them into 20 bars, 4 x 5-inches. I like small rectangles vs the standard large squares you get if you simply divide a 9 x 9 pan evenly into 16. Call me crazy, but it’s more fun to eat this size!
  • Or go smaller: cut those in half to make 40 bars! Love curbing a sweets craving with a little morsel? Go for 40 small bars: they’re perfect for little nibbles.
No bake peanut butter oatmeal bars

Making Them Vegan

Want to make vegan peanut butter oatmeal bars instead? The honey in this recipe is important for creating a nuanced, warm flavor and the sticky texture. Typically I use maple syrup as a vegan sweetener, but it doesn’t have quite the same texture and sweetness here.

I recommend using agave syrup: it’s slightly stickier than maple and should help the bars hold together better. But you can use maple syrup if it’s all you have!

Storage Info

These peanut butter oatmeal bars are the perfect treat to throw in the fridge and gobble up on moments notice! They keep very well in the fridge or freezer; here’s what to know:

  • Store in the fridge for up to 2 weeks. If you do the drizzle, wait for it to dry, then place wax paper between the layers. Or just don’t care and stack them, like we do!
  • Store in the freezer for up to 3 months. They also freeze well…and honestly taste great popped out of the freezer too.
No bake oatmeal bars

Dietary Notes

This peanut butter oatmeal bars recipe is vegetarian, dairy-free and gluten-free. For vegan and plant-based, see the notes above.

Print

Peanut Butter Oatmeal Bars (No Bake!)

Peanut butter oatmeal bars
Pin Recipe
Print Recipe

5 Stars 4 Stars 3 Stars 2 Stars 1 Star

4.2 from 10 reviews

These no-bake peanut butter oatmeal bars are chewy, sweet and ready in just 15 minutes with only 5 wholesome ingredients. The optional chocolate drizzle makes them irresistible!

  • Author: Sonja Overhiser
  • Prep Time: 15 minutes
  • Cook Time: 0 minutes
  • Total Time: 15 minutes
  • Yield: 20 bars (or 40 small bars) 1x
  • Category: Dessert or Snack
  • Method: No Bake
  • Cuisine: Vegetarian
  • Diet: Vegetarian

Ingredients

  • 1 cup creamy peanut butter (no sugar added, or sunflower butter for nut free)
  • ½ cup honey (or ½ cup agave syrup* for vegan)
  • 4 cups Old Fashioned rolled oats
  • ½ teaspoon kosher salt
  • ½ teaspoon cinnamon
  • 1 to 2 ounces dark chocolate (1/8 to 1/4 cup chocolate chips)

Instructions

  1. Mix together the peanut butter, honey, oats, salt and cinnamon in a bowl. (If the mixture seems dry and not sticky, add a bit more peanut butter and/ or honey; different peanut butter brands perform differently.)
  2. Add a sheet of parchment paper to a 9 x 9 pan. Place the ingredients in the pan and press it into an even layer. Use a small glass to roll over the top to get it smooth. 
  3. Freeze the bars for 10 minutes. Remove the pan from the freezer and use the parchment to lift it out of the pan. Cut into 20 rectangles (4 x 5 rows) or 40 small rectangles.
  4. In the microwave with short intervals or over a double boiler, melt the chocolate, stirring until it comes together into a glossy chocolate. If using the microwave, use short bursts of 10 seconds or so and stir after each: be careful not to overheat the chocolate or get any water in the chocolate, which will cause it to seize up. When melted, drizzle over the bars and allow to cool.  You can eat right away, or refrigerate for about 1 hour for a more solid texture. Store refrigerated for up to 2 weeks (or frozen for several months, placing wax paper between the layers). 

Notes

*Maple syrup is generally our sweetener of choice, but the flavor and texture of honey really make these bars. Since maple syrup is not as sticky as honey, for vegan substitute we recommend agave syrup. 

**We typically use about 1 ounce for a very light drizzle, but you can use more if you’d like more chocolate. 

Did you love this recipe?

Get our free newsletter with all of our best recipes!

More Healthy Treats To Try

  • Easy Oatmeal Bars The original! These are perfect for breakfast or snacks.
  • Homemade Granola Bars Made at home, they’re full of amazing flavor.
  • Peanut Butter Energy Balls or No Bake Energy Bites Try these tasty and easy energy bites that use similar ingredients.
  • Pecan Energy Bars More like a granola bar meets a Larabar.
  • Cashew No Bake Energy Bars Same idea, but with cashews and dates!


from A Couple Cooks https://ift.tt/6Wi0j9I
Newer Posts Older Posts Home

POPULAR POSTS

  • Veggie Protein Bowls
  • How to Make French Press Iced Coffee
  • How to Season Quinoa
  • Easy Grilled Tofu
  • Sauteed Shiitake Mushrooms
  • Simple Strawberry Smoothie
  • Easy Dense Bean Salad
  • 25 Top Tequila Cocktails
  • Cranberry Aperol Spritz
  • Shaved Asparagus Salad
Powered by Blogger

Recipe, Healthy meal

  • A Couple Cooks
  • A Couple Cooks
  • Pakistanfoodinusa

About Me

Traditional Pakistani Food in USA
View my complete profile

No Bake Energy Bites

By Traditional Pakistani Food in USA Published at May 11, 2026
Image

About Blog


Food stylist & photographer. Loves nature and healthy food, and good coffee. Don’t hesitate to come for say a small “hello!”

A

Popular Posts

Veggie Protein Bowls

Image

How to Make French Press Iced Coffee

Image

How to Season Quinoa

Image