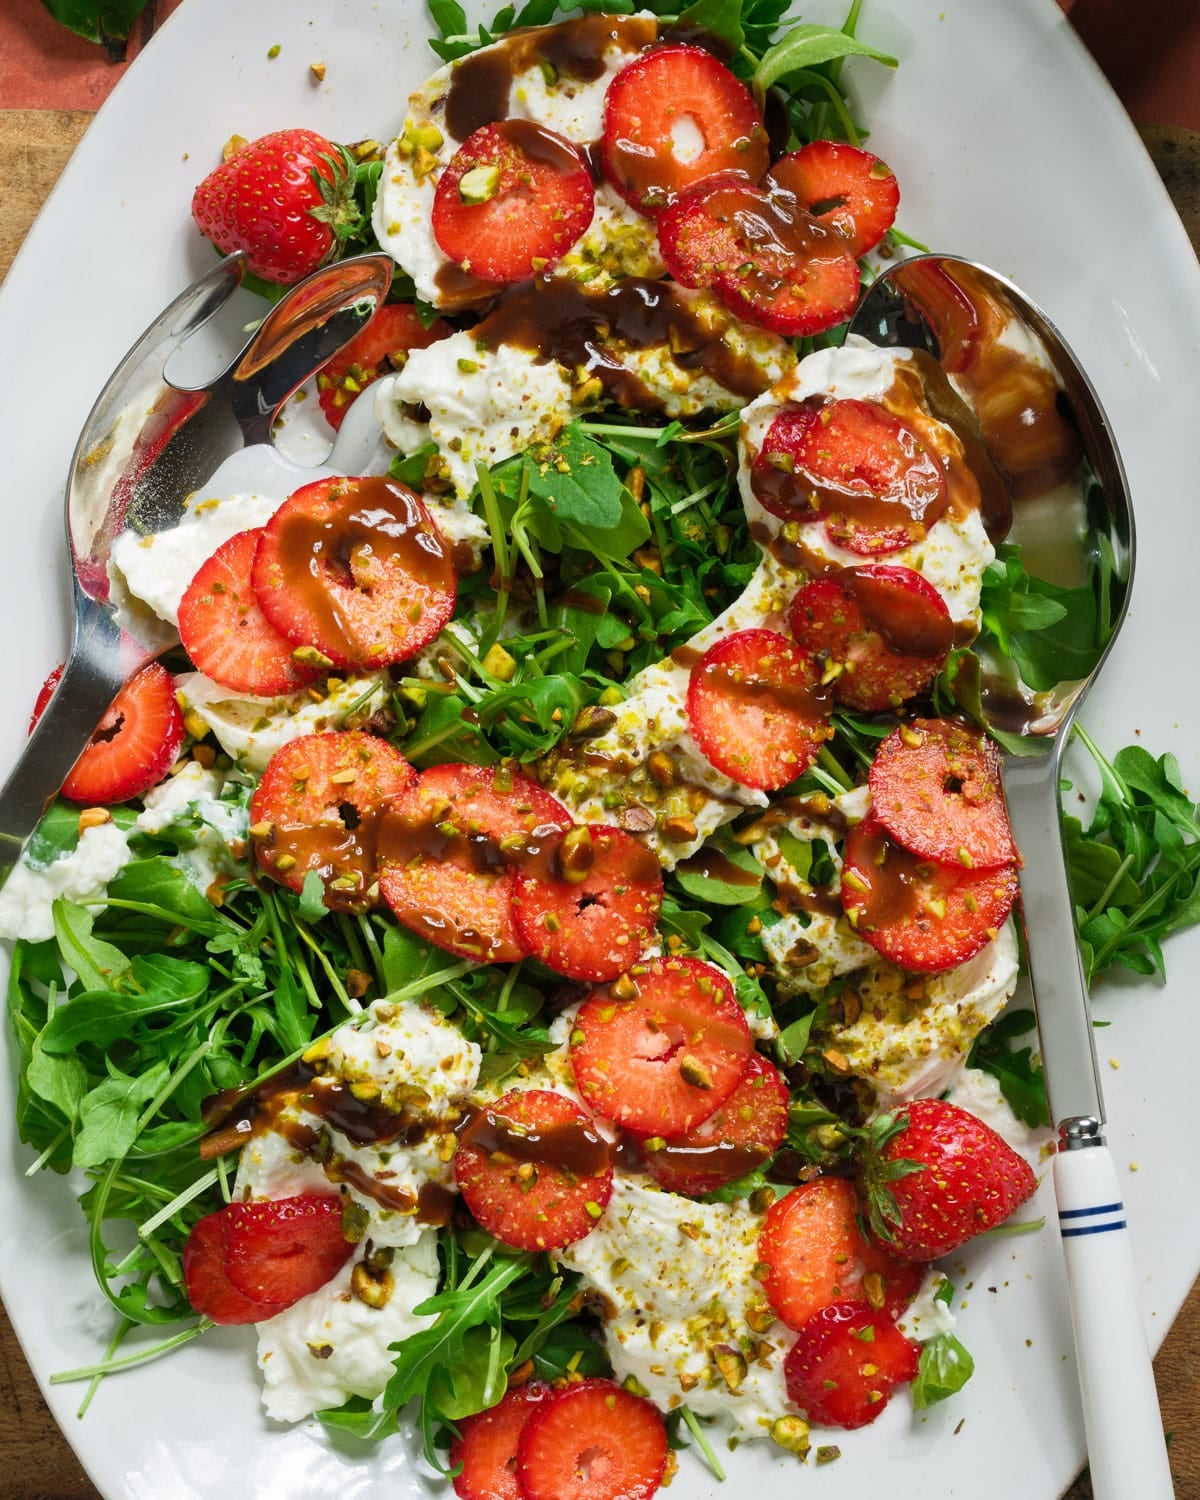
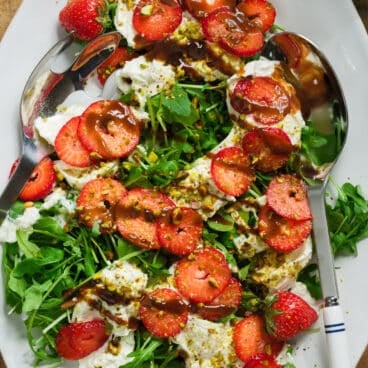
This strawberry arugula salad is a stunning 10-minute easy side dish! Ripe berries with crunchy pistachios, creamy cheese, and a tangy balsamic vinaigrette taste like summer in a bowl.
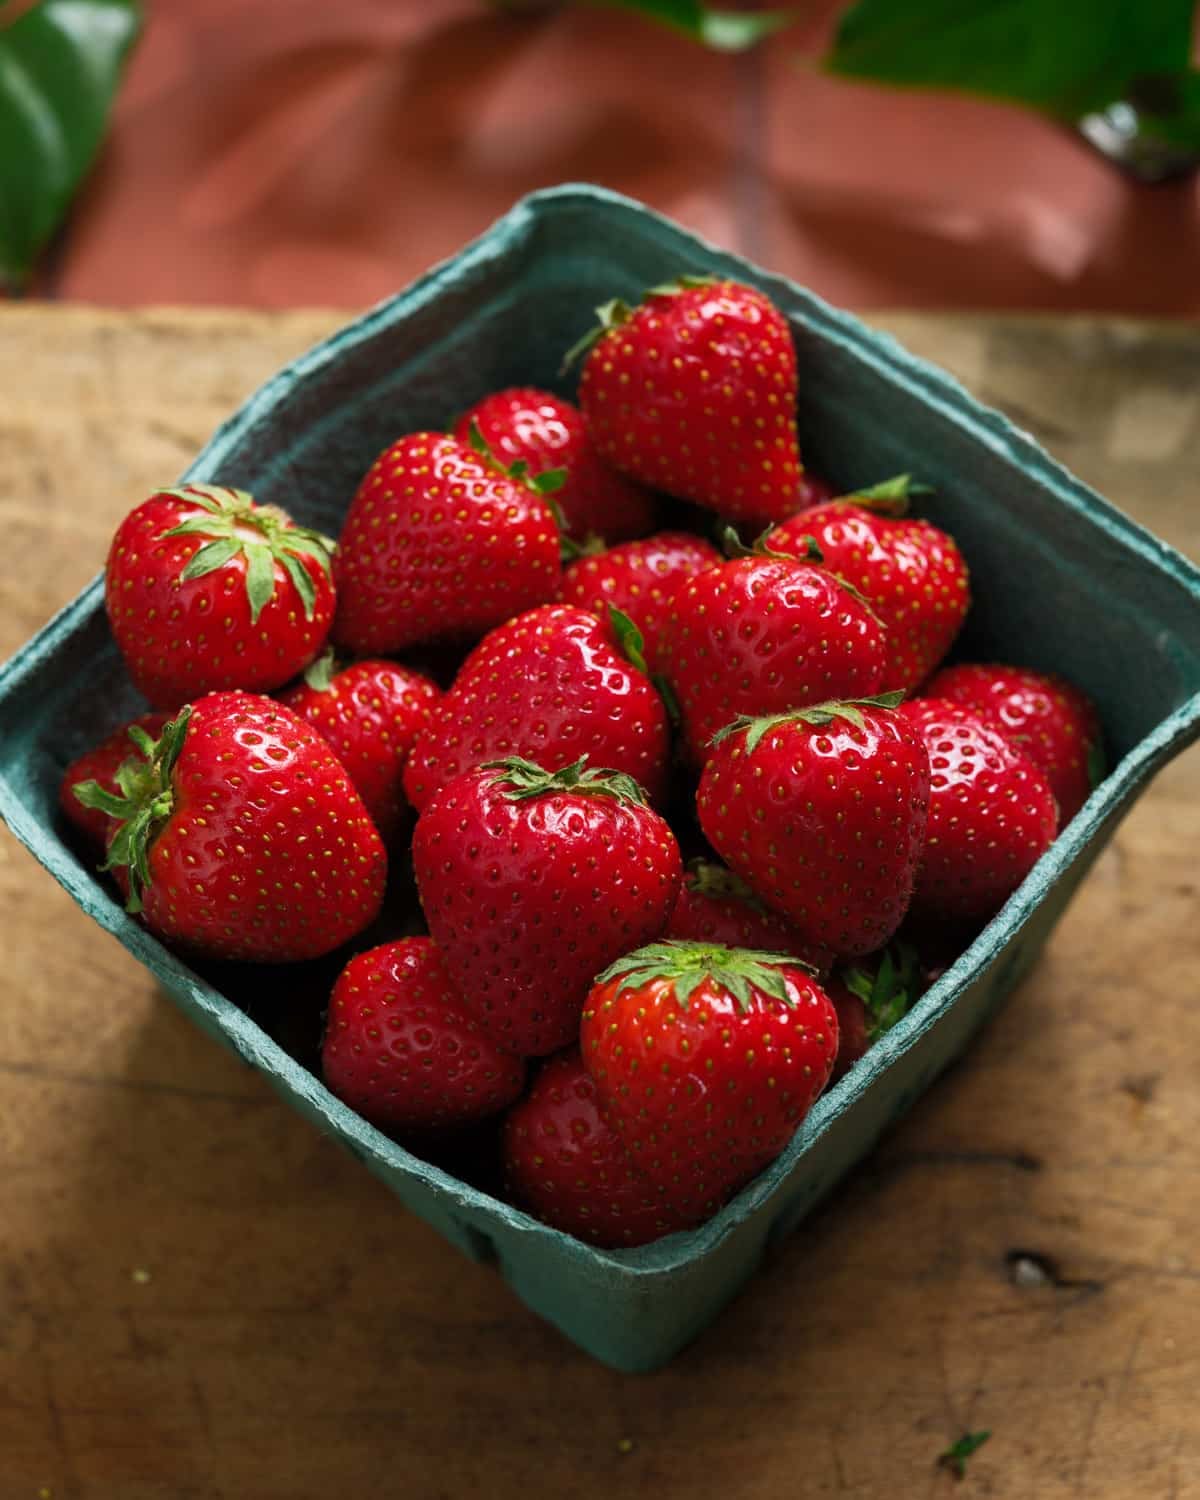
Every year I get unbelievably excited about the first strawberries at the farmer’s market. Years ago my first taste of local strawberries was truly life changing, so that sweet, fruity flavor feels nostalgic to me in the best way.
Here’s my new favorite way to eat strawberries: this insanely delicious strawberry arugula salad. I already have a very popular strawberry salad recipe but this one steps it up, with creamy cheese (burrata or feta), crunchy pistachios, and my zingy honey balsamic dressing. In 10 minutes, you’ve got a side dish that looks like it belongs on a magazine cover !
Why You’ll Love This Recipe
It’s probably the most delicious thing you’ll eat this week. I’m sorry to be dramatic, it just is!
It’s incredibly easy. No cooking, toasting nuts, or chopping: just whisking a dressing and slicing berries!
Pick burrata or feta cheese. Burrata is rich and creamy, great for special occasions. Use feta cheese crumbles for the everyday healthy version of this salad!
This is a very simple five-ingredient salad (plus a quick dressing). With foods like these, quality matters more than quantity. Here are a few ingredient notes:
Baby arugula: Always buy baby arugula, which is fluffy with mild flavor (not the mature arugula which is sold in bunches). I usually get the prewashed kind in bags or containers. Here’s my quick guide to arugula for more info.
Fresh strawberries: Find local and in-season if you can swing it; otherwise, use great store-bought berries that are in season.
Burrata or feta cheese: Burrata is the showstopper: creamy and milky against the bright berries. Feta works well for a more every-day version of the salad that fits the Mediterranean diet.
Roasted, salted pistachios: The crunchy, salty element. If you’ve only got raw pistachios, you can toast them yourself, then add a few pinches of salt to the salad.
Honey balsamic vinaigrette: My favorite sweet-tangy dressing made with balsamic, Dijon, maple syrup, olive oil, and salt. This is my go-to balsamic vinaigrette: it will make more than you need so you can save extras for future salads.
How to Make Strawberry Arugula Salad
I wanted to create a strawberry arugula salad that felt effortless to make, so this one is super simple. The full measurements are in the recipe card below!
Whisk the honey balsamic dressing. Whisk the vinegar, Dijon mustard, honey and salt, then add olive oil one tablespoon at a time, whisking after each addition so the dressing emulsifies.
Layer the salad. Spread the arugula across a large platter. Tear the burrata directly over the greens in messy pieces (or sprinkle the feta crumbles if using). Add the sliced strawberries and pistachios on top.
Dress and serve. Drizzle with about half the vinaigrette to start, taste, and add more if you want.
What to Serve Alongside
This salad is a perfect way to bring together a summer meal! Here’s what I’d recommend:
This salad is best eaten immediately. For make ahead, make the dressing in advance and store all components separately until ready to serve. Make sure to keep the arugula dry and in its original container until ready to serve.
The balsamic dressing keeps in the fridge for up to 2 weeks; allow to come to room temperature before serving.
Dietary Notes
This strawberry arugula salad is vegetarian and gluten-free. For vegan, use vegan feta. It is Mediterranean diet friendly with the feta cheese.
This strawberry arugula salad is a stunning 10-minute easy side dish! Ripe berries with crunchy pistachios, creamy cheese, and a tangy balsamic vinaigrette taste like summer in a bowl.
Make the dressing: In a medium bowl, whisk together the balsamic vinegar, Dijon mustard, honey or maple syrup, and salt until fully combined. Gradually whisk in the olive oil, adding 1 tablespoon at a time and whisking until it incorporates, until an emulsion forms. (Store refrigerated up to 2 weeks; bring to room temperature before serving).
Plate the salad: Place the arugula on a platter. If using burrata, top with torn burrata. Add the strawberries and pistachios. If using feta, sprinkle the feta on top of the berries. Drizzle with the desired amount of dressing (I start with about half, then add more to taste) and enjoy.
from A Couple Cooks https://ift.tt/uKD1t25
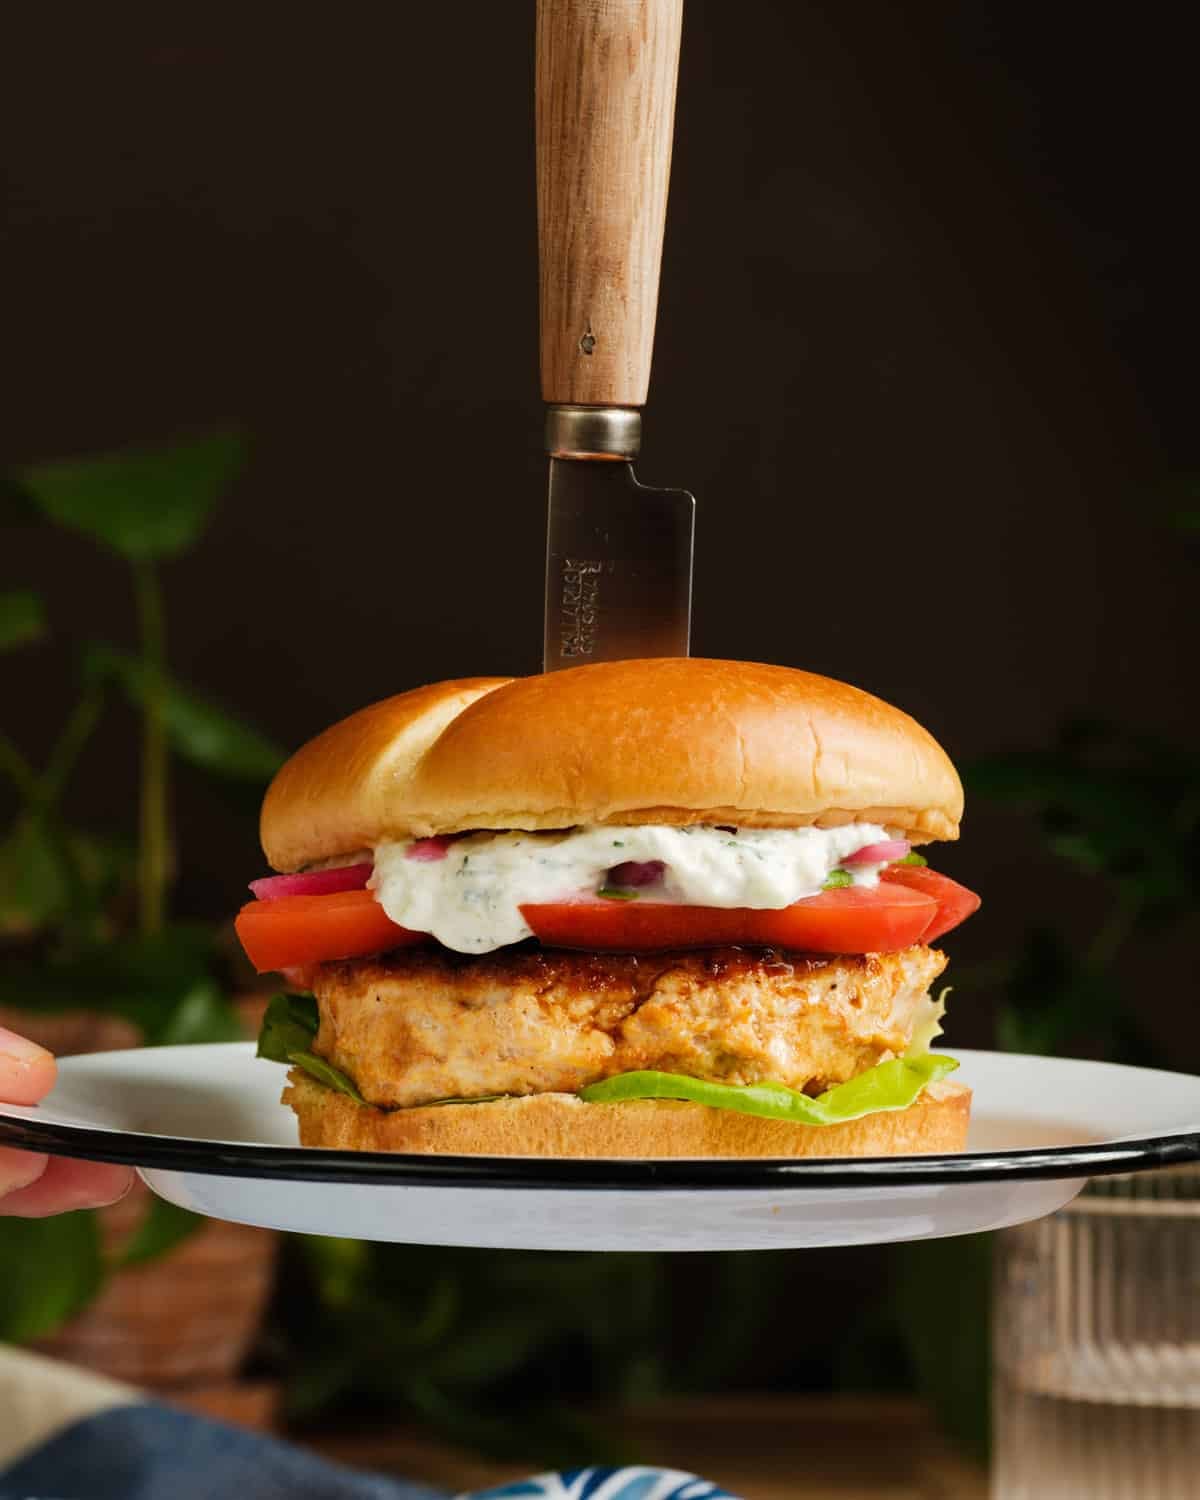
This juicy chicken burgers recipe is so easy: no breadcrumbs, no egg, just five pantry spices. It’s our family’s favorite healthy dinner that’s quick to make using the stovetop or grill!
If there’s one recipe that always goes over well as a family dinner, it’s this one: my extremely delicious and easy chicken burger! I eat the Mediterranean diet (which has limited red meat), so I wanted to create a burger recipe that fits into that way of eating.
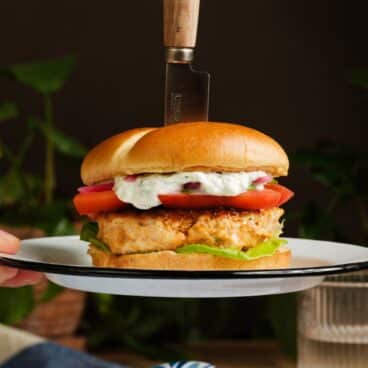
Turns out, a chicken burger is incredibly delicious, and easy to make! Most chicken burgers need breadcrumbs or egg to hold them together, but I figured out a way to make them with just spices and ground chicken (with the help of my husband Alex!). After one bite, I was hooked! You can serve them on a bun or for gluten-free, over greens with tzatziki sauce and pickled red onions.
Why You’ll Love This Recipe
Delicious healthy dinner idea: It’s high protein, gluten-free, dairy-free, and Mediterranean diet friendly, with lean ground chicken, dried spices and olive oil.
No breadcrumbs or egg needed: The seasoning blend and a quick chill in the fridge do all the binding work: no fillers required!
Quick prep: Faster than ordering takeout and a whole lot lighter!
Stovetop or grill: Two methods for whatever weather or mood you’re in.
Ingredients You’ll Need
Here is the simple ingredient list you’ll need for these chicken burgers:
Ground chicken: This is an economical option for a hearty chicken dinner.
My secret spice blend: If you know me, this is not so secret: I use smoked paprika, cumin, garlic powder, onion powder, salt and pepper to bring a big pop of flavor to these burgers.
Olive oil: Used for pan-frying.
Tips For Making Chicken Burgers That Aren’t Dry
Don’t skip this section! Ground chicken is very different to work with than ground beef. It has a lower fat content, so it’s not quite as naturally juicy and it doesn’t stick together as well. However, it makes a great burger! Here’s what to do:
1. Don’t overmix the meat. The more you handle ground chicken, the stickier it gets and the tougher the burgers are. Fold the seasonings in just until you no longer see streaks of bare meat. You’ll find you need to wash your hands a few times during the shaping process.
2. Spread the meat out before seasoning. Sprinkling the spice mix over a flat layer of chicken on a baking sheet means you can fold it in with two or three quick passes.
3. Chill the patties. Just 15 minutes in the fridge helps them firm up so they don’t fall apart when they hit the hot skillet.
4. Use a thermometer. Chicken needs to hit 165°F, but try not to overcook it or it will be tough. Use an internal read food thermometer for best results.
Topping Ideas
This is where things get fun! Here are some of my favorite toppings for these chicken burgers:
Tzatziki sauce for a cooling, cucumber-y bite — truly my favorite sauce!
Basil aioli for something a little richer and herby
I wanted to call this out because the process for grilled chicken burgers is a little different than beef burgers. Using aluminum foil first keeps the patties from sticking or falling apart while they firm up; cooking on the grates adds grill marks and a touch of charred flavor.
Preheat the grill to medium-high heat. Place a sheet of aluminum foil brushed with olive oil directly on the grates and arrange the patties on top in a single layer.
Close the lid and grill for 5 to 6 minutes, until cooked about halfway through. Flip and cook another 4 minutes on the foil.
Transfer the burgers directly onto the grill grates (off the foil) and grill for 2 to 4 minutes more, flipping once, until the internal temperature reaches 165°F (74°C) at the thickest point.
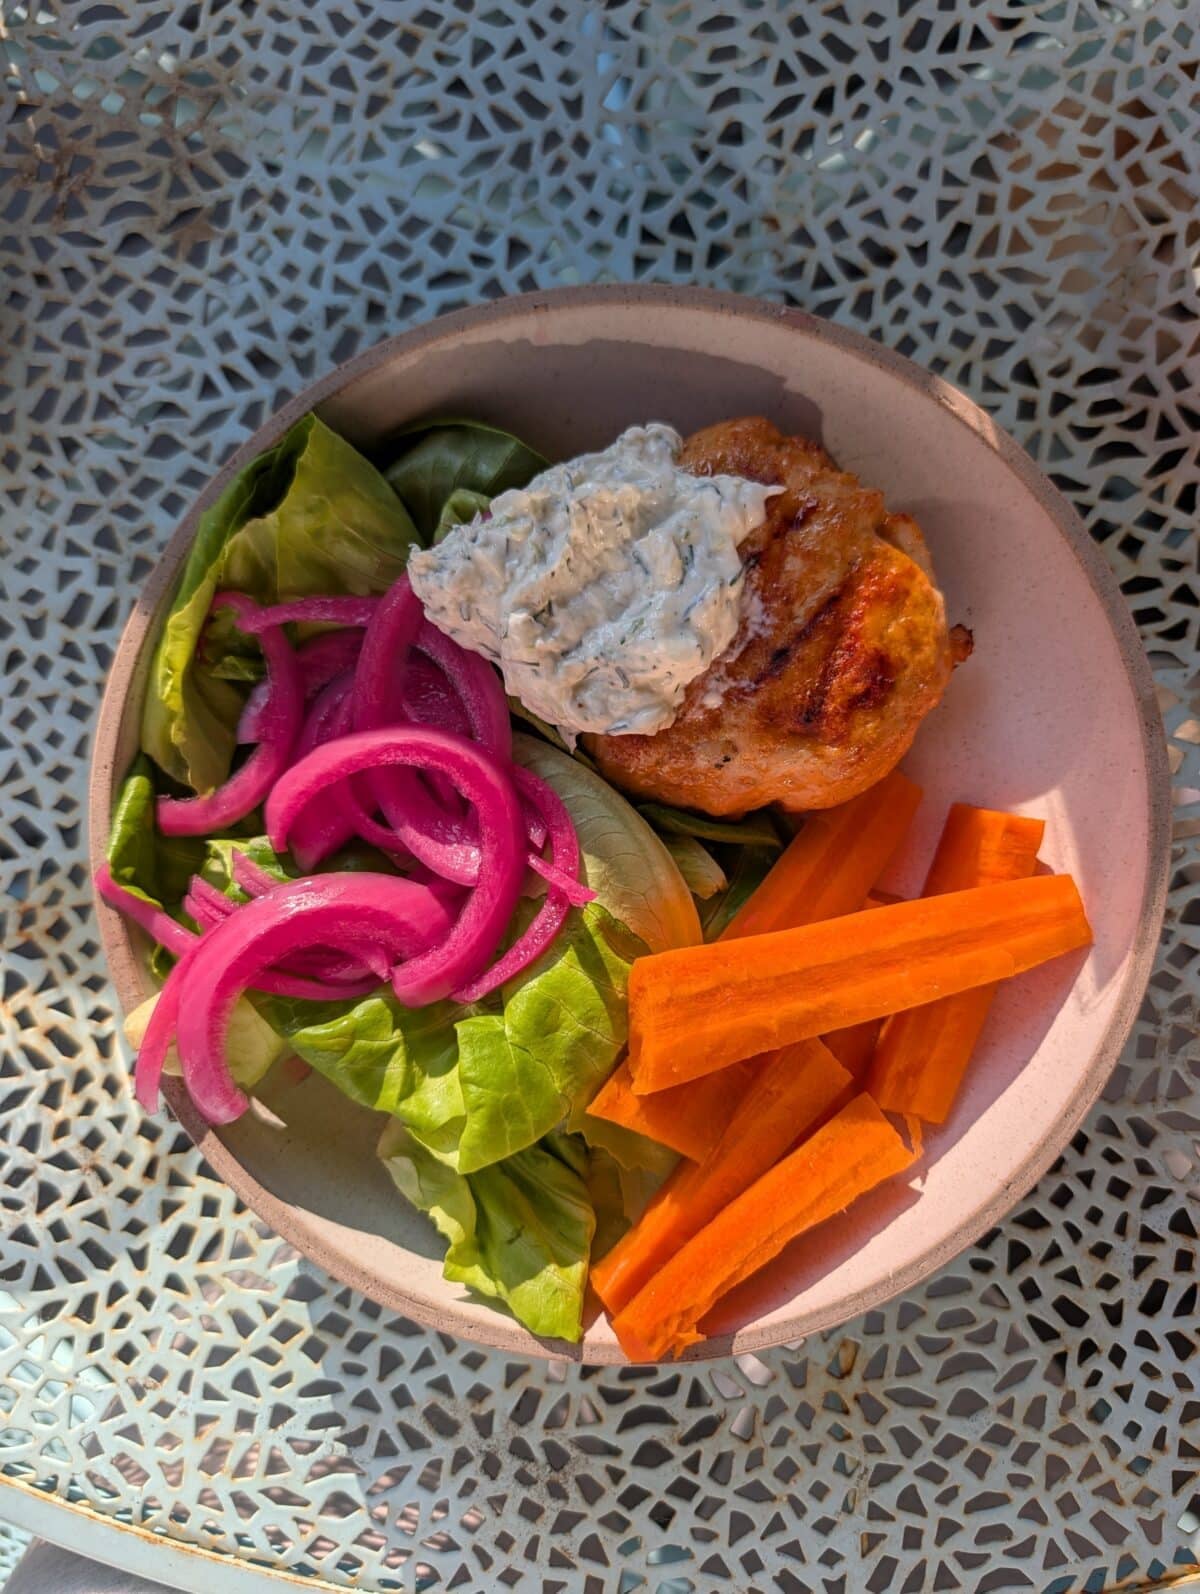
(Here’s a photo of how I served it as a real burger bowl on my patio! I would add a whole grain next time but I was low on time.)
How to Serve Chicken Burgers
While I do like a classic serving of a burger, you don’t need to serve the burger on a bun! I love serving it in a bowl with greens, sauce, and veggies. Here are a few great sides for burgers and some bowl ideas:
In a burger bowl with tzatziki, pickled onions, and other fresh veggies (and possibly a whole grain like lemon rice)
This delicious juicy chicken burgers recipe is so easy: no breadcrumbs, no egg, just five pantry spices. It’s our family’s favorite healthy dinner that’s quick to make using the stovetop or grill!
Make the burgers: In a small bowl, stir together the onion powder, garlic powder, paprika, cumin and kosher salt and pepper. Spread the ground chicken out on a large baking sheet and sprinkle it evenly with the seasoning mixture. Using your hands, gently fold the ground chicken until the seasonings are incorporated, being careful not to overmix.Form the mixture into 6 equal patties, washing your hands as needed to form smooth patties. Refrigerate for 15 minutes.
Meanwhile, prep the toppings: In a small bowl, stir together the tzatziki sauce ingredients and refrigerate until serving. Prep the other toppings.
For stovetop: Heat your largest stainless steel or cast-iron skillet over medium-high heat. Add the olive oil to the pan, then place all of the burgers into the skillet (or cook in batches). Cook for 3 to 4 minutes per side, or until lightly browned and the internal temperature reaches 165°F [74°C] when measured at the thickest point with an instant-read thermometer, taking care not to overcook.
For grill: Preheat the grill to medium-high heat. Place a sheet of aluminum foil brushed with olive oil directly on the grates and arrange the patties on top in a single layer. Close the lid and grill for 5 to 6 minutes, until cooked about halfway through. Flip and cook another 4 minutes on the foil. Carefully transfer the burgers directly onto the grill grates (off the foil) and grill for 2 to 4 minutes more, flipping once, until the internal temperature reaches 165°F (74°C) at the thickest point. (The foil keeps the patties from sticking or falling apart while they firm up; cooking on the grates adds grill marks and a touch of smoky char.)
Place the burgers on buns, or I also like to serve them in bowls with greens and the sauce and pickled onions. Leftover burgers store up to 4 days refrigerated.
Here are the top Midori cocktails that showcase this bright green Japanese melon liqueur! These drinks are sweet-tart and refreshing with fresh citrus and quality ingredients.
Got a bottle of Midori? This neon green Japanese liqueur was emblematic of drinks of the 1980’s, brightly colored and intensely sweet. It’s now back in style and and better than ever, with an earthy melon flavor that makes fruity, sweet tart drinks.
I’ve made hundreds of cocktail recipes, and I’ve found that when paired with fresh lemon juice and quality ingredients, Midori creates some genuinely delicious cocktails! Here’s a list of my best Midori cocktails, from the citrusy Japanese Slipper to the classic Midori Sour.
The most famous Midori cocktail is the Midori Sour. This 1980’s classic tastes like a liquid melon Jolly Rancher, but perfectly sweet tart! My spin is a refreshed version of this classic with real lemon and lime instead of the traditional sour mix.
The Midori Sour is a popular cocktail from the 1980’s that sprung up after the Japanese liqueur was introduced in the United States in 1978.
Ingredients: Midori, lemon juice, lime juice, soda water
Here’s an Midori cocktail that’s as sophisticated as it is stunning: the Japanese Slipper! This bright green drink is perfectly balanced between sweet and sour, with notes of melon and citrus (and it's not overly sweet or artificial tasting).
The Japanese Slipper was invented in 1984 in Melbourne, Australia by a French bartender named Jean-Paul Bourguignon. The fresh lemon and Cointreau harken back to classic cocktails.
Here’s a Midori cocktail that’s eye-catching and absolutely delicious: a spin on the Long Island Iced Tea starring the honeydew melon-flavored liqueur. It’s refreshing, zingy, and full of flavor contrasts of lemon, orange liqueur, and bright melon.
Tokyo Tea is a spin on the popular Long Island Iced Tea, invented in the 1970’s. This drink likely came about after Midori was introduced in the US in 1978.
Ingredients: vodka, tequila, white rum, gin, Cointreau, lemon juice, simple syrup, Midori, soda water
Want a spin on the classic margarita? Try it with Midori melon liqueur, which makes a refreshing and unique flavor combination that is perfect for any occasion. Up your margarita game with this deliciously easy Midori cocktail. via A Grateful Meal
Combine Midori with vodka and orange juice, and you've got another classic 1980's cocktail. This cocktail works serve in a martini glass, or you can combine it with soda water as a highball. Either way, it's an eye-catching green drink! via Dishes Delish
A few things I’ve learned after mixing up these green drinks:
Use fresh citrus, always. Midori is so sweet on its own that bottled juice or sour mix is a no-go: it dips into too sweet territory.
Less is more. Most recipes call for ½ to 1 ounce of Midori per drink. I rarely go higher, even in melon-forward cocktails: this stuff is pretty strong!
Chill your glasses. A frosty glass makes these drinks even more impressive. Try refrigerating for at least 20 minutes before serving.
Buying and Storing Midori
Midoriis a bright green, honeydew melon-flavored Japanese liqueur. It was first released in 1964 with the name Hermes Melon Liqueur. When released in the US in 1978, the name changed to Midori, the Japanese word for green.
A small bottle (375 ml) costs around $15, and a large bottle (750 ml) is about $25-30. I recommend starting with the smaller bottle if you’re new to Midori cocktails. The liqueur has a long shelf life and doesn’t need refrigeration. Store it a cool, dark cabinet away from direct sunlight.
Frequently Asked Questions
What does Midori taste like?
Midori has a distinct sweet honeydew melon flavor. It’s intensely sweet on its own, which is why it’s almost always mixed with citrus, soda, or another sour element rather than sipped neat.
What’s a good substitute for Midori?
If you don’t have Midori, the closest swap is another melon liqueur such as Bols Melon or Marie Brizard Watermelon.
Why is Midori bright green?
The neon green color comes from added food coloring. The liqueur itself is made from honeydew and yubari melons.
Does Midori go bad after opening?
Like most liqueurs, an unopened bottle of Midori will last indefinitely. Once opened, it’s best within a few years, but stored properly in a cool, dark place, it won’t spoil.
This Dijon mustard dressing is the 5-minute homemade vinaigrette you’ll make on repeat: tangy, balanced, and made with pantry ingredients. Skip bottled dressing and whisk this up instead!
This Dijon mustard dressing is as easy as they come. Really! There’s no lemon juice to squeeze and no garlic to mince: all you do is mix together a few ingredients that are probably already in your pantry.
The flavor of this vinaigrette is one of my absolute favorites: it’s perfectly balanced, tangy and savory. It takes only 5 minutes to put together this easy homemade salad dressing and I promise, it will become your new go-to!
5 Star Reader Review
“Perfect dressing for a spring salad that I was serving with crab cakes. I didn’t have maple syrup, so used local honey, and it was delicious!!” -Nancy
Ingredients in This Dijon Mustard Dressing
One of the keys to eating healthy in the long term: making your own salad dressing! Before I started cooking a lot, I had a collection of salad dressings in my fridge that were from the dark ages. Seriously, who knows when some of these dressing bottles came to be!
Since that time, I’ve stopped buying dressing altogether and started making it. It’s easy to do and you know exactly what’s in it: no preservatives or sky high sodium. Here’s what you’ll need here:
Dijon mustard: It adds tangy flavor and it’s a natural emulsifier, so it gives this dressing its creamy body. Use a smooth, classic Dijon (not whole-grain) for the right texture.
White wine vinegar: Bright, clean, and a little softer than red wine vinegar. You can use apple cider vinegar in a pinch.
Maple syrup: This rounds out the sharpness of the vinegar and mustard without making the dressing sweet. Honey is a great swap.
Extra-virgin olive oil: This is the high quality oil I use in all my salad dressing recipes.
The Secret to a Dressing That Stays Creamy
An emulsion is when a vinaigrette dressing becomes creamy and all one texture. When you’re using olive oil and vinegar, you may notice that they can tend to separate. If you whisk up your emulsion correctly, it will stay creamy as it sits. (Often when storing in the refrigerator, it will separate: so you can re-whisk it prior to serving.)
Here’s what to do to make an emulsion that stays creamy:
Use a medium sized bowl. Believe it or not, we’ve had issues using too small of a bowl when whisking a dressing. You need enough room that the whisk can move vigorously back and forth.
Whisk the olive oil in 1 tablespoon at a time. The gradual adding of olive oil is what allows the oil to seamlessly integrate. You can also drizzle it in gradually, but we find it easier to add 1 tablespoon and then whisk, then add another and whisk again.
10 Salads to Try With Dijon Mustard Dressing
This Dijon mustard dressing is so quick to make, it’s our new go-to! Of course, we have lots of homemade healthy salad dressings that we love. But this one might be the simplest! Another bonus: it’s a vegan salad dressing, too. Here are a few salads where it would work well or easily replace the dressing listed in the recipe:
This dressing keeps refrigerated for at least 2 weeks. The olive oil will solidify when cold, so pull it out about 10 minutes before serving and let it come to room temperature. Give it a quick whisk or shake before pouring.
Dietary Notes
This Dijon mustard dressing recipe is vegetarian, vegan, plant-based, dairy-free, and gluten-free.
This Dijon mustard dressing is the 5-minute homemade vinaigrette you’ll make on repeat: tangy, balanced, and made with pantry ingredients. Skip bottled dressing and whisk this up instead!
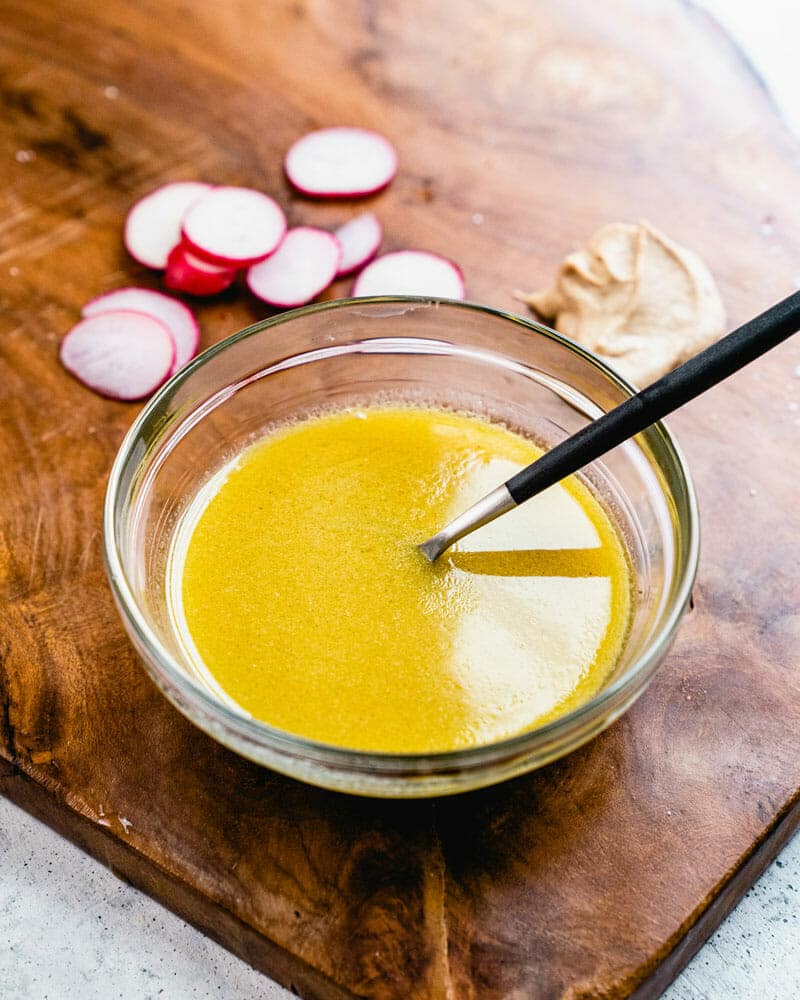
In a medium bowl, whisk together the white wine vinegar, Dijon mustard, maple syrup, and kosher salt.
Whisk in the olive oil 1 tablespoon at a time until a creamy emulsion forms. Store refrigerated and bring to room temperature before serving (keeps at least 2 weeks).
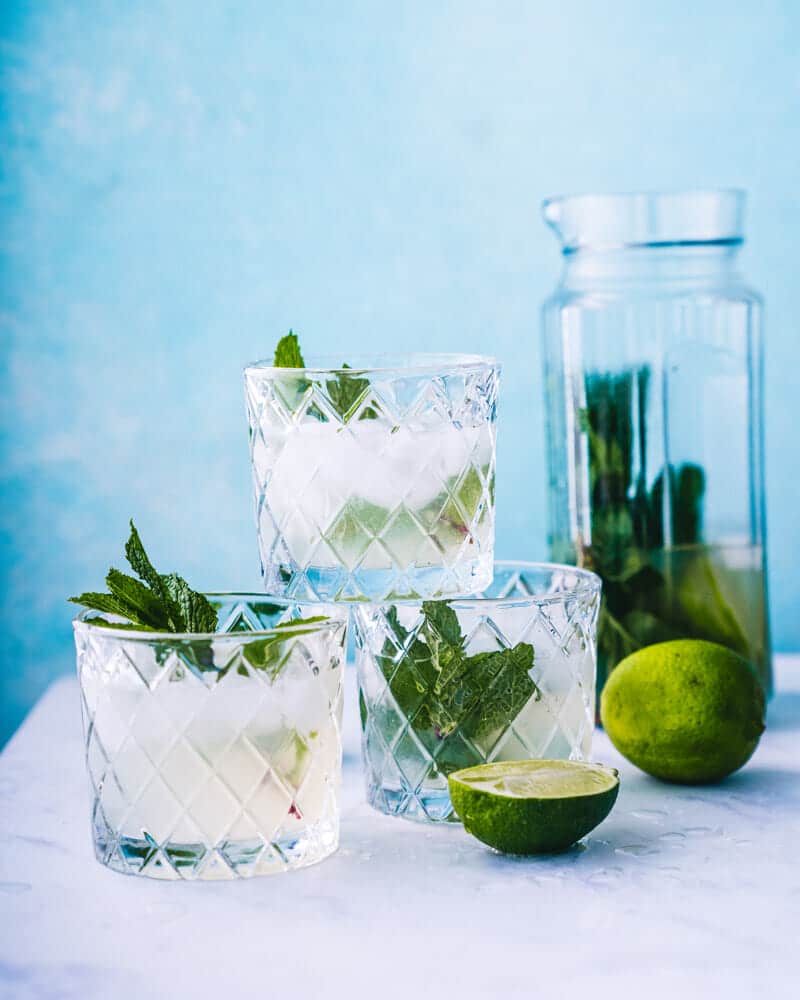
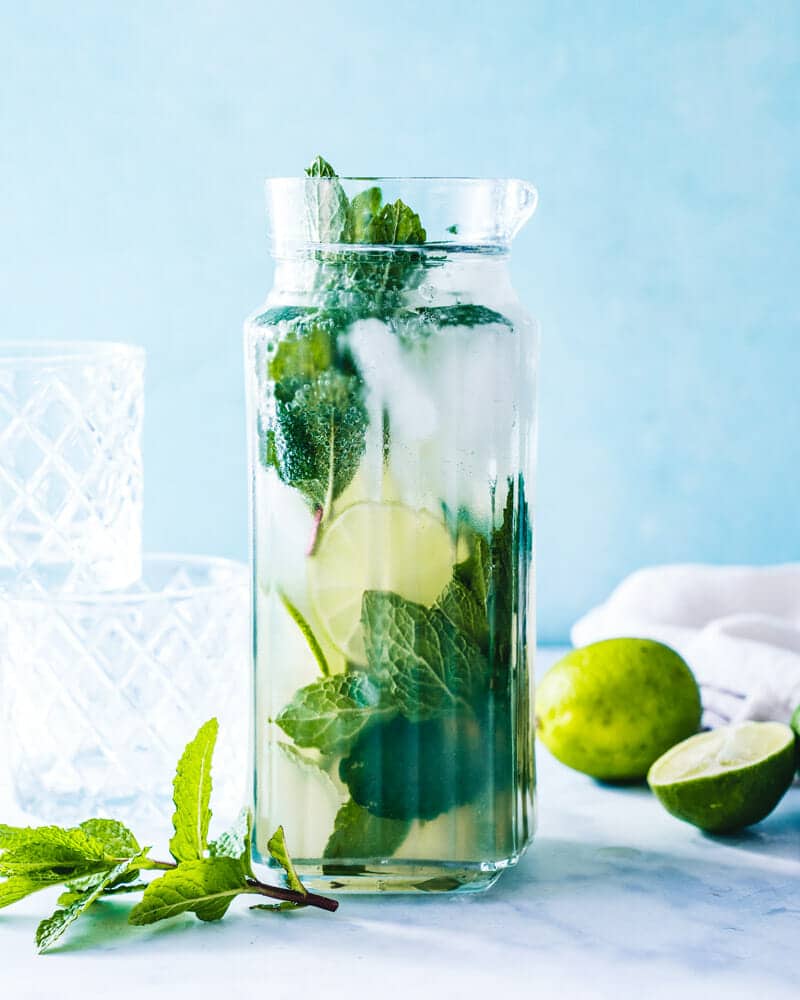
Make drinks for a crowd with my easy mojito pitcher recipe! Mint, lime, white rum, and soda water come together for the ultimate big batch summer cocktail.
The minty mojito is one of my favorite classic cocktails of all time. But have you ever tried to make more than two mojitos, one after another? It takes far too long to make them to order.
So enter: my very favorite mojito pitcher recipe! I made this big batch cocktail for an outdoor dinner, and it’s so much more fun with this party drink in your hand. It’s minty, tangy, bubbly, and every time I drink one I feel that carefree feeling like the last day of school before summer vacation!
5 Star Reader Review
“This recipe was a winner! I made it for a girls night my friend was having. Everyone loved it!” -Beth
Mojito Pitcher Ingredients
The Classic Mojito was invented in Havana, Cuba, though the exact origin is unknown. Some say it goes all the way back to the 1500’s with an early combination of lime, sugar and rum. The modern version of it gained steam in the 1930’s, when writer Ernest Hemingway helped to popularize it.
The Mojito is usually as a single drink, not a pitcher. My pitcher version uses a homemade mint simple syrup, which is a little different from the standard method. You’ll need the following ingredients:
Fresh mint leaves: Pack them loosely into a measuring cup. (Also here’s how to store fresh mint so it stays the freshest.)
Fresh lime juice: Always use fresh juice: never bottled! The flavor difference is huge.
White rum: A white rum is traditional.
Soda water or club soda: Stirred in at the last minute to keep everything bubbly!
The Key Move: A Quick Mint Simple Syrup
The standard mojito is made in a cocktail shaker: first you muddle mint, then add simple syrup, lime juice and rum. But for a pitcher version, you don’t want to have to muddle such a large quantity of the herb. That’s where the mint syrup comes in! Make a quick mint simple syrup, and it infuses minty fresh flavor into each drink. It’s similar to this mint simple syrup, but even quicker. Here are the main steps:
Place mint leaves in a pan with equal parts sugar and water.
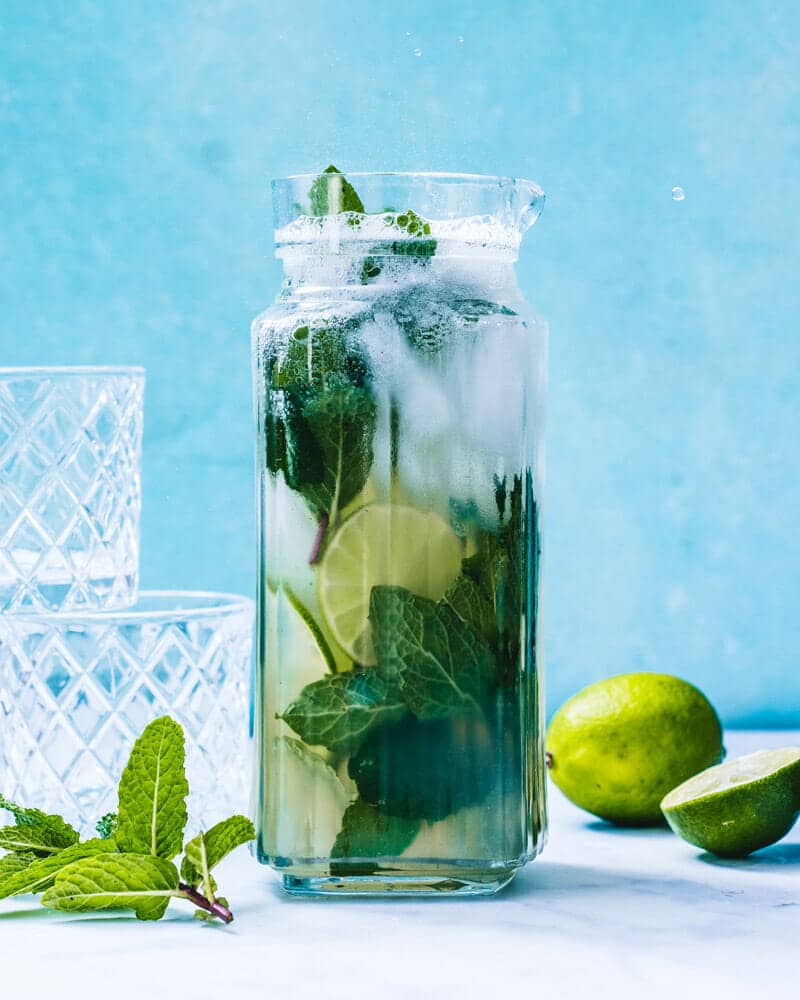
Bring to a simmer until the sugar is dissolved, then allow to sit at least 5 minutes. Then strain it into a large pitcher.
Otherwise, this mojito pitcher recipe is beyond simple. Mix the syrup with lime juice and rum, then add ice and garnishes to the pitcher. Serve topped off with soda water! Speaking of…
Soda Water vs. Club Soda: Does It Matter?
Speaking of soda water, is it club soda? Is it seltzer? In this mojito pitcher recipe, I use the term “soda water” to mean any type of unflavored sparkling water:
Soda water aka seltzer is carbonated water with no additives — straight up bubbles!
Club soda is carbonated water infused with added minerals, which give it a salty, lightly sweet flavor. It’s great in cocktails, like these top club soda cocktails.
What about tonic water? Tonic water is is carbonated water with added quinine and sugar. Don’t use it in a Mojito because of the distinct flavor. But you can use it for a Gin and Tonic, Vodka Tonic, Tequila Tonic or Whiskey Tonic!
Mojito Variations to Try
Want a few variations on this Mojito pitcher recipe? Here are a few different Mojito variations to try: you can adapt each of them to work as a pitcher!
Limoncello Mojito Add this Italian lemon liqueur for a citrusy twist
Virgin Mojito Mocktail Go virgin and skip the rum! Use the mint syrup, but you can add a hint of orgeat too if you like.
Strawberry Mojito Muddle 1 pint strawberries for a fruity variation!
Raspberry Mojito Muddle 1 pint raspberries, and add it to the mix.
The mint syrup, lime juice, and rum can be mixed in the pitcher up to two hours ahead and refrigerated. Hold off on the soda water and ice until just before serving. Any leftover mint syrup keeps in a sealed jar in the fridge for about 2 weeks — and it’s great in lemon iced tea as a sweetener.
Make drinks for a crowd with my easy mojito pitcher recipe! Mint, lime, white rum, and soda water come together for the ultimate big batch summer cocktail.
Add the sugar, water and mint to a small saucepan and heat over medium heat. Bring to a simmer and stir until all sugar is dissolved. Turn off the heat and allow it to sit for at least 5 minutes. Then strain it into a large pitcher.
Add the lime juice and rum to the pitcher. Add the extra mint leaves and the extra lime, cut into rounds. Fill the pitcher with 4 handfuls of ice. Gently stir in soda water just before serving.