Here’s how to make a Black Russian! This coffee-flavored vodka cocktail is perfect for after dinner drinks or an afternoon pick-me-up.
Here’s a cool sweet treat in the form of a cocktail: the Black Russian! This classic cocktail from the 1950’s is the perfect after dinner drink or afternoon pick-me-up. It’s got just 2 ingredients, and almost tastes like a dessert.
You might know its more popular cream-filled cousin, the White Russian. But the Black Russian is the original, and as a cocktail expert: I might like it even a little better. Here’s what to know about this classic drink.
What’s a Black Russian?
The Black Russian is a vodka cocktail with coffee liqueur. This classic cocktail was invented back in 1949, when it was created in a hotel bar in Brussels for the American ambassador to Luxembourg (here’s more about that).
So, the drink is not Russian in origin! It was named for the vodka and the black color of the coffee liqueur.
Ingredients You’ll Need
This cocktail is on the list of International Bartender Association’s IBA official cocktails, meaning that it has an “official” definition. The ingredients in a Black Russian are:
Vodka: A clean, mid-priced vodka is best here, and lets the coffee flavor lead. I like Tito’s for most vodka cocktails.
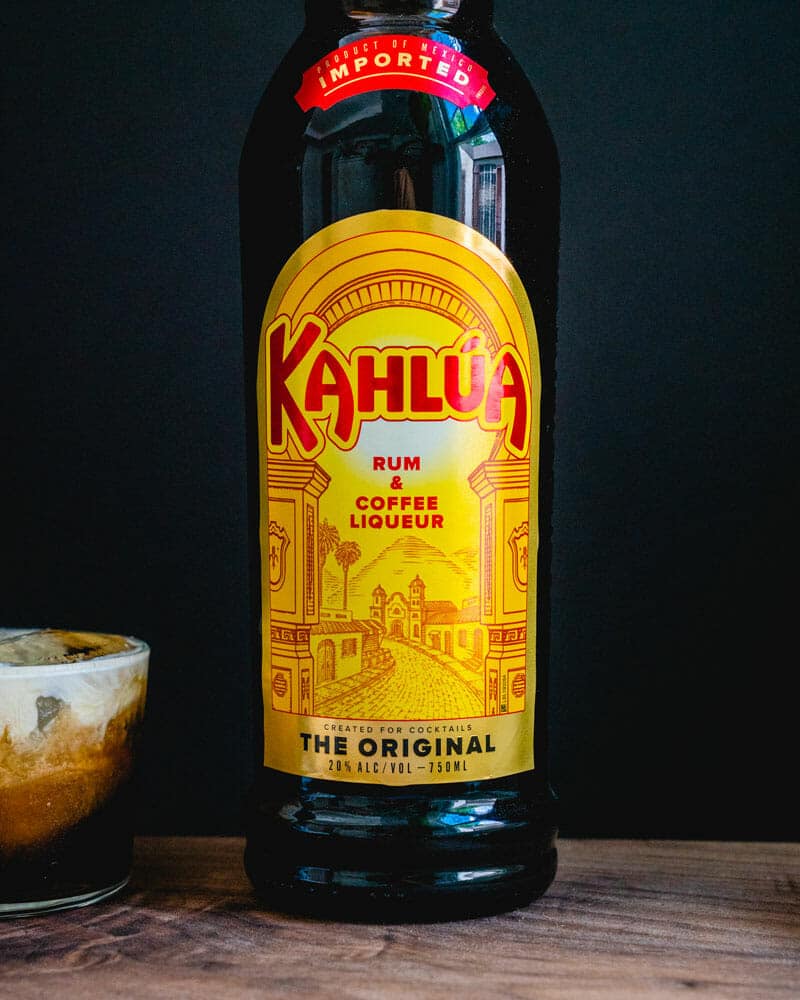
Coffee liqueur: Kahlúa is the standard and what I stock in my home bar. It’s made in Mexico from rum, sugar, and coffee. It does have some caffeine, but only about 25% as much as the same volume of coffee. A bottle runs around $20 and lasts for years when stored in a dark, dry place.
If you like coffee and sweet drinks, a Black Russian is the drink for you. The Kahlua has notes of coffee, vanilla, and brown sugar, and the neutral vodka rounds it out as the spirit.
It’s similar to a boozy iced coffee, but smoother and more rounded. I personally feel like it’s not quite as rich as a White Russian, making it easier to sip on.
How to Make a Black Russian
Once you’ve got your ingredients, this two ingredient cocktail takes only a few minutes to make. There’s one difference from the White Russian: you don’t mix the ingredients together in the glass. Instead, stir them in a mixing glass: it’s a classic stirred cocktail like the Martini. Here’s what to do:
Stir together the vodka and Kahlua in a cocktail mixing glass. Shaking dilutes the drink with ice. Adding to the glass doesn’t get it cold enough. So you have to stir it in a separate container like a cocktail mixing glass.
Don’t have a mixing glass? Use any glass or container you like to mix the drink, then strain it into the serving glass. Or, grab yourself a cocktail mixing glass. (Plus, it just looks cool.)
Black Russian vs. White Russian
What’s a Black Russian vs White Russian? The Black Russian is vodka and Kahlua, and the White Russian is the same ingredients with heavy cream. To make the popular White Russian variation, just add 1 ounce of heavy cream along with the same amount of Kahlua. To make a lighter version, you can use milk if you like. The flavor’s not nearly as creamy, but it’s lighter and easier to drink.
Why drink a Black Russian instead of the white variation? Well, it’s healthier with less calories! Even better, we prefer the flavor and simplicity of the straight version to its creamy cousin.
More Variations to Try
There are a few other riffs on the Black Russian theme that are worth mentioning! If you’re a fan of this drink, make sure to try:
Mind Eraser: Essentially a layered version of the Black Russian, topped with soda water! It’s bubbly and refreshing.
Colorado Bulldog: Try the White Russian in a highball glass with a splash of cola, and it tastes like a root beer float.
When to Serve a Black Russian
The Black Russian is a sweet cocktail, almost a dessert! It works before dinner, after dinner, or anytime in between. Serve it as a:
This easy cilantro lime sauce is a zesty spin on ranch with bright lime and fresh cilantro! No blender needed: just stir it up and drizzle on grain bowls, tacos, and more.
Hello, and welcome to my new favorite sauce: this quick cilantro lime sauce! It’s is perfect for dolloping grain bowls, drizzling over tacos, and more. It’s a zingy version of ranch dressing meshed with the Mexican flavors of lime and cilantro.
The best part: no blender required. Because here’s the thing: when I’m making a fast dinner recipe, the last thing I want to do is get out the blender. (Yep, I’m lazy.) So here’s a fast and easy sauce: all you have to do is chop a few ingredients and stir!
5 Star Reader Reviews
“This was so, so good. I am totally addicted to this sauce and now put it on everything!” -EMM
“Love love love this cilantro lime sauce on our blackened fish tacos! Super creamy, nice flavor and compliments a spicy dish perfectly. Thank y’all for sharing!” -John
Ingredients You’ll Need
I created this cilantro lime sauce to go with my Easy Rice Bowls. I wanted a drizzle that would add lots of flavor to the bowl without being too time consuming. Here’s what you’ll need:
Greek yogurt + mayonnaise: This sauce uses our famous combo of Greek yogurt plus mayo to make a light and flavorful creamy sauce. The yogurt offsets the richness of mayo. You’ll see the same idea in many of our recipes, like our tuna salad, egg salad, and homemade ranch.
Cilantro: Here you’ll chop it as finely as possible.
Lime: The lime brings a bright zing to the sauce.
Garlic powder and onion powder: These bring the ranch-like savoriness.
Dried dill: This is the element that completes the ranch flavor! You can omit if you want more straightforward Mexican flavors: it’s still good.
How to Make Cilantro Lime Sauce
The best part of this cilantro lime sauce: you don’t need to dirty a blender! When I’m making a fast and easy dinner, it seems like a big obstacle to get a blender dirty. Of course, you can use a blender if you’d like a creamier texture and a light green color. Here are a few notes on the two processes:
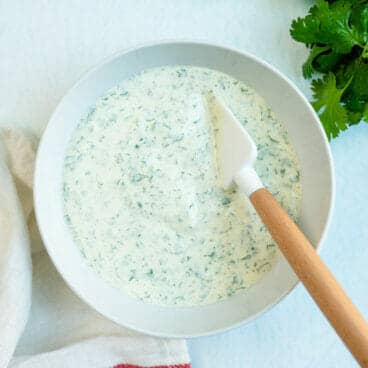
Stirring method: Chop the veggies as finely as possible. Because you won’t be using a blender, you’ll need to chop that cilantro as finely as possible so the sauce is relatively smooth. The sauce will be white with green flecks, as you see in the photos.
Blending method: Immersion blend for a light green sauce. Want a light green sauce that’s fully creamy? You can blend it to get a more uniform texture. It’s easiest to use an immersion blender or food processor, due to the small quantity of ingredients.
Sauce Variations To Try
Looking for a different type of cilantro lime sauce? We’ve got lots of variations. Here are some of our other favorite cilantro lime sauces:
Cilantro Lime Dressing(a favorite!) — A bright green, blended dressing that adds big flavor to any salad or burrito bowl.
You can use this cilantro lime ranch sauce in a multitude of recipes! It’s inspired by Mexican flavors fused with ranch dressing, which makes it work in lots of ways. Here are some ideas:
Leftover cilantro lime sauce lasts up to 1 week in an airtight container in the refrigerator. It’s best within a few days. Give it a quick stir before serving.
Dietary Notes
This recipe is vegetarian and gluten-free. For vegan, see the Variations section above.
This easy cilantro lime sauce is a zesty spin on ranch with bright lime and fresh cilantro! No blender needed: just stir it up and drizzle on grain bowls, tacos, and more.
In a medium bowl, mix the cilantro and lime juice with the Greek yogurt, mayonnaise, sugar, garlic powder, onion powder, dill, salt and pepper. (Alternative: You can blend all ingredients using an immersion blender or in a food processor if you’d like a smooth, light green sauce.) Eat immediately or refrigerate up to 1 week.
More Cilantro Recipes
Cilantro might be a controversial ingredient, but we’re solidly on Team Cilantro! Here are a few more cilantro recipes to use up the bunch:
Cilantro Lime Shrimp A healthy, easy dinner recipe that takes just 10 minutes! Serve with rice, in tacos, or as a Mexican-style salad topping.
Best Salsa Recipe The very best salsa recipe! This fresh salsa features ripe and juicy tomatoes, cilantro, jalapeño, and lots of lime.
Simple Guacamole Creamy, savory and perfectly balanced, you’ll hear a chorus of “Wow’s” every time you serve it.
from A Couple Cooks https://ift.tt/0gBEpmT
Learn how to make a grain bowl with whole grains, protein, fresh veggies, and creamy tahini sauce. It’s a healthy, fast, and easy 30-minute dinner!
Want to make a grain bowl? Bowl meals are so popular these days, and often they’re on our table because it’s one of the easiest ways to turn random ingredients into a healthy dinner!
Here’s the thing: you can’t just throw anything into a bowl. A good grain bowl has to be well-seasoned, and play up contrasts in color, texture and flavor. It’s got to have enough protein to keep you full, and a great sauce to bring it all together. I’ll talk you through a few steps, and then show you our favorite grain bowl that makes a fast and easy dinner in 30 minutes.
Why You’ll Love This Grain Bowl
It’s ready in 30 minutes. With a few make-ahead tricks, it’s even faster!
It’s filling. Protein and fiber from the grains and chickpeas keep you full for hours.
It’s a leftover hero. A grain bowl a great way to turn random fridge bits into a real meal.
It’s plant-based and crowd-friendly. Vegan, vegetarian, and easy to adapt for any eater.
What Is A Grain Bowl?
A grain bowl is a one-bowl meal that combines cooked whole grains, protein, vegetables, and a flavorful sauce. It’s similar to a Buddha bowl or poke bowl, but what goes into a grain bowl is up to you.
When you choose the elements for your grain bowl, you’ll have to keep contrasts in mind! Think about textures, colors, and flavors as you pick out each of the elements. You don’t want a bowl that’s all mushy, drab, or all the same flavor profile. Here are a few notes:
Texture: Whole grains are fluffy, beans and chickpeas can be soft. Think about adding a crunch with raw veggies, needs or seeds.
Color: We eat with our eyes! No one wants a brown or yellow bowl. Add colorful fresh or cooked veggies to round out the bowl! The more colors, the better.
Flavor: Using several components naturally makes flavor contrasts. Think about contrasts in elements that are savory, naturally sweet, tangy, salty, and even lightly bitter.
How to Build a Grain Bowl: The 4 Elements
1. Pick your grain
The grain is your foundation, and it’s where the “healthiest grain” question usually comes up. Honestly, there’s no single best one—they each bring something. Here are my favorites:
Quinoa: My top pick. It cooks in about 25 minutes, and is naturally gluten-free with a complete protein.Try my Seasoned Quinoa.
Millet and Freekah: A few additional unique whole grains. Try my millet recipe or freekah recipe.
2. Add a protein
Protein is what keeps a grain bowl from leaving you hungry an hour later. My standby is easy canned chickpeas—my five-minute trick for making a bland can of beans taste fantastic. But you have plenty of options depending on the night:
This is where color and freshness come in. For my Mediterranean bowl I like for cherry tomatoes, sliced English cucumber, and red onion. But almost anything works, like avocado, broccoli, peppers, cauliflower, zucchini, spinach, kale, roasted sweet potatoes, carrots, green beans, eggplant, asparagus, cabbage, mushrooms, Brussels sprouts, or roasted vegetables.
4. Finish with a sauce
A great sauce is the difference between a random bowl and a “delicious grain bowl”. Here are some of my favorite sauce ideas:
Using a vague theme can be helpful for tying a grain bowl together. It’s not necessary, but using flavors that go from a specific cuisine can make for harmony in the bowl! Here are a few ideas:
Mediterranean style: That’s the style of this easy grain bowl! It’s got Mediterranean or Greek style elements like tahini sauce, chickpeas, cucumber and tomatoes.
Mexican style: Try a bowl like this Rice Bowl with rice, black beans, and cilantro sauce.
Moroccan style: Roast up a bunch of veggies for a Roasted Vegetable Bowl with freekah and lemon yogurt sauce.
Japanese style: Try a Sushi Bowl with sushi rice, ahi tuna, and healthy veggies.
My 30-Minute Grain Bowl Concept
This easy grain bowl is Mediterranean-inspired and takes just 30 minutes to make into a healthy lunch or dinner! Because some grains can take longer to cook, this concept can often take longer than 30 minutes if you make them all at once. This recipe is quick and easy! Make it even faster with our make-ahead tips below. It’s a plant based and vegan recipe that’s great for weeknight cooking. Here are the elements that make this grain bowl so quick:
Easy chickpeas: These Easy Canned Chickpeas are our trick on how to make a bland can of beans taste great in just 5 minutes! We use this trick all the time in the kitchen.
Seasoned quinoa: This Perfect Seasoned Quinoa is another trick to make quinoa taste fantastic. Put on a pot and make the rest of your components.
Mediterranean-style veggies: Grab your tomatoes, cucumber, and some Kalamata olives if you’d like.
Tahini sauce: This Tahini Sauce works for lots of different bowls: and it’s perfect for this one with a Mediterranean flair.
How to Serve and Store
Want to make a grain bowl ahead of time? Great! Because it can take a while to prepare all the components. To make the fastest healthy dinner or lunch, think about doing a few things in advance. Here are a few ideas:
Cook the grain in advance. Refrigerate until serving. Reheat on the stovetop lightly, or just serve it at room temperature. Rice can dry out, so when you reheat it on the stovetop, add a splash of water and then cover it so it can steam. Leftovers last up to 5 days.
Cook the protein in advance. If you’re making a bowl with chicken, fish, or tofu, you can cook that in advance and refrigerate until serving. Leftovers last 3 to 4 days.
Use a grain bowl to use up leftovers! The best part about bowl meals? They’re great for leftovers. Use the bowl concept to eat up leftover items you’ve cooked throughout the week.
Dietary Notes
This grain bowl recipe is vegetarian, vegan, plant-based, dairy-free, and gluten-free.
Make the grain: Go to Seasoned Quinoa to make the quinoa, or follow the other whole grain recipes listed above. The quinoa takes about 25 minutes total, so use the cook time to prepare the remaining ingredients.
Make the chickpeas: Drain and rinse the chickpeas. Mince the garlic. In a large skillet, heat the olive oil over medium heat. Add the garlic and sauté for 1 minute until fragrant but before it browns. Add the chickpeas, smoked paprika, salt, and several grinds of black pepper. Cook 2 minutes until warmed through.
Assemble the bowls: Place the quinoa and chickpeas in the bowl. Add the fresh veggies and drizzle with the sauce. (Meal prep notes: You can make quinoa, chickpeas, and dressing in advance: quinoa stores refrigerated 5 days and chickpeas store 3 to 4 days, and the dressing stores 1 month.)
Notes
*This makes a solid 4 to 6 servings of protein. If you’re cooking for 1 or 2, make half this recipe (or go to Easy Canned Chickpeas.)
from A Couple Cooks https://ift.tt/wu1Dx8d
This lemon zucchini bread is incredibly moist with a bright citrus zing! Bake it up and top it with a zesty glaze.
Here’s a surprise favorite in my house when it comes to zucchini recipes: Lemon Zucchini Bread! Honestly, I’d make this instead of classic zucchini bread every time. This loaf is incredibly moist, super zingy from the lemon zest and topped with a flavor-popping sweet glaze.
Cut it into thick slices and it’s extremely irresistible. I’m a huge chocolate person, but this is my favorite variation on zucchini bread (though this Chocolate Zucchini Bread is an extremely close second!).
5 Star Reader Reviews
“What a keeper! Moist! Delicious! I found the cake not to be too sweet at all with the amount of sugar in the recipe. Do not leave off that wonderful glaze!! It was just the ticket to pull the whole flavor profile together in the best way!” -Terry
“My two breads came out very well!! Very moist. I didn’t make to glaze and found it to still be delicious. Thank you.” -Cathy
Ingredients in Lemon Zucchini Bread
This lemon zucchini bread is a spin on my classic zucchini bread, using lemon juice, zest, and a sweet lemon glaze. But it tastes even greater than just a citrus variation: it transforms its entire character from comforting and homey to bright and zippy! I could not stop sneaking bites of this one. The glaze absolutely makes the flavor, so don’t be tempted to leave it out. Here are the ingredients you’ll need:
Zucchini: It melts right into the batter and brings a moist texture to this bread. I like to shred using the large holes on a grater so you can see the zucchini shreds, but you can use the small holes if you want it to fully disappear.
Lemon zest and juice: The zest carries most of the flavor, so don’t skip it. Here’s how to zest a lemon cleanly.
All-purpose flour: This provides the structure of the loaf.
Unsalted butter and neutral oil: I like using butter for flavor and oil for that bakery-style moist crumb.
Granulated sugar and powdered sugar: Granulated sweetens the bread; powdered sugar makes the glaze.
Eggs, vanilla, baking powder, baking soda, and salt: The usual quick-bread supporting cast.
How to Shred Zucchini For This Loaf
Prepping the zucchini is the only slightly fussy part, and it takes about two minutes. A few notes that make a difference:
Use the large holes of a box grater. They give you long, soft shreds that disappear into the batter. A food processor with a shredding disc works too. You can use the small holes of the grater if you want it to fully disappear into the texture,
No need to peel or deseed. For a standard medium zucchini, the skin is thin and the seeds are small. But if you’re working with a giant late-season zucchini, scoop out the spongy seed core first.
Don’t squeeze out the liquid. For this recipe the answer is no! The moisture in the shredded zucchini is what keeps the loaf soft, and the batter is balanced for un-squeezed zucchini.
The Secret to a Lemony Loaf
This recipe uses a trick for enhancing the lemon flavor. Instead of adding the lemon zest right to the recipe, you’ll place the zest in the sugar and use your hands to rub it into the sugar for a minute or so. This activates the essential oils in the zest, helping it to taste more lemony than it would without this step.
Tips For the Best Lemon Zucchini Bread
If you’re a zucchini bread fan, you’ll know it’s simple to mix up: mix the wet and dry ingredients, pour in the pan, and bake! Here are a few tips for making the perfect bread:
Zest your lemon first before juicing it. Lemons are difficult to grate once they’re juiced, so don’t forget the zest. A microplane grater makes quick work of it; it’s a handheld grater with small sharp holes that’s easier to use and clean than a box grater.
Use an aluminum baking pan for best results. Ceramic and glass pans don’t cook as evenly for quick breads. Use aluminum if you can! I recommend a 9-inch loaf pan, but you can use an 8-inch pan too: just increase the bake time slightly.
Don’t overmix! This is extremely crucial when making a zucchini bread. Overmixing a quick bread batter leads to holes in the texture of the crumb. Mix until the batter is combined and there are no dry spots remaining.
Tips For the Lemon Glaze
What makes this lemon zucchini bread is the glaze, which infuses a huge citrus burst. It brings the flavor to just the right pop, so I think it’s required here. Here’s what to know about the glaze:
Wait until the bread is cool prior to icing. Otherwise, the icing will melt into the bread.
Use a fork for drizzling. I’ve found that a fork makes the best drizzly lines: with a spoon it’s a bit too chunky.
Use less if desired. You can make a half recipe of the icing if you’d like to cut the sugar.
Recipe Variations
Once you’ve got the base loaf down, it’s easy to riff on this concept:
Lemon poppy seed: Stir a tablespoon of poppy seeds into the batter for a Lemon Poppy Seed Muffin vibe.
Lemon blueberry: Fold in 1 cup fresh blueberries (toss them in a little flour first so they don’t sink), like my Lemon Blueberry Bread.
Cream cheese glaze: Swap the lemon glaze for a cream cheese frosting loosened with a little lemon juice.
Storing Leftovers
This lemon zucchini bread is best stored refrigerated because of the lemon glaze. Refrigerate wrapped in aluminum foil for up to 10 days, then bring to room temperature before enjoying.
You can also freeze un-iced bread for up to 3 months: slice it into pieces and wrap it in plastic wrap then a freezer-safe bag or container.
Dietary Notes
This lemon zucchini bread recipe is vegetarian.
Frequently Asked Questions
Can you taste the zucchini in this bread?
No, you cannot taste the zucchini in this bread. It adds moisture and a tender texture without affecting the lemony flavor.
Can I substitute the zucchini with another vegetable?
While zucchini is the most common vegetable used in this bread, you can experiment with substituting yellow squash. Keep in mind that the flavor and texture may vary slightly.
Can I reduce the amount of sugar?
Yes, you can reduce the sugar by up to ¼ cup without affecting the texture too much. However, keep in mind that reducing the sugar will make the bread less sweet and the texture more tough.
Can I add poppy seeds or other mix-ins to the batter?
Absolutely! Poppy seeds are a classic addition to lemon bread, but you can also try adding chopped nuts or even a streusel topping for extra flavor and texture.
My bread sunk in the middle, what happened?
If your bread sunk in the middle, it could be due to underbaking or opening the oven door too frequently during baking. Make sure to bake the bread until a toothpick inserted into the center comes out clean, and avoid opening the oven door too often to maintain a consistent temperature.
2 cups shredded zucchini, packed (about 3/4 pound or 2 medium zucchini), grated with large grater
Lemon Glaze
1 cup powdered sugar
2 tablespoons fresh squeezed lemon juice
Instructions
Preheat the oven to 350°F. Butter a 9×5-inch loaf pan.
Place the lemon zest in a large bowl with the sugar. Use your fingers to rub the zest into the sugar until it is fragrant (this activates the flavor of the zest).
Whisk in the melted butter, oil, eggs, vanilla, baking powder, baking soda, salt, and lemon juice. Use a spatula to mix in the flour and zucchini until just combined.
Pour the batter into the loaf pan. Bake 60 to 65 minutes (insert a toothpick into the center of the loaf: if it comes out with a few clinging crumbs, it’s done!)
Cool the bread in the pan for 30 minutes. Then run a knife around the edge and invert the loaf onto a cooling rack. Allow to cool fully to room temperature, at least 1 hour or more.
Mix the glaze ingredients in a small bowl until it comes together into a smooth icing (if it is too runny add a bit more powdered sugar; if it’s too thick add a few drops more liquid). Use a fork to drizzle the top of the bread with the icing. Allow the glaze to dry for 15 minutes, then slice into pieces and serve.
The bread lasts 3 to 4 days at room temperature wrapped in aluminum foil or refrigerated for 10 days wrapped in foil (bring to room temperature before enjoying). You can also freeze un-iced bread for up to 3 months (slice it into pieces and wrap it in plastic wrap then a freezer-safe bag or container).