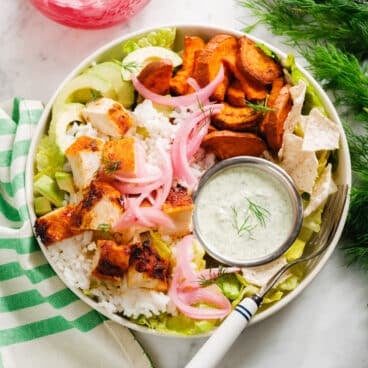
This chicken rice bowl is loaded with sweet potatoes, crisp romaine, and pickled red onions, all drizzled with an herby Green Goddess Ranch! It’s a satisfying, meal-prep-friendly dinner.
Who doesn’t love a good bowl meal? Honestly I eat about 9 of 10 dinners right out of a bowl. This chicken rice bowl recipe is one of my new favorite ways to do it, inspired by my recent Sweetgreen order.
There’s tender sweet potato, hearty chicken, crunchy romaine and tangy pops of pickled red onions, all brought together by the creamy, herby Green Goddess Ranch dressing. I could eat it every night! This is a great dinner idea for meal prep where you make one or more components ahead, making it come together simply when you’re ready to eat.
What You’ll Need
For this rice bowl recipe, I modeled it loosely off of the Chicken Avocado Ranch bowl at Sweetgreen, but it’s my own creation. Here’s what you’ll need:
Long grain white rice: You can cook the rice or even use packets of pre-cooked rice for ease of prep (I like the brand Seeds of Change). See below for rice variations.
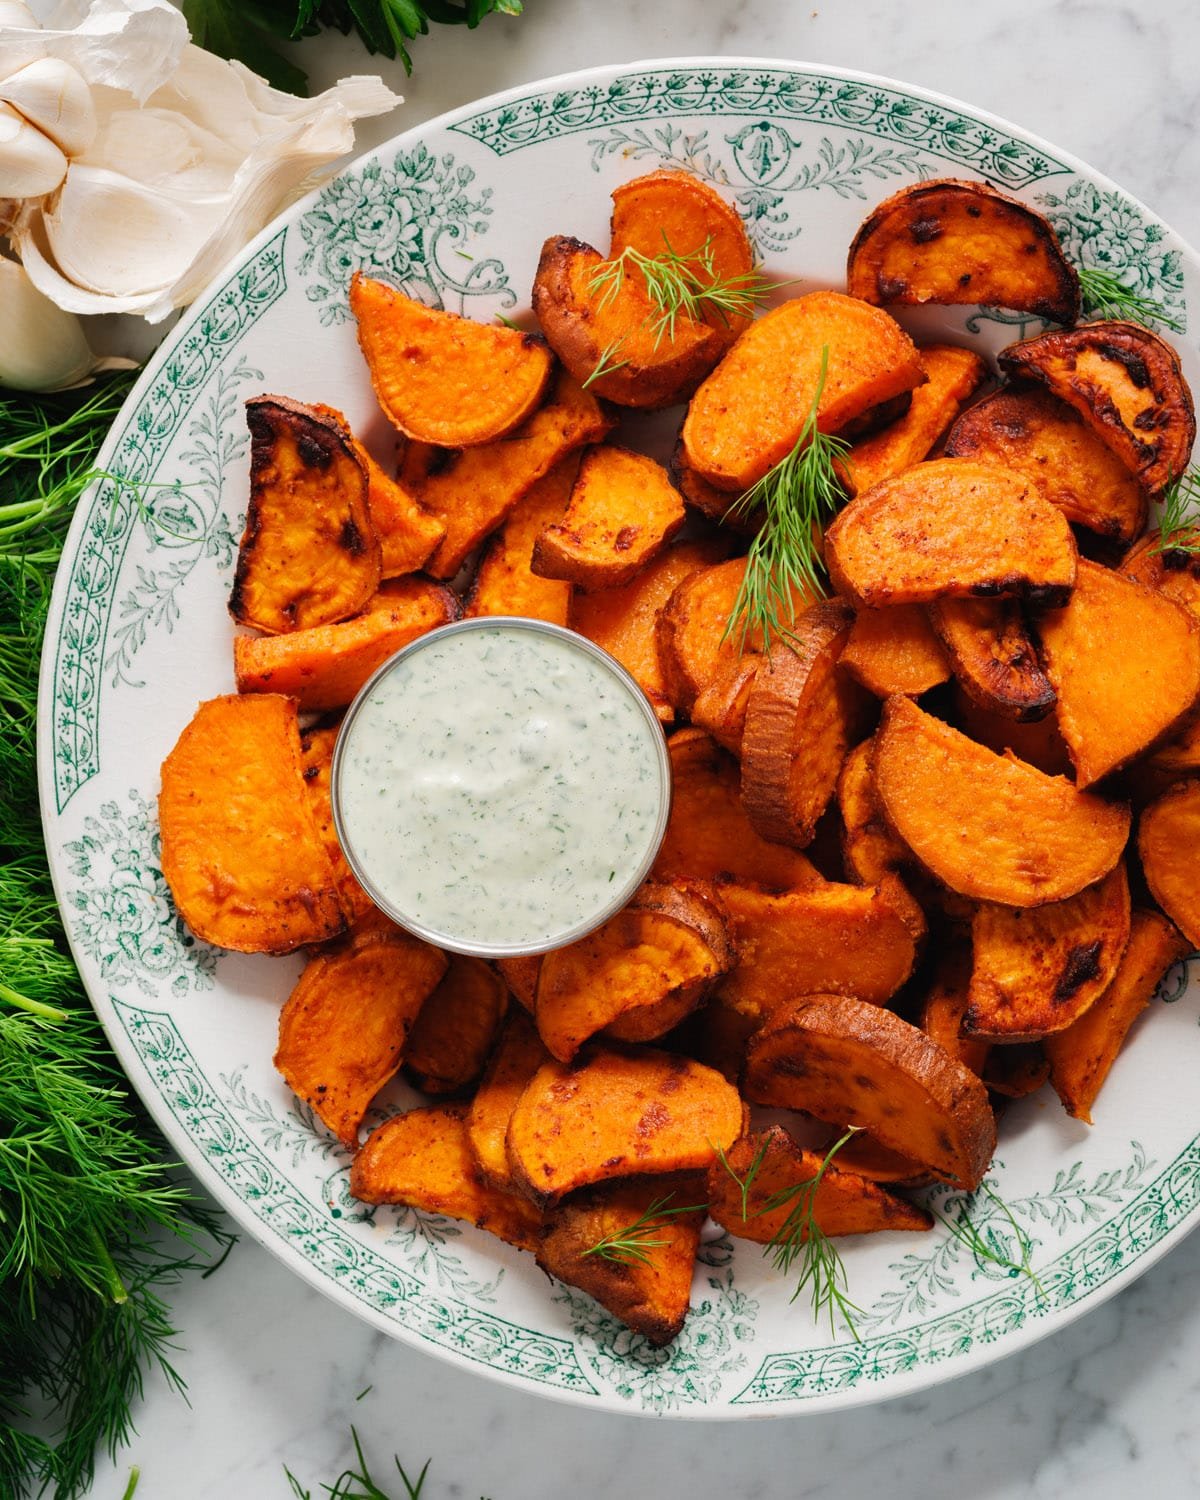
Roasted sweet potatoes: These add a heartiness that makes it a satisfying meal. I like to slice them into half-moons and make roasted sweet potatoes in advance. The half moon shape makes them a little bigger than diced, which I’ve found holds up better in the fridge.
Sauce: My Green Goddess Ranch sauce is creamy, herby, garlicky, and really makes the bowl sing. See below for sauce variations.
Pickled red onions: These add the pop of brightness and acidity. I like making a jar of homemade pickled red onions for the week if I have time, but they’re also easy to find jarred at the store.
Romaine, avocado, and tortilla chips round out the bowl.
Meal Prep Tips for This Chicken Rice Bowl
This rice bowl recipe is a little different from my other recipes: I wouldn’t make the entire recipe at once. Instead, I would recommend prepping at least one or two of these components in advance. Here are my tips:
Roast the sweet potatoes up to 2 days ahead and refrigerate until ready to serve. I actually made them in my air fryer (recipe coming soon!).
Cook the ricethe day of, or make it in advance and reheat on the stovetop with a splash of water over low heat. You can also make Instant Pot Rice which is a nice hands off method.
The easiest method for chicken is air fryer chicken, which is what I normally use for this bowl. You can also make pan seared chicken thighs which are just as delicious. Or even mix up this bowl with leftover chicken from another meal.
The pickled red onionstake only 30 minuteshands off, so it’s actually easy enough to get them going while you make the rest of the bowl components.
The sauce is easy to make in advance or day of while the rice cooks. It’s just a matter of how easy you want the recipe to be! Of course, you can use a store-bought jarred sauce in a pinch to make this recipe come together super fast.
This chicken rice bowl is loaded with sweet potatoes, crisp romaine, and pickled red onions, all drizzled with an herby Green Goddess Ranch! It’s a satisfying, meal-prep-friendly dinner.
This recipe is about component cooking, so the links to the various components are below. Just open each in a new tab when you’re ready to cook!
Cook the sweet potatoes. Slice the potatoes into half-moons about 1/4-inch thick and make Roasted Sweet Potatoes. I like cooking them in advance, then refrigerating 1 to 2 days until serving (or up to 5 days).
Cook the rice. Rinse the rice in cold water in a fine mesh strainer, then shake dry. Add the water to a pot and bring to a boil. Add the rice and salt, bring back to a boil, then reduce the heat to low and cover. Simmer for 12 to 15 minutes, until the water is completely absorbed (test by pulling back the rice with a fork). Remove from the heat, keep covered, and let rest for 10 minutes. (If you cook the rice in advance, heat it back up in a pot with a splash of water on low heat. It lasts 5 days refrigerated.)
Make the sauce. Make the Green Goddess Ranch — it is also easy to prep ahead and will keep refrigerated for up to 1 week.
Assemble the bowls. Place the chopped romaine in a bowl. Add rice, then top with roasted sweet potatoes, chicken, avocado slices, and pickled red onions. Add a handful of crushed tortilla chips if desired. Drizzle generously with Green Goddess Ranch and serve.
Notes
Shredded chicken variation: You can also make this with shredded chicken, like my Crockpot Shredded Chicken (my favorite), Instant Pot Shredded Chicken, or Stovetop Shredded Chicken.
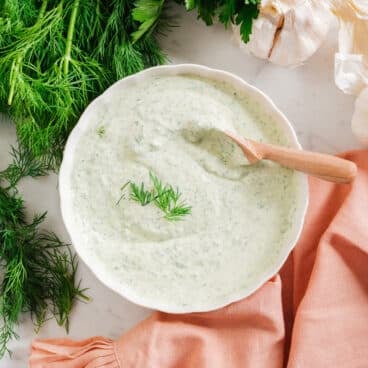
This creamy green goddess ranch dressing is loaded with fresh dill, parsley, and herbs: a copycat of Sweetgreen’s fan-favorite sauce that’s ready in 5 minutes! Drizzle it on bowls, salads, or use it as a dip for roasted vegetables.
Here’s a green sauce that’s about to become your new favorite: I know, because it’s mine! In the past few years I’ve become obsessed with the Green Goddess Ranch sauce at the popular bowl-meal restaurant Sweetgreen. After eating it recently, I decided: this sauce is too good not to figure out how to make a version myself!
After recipe testing, I found the secret: generous handfuls of fresh dill, parsley, and dried tarragon, blended right into a Greek yogurt and mayo base. After one spoonful, I declared it my new favorite green sauce: it’s creamy, herby, and each bite tastes irresistible. It’s great for dipping vegetables or drizzling on salads or bowl meals through the week!
This recipe is like a combination of the three: it’s creamy like ranch, herby like green goddess. The Greek yogurt lightens it quite a bit, and the mayo brings in a ranch-like richness. It truly is a sauce that works on everything!
Ingredients You’ll Need
In my research, I actually found Sweetgreen’s recipe for their Green Goddess ranch. It uses a load of mayonnaise, but I’m the queen of balancing mayo with Greek yogurt (I do this in many of my sauce and healthy dip recipes). So I added some of that and voila: this sauce was born. Here’s what you’ll need:
Fresh dill: This is the key ingredient that gives the sauce its distinctive flavor: do not skip it!
Fresh parsley: Use the leaves and tender stems: tear off a few handfuls and add to a measuring cup. It doesn’t have to be perfect!
Dried tarragon: This seasoning adds a delicious complexity: it’s also worth seeking out (and is a nod to a traditional Green Goddess dressing).
Greek yogurt: Full-fat yogurt gives the creamiest result, and adds a lightness and tang to the dressing.
Mayonnaise: This adds richness and helps the dressing stick to vegetables: it’s also required! A sauce with all Greek yogurt is more watery and less of a dressing.
Shallot + garlic: A small amount of each is key for adding savory flavor.
White wine vinegar: This adds a brightness to the flavor.
Tips for Making Green Goddess Ranch Dressing
Here are a few things to keep in mind for this dressing:
Use a food processor. A food processor is easiest for blending and you can throw in the shallot and garlic and chop them up first. You can also use a small blender, but I would mince the garlic and shallot by hand first. It will not work in a large blender because the quantity is not large enough.
Resist the urge to over blend. The sauce should turn a gorgeous pale green and have some nice herb chunks in it. Over-blending is more risky if you’re using a small blender, where the sauce can become runny if you blend too long.
Adjust seasoning as desired. Add another pinch of salt if necessary to bring out the flavor.
Ways to Use This Dressing
Once you have a jar of this in the fridge, you’re set for meal prep! Here are my favorite ways to use this sauce:
Drizzle over grain bowls. I love building a bowl with a protein, rice, roasted sweet potatoes, mixed greens, pickled red onions, and sliced avocado. Try my Chicken Rice Bowl or swap in baked tofu for vegan variation.
This dressing stores well refrigerated airtight for up to 1 week. Give it a stir before using: it may thicken slightly as it sits, which is normal.
Dietary Notes
This Green Goddess ranch is vegetarian and gluten-free. For dairy-free or vegan, substitute vegan mayonnaise and a plain vegan coconut yogurt (I like the brand Cocojune).
This creamy green goddess ranch dressing is loaded with fresh dill, parsley, and herbs: a copycat of Sweetgreen’s fan-favorite sauce that’s ready in 5 minutes! Drizzle it on bowls, salads, or use it as a dip for roasted vegetables.
Add the garlic and shallot to a food processor (see Notes) and blend.
Add the remaining ingredients and blend until creamy. Taste and add another pinch of salt if necessary. Transfer to an airtight container; the dressing stores in the refrigerator for 1 week.
Notes
Blender variation: You can also use a small blender to make this sauce. Mince the garlic and shallot first, then blend everything until creamy: making sure not to over blend. It will not work in a large blender because the quantity of ingredients is not large enough.
Vegan / dairy-free variation: Use vegan mayonnaise and a thick plain vegan coconut yogurt. I like the brand Cocojune.
This easy rice bowl is a 30-minute dinner loaded with flavor-packed black beans, colorful veggies, and a zingy cilantro lime sauce you’ll want to put on everything.
Every time I ask readers what they want, I get a similar answer: fast and easy dinner recipes! That’s right: you don’t care how basic it is, you just want easy, healthy ideas to get food on the table.
So here’s one to file under dinnertime basics: this easy rice bowl! This 30 minute dinner features my easy black beans, a trick to make a bland can of beans taste amazing in 5 minutes. Pair it with rice and colorful veggies and a zingy cilantro lime ranch that you’ll want to bathe in. This bowl is so tasty and easy, I simply inhale it every time I make them!
Start With The Rice
The longest lead time on a rice bowl is cooking the rice. So get that started first! You can use any variety of rice you’d like. I like cooking rice on the stovetop, but a pressure cooker also makes quick work of it. You can also make the rice in advance and reheat it before serving. Here are my favorite methods for cooking rice:
How to Cook Rice: My secret way to get perfectly cooked rice every time.
The best part of this rice bowl, similar to a burrito bowl, is the easy black beans! This is the way to bring big flavor with only a few minutes of cooking. Once you’ve got your rice started, whip up those black beans. Here’s what you need to infuse huge flavor into these beans in no time:
Canned black beans: You don’t even have to rinse them! The residual can liquid makes a creamy sauce.
Fresh garlic: Minced fresh garlic brings big savory flavor.
Cumin: A hint of cumin adds the final flavoring.
How to Make an Easy Rice Bowl
Now it’s time to make a rice bowl! The vegetable and sauce ideas I’ve provided here are just ideas: this is a free-form concept so anything goes! Here are a few ideas for vegetables and components you can swap in. This one is like to a burrito bowl, but you can use different flavors and sauces for a different vibe. The main guiding principle: maximize contrasts in color, flavor and texture:
Make the rice. See above.
Make the protein. You can of course use any type of protein you like: beans, tofu, tempeh, chicken, shrimp: you name it! This bowl would be great with Cilantro Lime Shrimp too.
Prepare the veggies. Use lots of colorful raw veggies. Some favorites are avocado and cherry tomatoes. I like to add corn for sweetness and red onion for a savory crunch. Other ideas are bell peppers, leafy mixed greens, or roasted sweet potatoes,
Add the sauce. Top it all off with a healthy sauce to bring it together: ideas below!
Sauce Ideas and Protein Variations
This rice bowl is covered in a creamy, zingy cilantro lime ranch that takes it over the top! You’ll love this tasty sauce: but we’ve got lots of other options too. If you’re looking for a vegan variation, review the list below:
A great rice bowl isn’t just about flavor: it’s about contrast. Here’s what I aim for every time:
Color variety. Red tomatoes, yellow corn, green avocado, purple onion. Eating the rainbow isn’t just a health cliché — it makes the bowl visually irresistible.
Temperature contrast. Warm rice and beans against cool, raw vegetables creates a layered experience in every bite.
Texture contrast. Creamy avocado, crunchy onion, chewy beans, fluffy rice. Every forkful should have something going on.
Don’t skip the fresh herbs. A handful of torn cilantro on top brightens everything and ties the bowl together.
Storage and Make Ahead Tips
Make this rice bowl even quicker by making the rice in advance. Refrigerate it until you’re ready to serve. You may have noticed that when you refrigerate rice, it gets very dry. Here’s a trick for how to reheat rice so that it’s perfectly moist:
Place the cold rice in a saucepan on the stovetop.
Add a small splash of water.
Heat the rice until it’s warmed through: the water will steam and absorb into the rice.
Dietary Notes
This rice bowl recipe is vegetarian, vegan, plant-based, dairy-free, and gluten-free.
Frequently Asked Questions
What goes in a rice bowl?
A rice bowl typically includes a base of cooked rice, a protein (beans, chicken, shrimp, tofu), fresh or roasted vegetables, and a sauce or dressing. The combination is flexible: mix and match based on what you have.
Can I use cauliflower rice instead?
Yes! For a lower-carb version, cauliflower rice works as a base. The beans and sauce are hearty enough to carry the bowl without traditional rice.
Can I make this rice bowl gluten-free?
This recipe is naturally gluten-free as written. Make sure to double-check that any store-bought sauces or seasonings you use are certified gluten-free.
How do I keep rice from drying out when reheating?
Add a small splash of water to the rice in a saucepan and heat covered over medium heat. The steam absorbs into the rice and restores its texture.
Can I add other vegetables to this rice bowl?
Absolutely. Bell peppers, roasted sweet potatoes, spinach, mixed greens, or sautéed zucchini all work well. The guiding principle: maximize color and texture contrast.
This easy rice bowl comes together in a flash! This fast dinner stars black beans and veggies with zingy cilantro lime ranch sauce. Variation: Try my Shrimp Rice Bowl!
Cook the black beans: Mince the garlic. In a medium saucepan, heat the olive oil over medium heat. Add the garlic and sauté for 30 seconds to 1 minute until fragrant but not yet browned. Add the beans (drained but not rinsed), cumin, kosher salt, and several grinds of black pepper. Cook 2 minutes until warmed through. Taste and add additional salt if desired.
To serve, place rice in the bowl and top with black beans and vegetables. Drizzle with the sauce and top with torn cilantro. The components for the rice bowl store up to 3 days refrigerated.
Notes
*If you’re cooking for 1 or 2, make half this recipe and cook 1 cup dry rice.
Learn how to cook eggs 10 different ways, from sunny side up and scrambled to poached and soft-boiled. Includes step-by-step instructions and helpful tips!
Good morning! It’s your resident egg-spert here (sorry, I had to!). Want to master sunny side up? Need a skillet of scrambled eggs or the perfect omelette? I’ve got you.
As a cookbook author and recipe developer, here are my 10 best ways showing how to cook eggs! These master methods will get you from 0 to breakfast in minutes. These are the egg basics every home cook should know.
How To Cook Eggs: 10 Ways
Below you’ll find my favorite 10 methods for cooking eggs, from the quickest fried eggs on the stovetop to slow-baked eggs in the oven. Each one includes doneness cues so you know exactly when the eggs are ready. I’ve linked to full recipes for if you want a deeper dive on a specific technique!
1. Sunny Side Up
Sunny side up eggs are cooked until the whites are solid but the yolk is still runny. The round yellow yolk gives a sun-like appearance, hence the name!
How to cook it: Melt butter in a non-stick or cast iron skillet over medium low heat. Add the egg and sprinkle with salt and pepper. Cook 2 to 3 minutes until the whites are firm but the yolk is runny. Do not flip.
Tip: Keep the heat at medium-low the entire time. High heat cooks the egg whites too fast and leads to rubbery edges before the yolk has a chance to set.
2. Over Easy
Over easy eggs are cooked on both sides, but the yolk remains runny. The second side gets just enough heat to set the top of the egg white.
How to cook it: Melt butter in a non-stick or cast iron skillet over medium low heat. Add the egg and sprinkle with salt and pepper. Cook 2 to 3 minutes until the whites are firm. Flip and cook 20 to 30 more seconds.
3. Over Medium
Over medium eggs are cooked on both sides until the yolk is jammy and slightly runny, like the yolk of a soft boiled egg.
How to cook it: Melt butter in a non-stick or cast iron skillet over medium low heat. Add the egg and sprinkle with salt and pepper. Cook 2 to 3 minutes until the whites are firm. Flip and cook 1 more minute.
4. Over Hard
Over hard eggs are cooked on both sides until the yolk is fully cooked.
How to cook it: Melt butter in a non-stick or cast iron skillet over medium low heat. Add the egg and sprinkle with salt and pepper. Cook 2 to 3 minutes until the whites are firm. Flip and cook about 2 more minutes until the yolk is fully cooked, gently pressing the yolk with a spatula to make sure it’s broken.
5. Scrambled Eggs
Scrambled eggs are beaten and then gently cooked, scraping them into folds. The key is resisting the temptation to rush! I’ve also tested fluffy scrambled eggs with a few extra tricks if you want to level up.
How to cook it: Beat the eggs with a whisk, usually 2 eggs per person. Season with salt and pepper. Melt butter in a non-stick or cast iron skillet over medium heat. Add the eggs. When they begin to set, use a flat spatula to slowly scrape sections of eggs, creating folds. Remove from the heat just before they fully harden, cooking about 2 minutes total.
Tip: Don’t stir constantly. Let the eggs sit briefly between folds for those cloud-like layers.
6. Poached Eggs
Poached eggs are cooked outside the shell in boiling water until the whites are hard and the yolk is still runny. It might seem intimidating, but once you’ve tried it a few times it’s pretty repeatable.
How to cook it: Fill a large skillet with 1 ½ inches of water, then add 1 splash white vinegar. Heat to just under simmering (190°F). Working quickly, crack each egg into a small bowl, then slide it into the water. Cook for 4 minutes until the whites are set. Remove with a slotted spoon.
Tip: The white vinegar helps the egg white coagulate and hold its shape. Also, I’ve found fresh eggs poach much better than older ones.
How to cook it: Place eggs in a large pot and and cover with 1 inch water. Bring the water to a boil. As soon as it boils, remove the heat, cover and let stand 15 minutes. Then place the eggs in an ice water bath to cool completely before peeling.
Peeling tip: Slightly older eggs peel far more easily than fresh eggs (like eggs that have been refrigerated for 7–10 days). Also, lightly tap the larger end of the egg so that the shell crushes. The bottom end of the egg has an air bubble, which makes it easier to crush the shell.
How to cook it: Fill a medium pot of water and bring it to a boil, then reduce to a simmer where the water is just vibrating. Gently lower the eggs into the water with a spoon. Simmer for 7 minutes. Then place the eggs in an ice water bath to cool completely before peeling.
9. Classic Omelette
A classic omelette is made with beaten eggs that are folded around a filling while they cook. This French method takes just a few minutes in a hot skillet.
How to cook it: Go right to the recipe for this one! It’s a precise technique that’s important to read in detail. See How to Cook an Omelette.
10. Baked Eggs
Baked eggs are are cracked into small dishes and baked in the oven, instead of cooking them on the stovetop. This cooks the whites and leaves the yolk runny. It’s a hands-off method that’s especially nice for brunch when you’re cooking for a crowd.
How to do it: Preheat the oven to 375 degrees Fahrenheit. In the bottom of each small oven safe dish or ramekin, place 1 small pat butter. Place the dishes on a baking sheet and slide in the oven to allow it to melt (about 1 minute), then brush it around the sides of the dish. Add 2 eggs to each dish and season with salt and pepper. Bake 12 to 15 minutes until the whites just set.
Tip: The eggs are done when the whites are opaque and no longer jiggly when you gently shake the pan.
Egg Nutrition
Eggs are some of the most nutritious foods on the planet! Recent research has found that eggs can increase the good cholesterol the body needs. They’re an affordable and easy-to-eat source of high quality protein. They’re also especially helpful for vegetarian diets as a natural source of B12. One egg has:
Raw eggs in their shells keep for 3 to 5 weeks in the refrigerator when stored in their original carton. Hard boiled eggs (peeled or unpeeled) should be used within 1 week. Always store eggs in the coldest part of the fridge, not in the door.
Do you need a nonstick pan to cook eggs?
No: it’s helpful for beginners but you can use a fully preheated cast iron or stainless steel pan. A good nonstick pan prevents sticking, makes flipping fried eggs much simpler, and is easy to clean. A well-seasoned cast iron skillet is a great alternative and gives the whites a slightly crispier edge. If using stainless steel, make sure it’s fully preheated and well-oiled before the eggs go in.
What’s the best way to season scrambled eggs?
Salt is essential: add a pinch while whisking the eggs rather than only at the end, so the seasoning works into the eggs as they cook. Black pepper is the classic addition. Beyond that, I love a little garlic powder, fresh chives, or even a small handful of cheese stirred in at the end (I love eggs with goat cheese).


 Tip: Keep the heat at medium-low the entire time. High heat cooks the egg whites too fast and leads to rubbery edges before the yolk has a chance to set.


