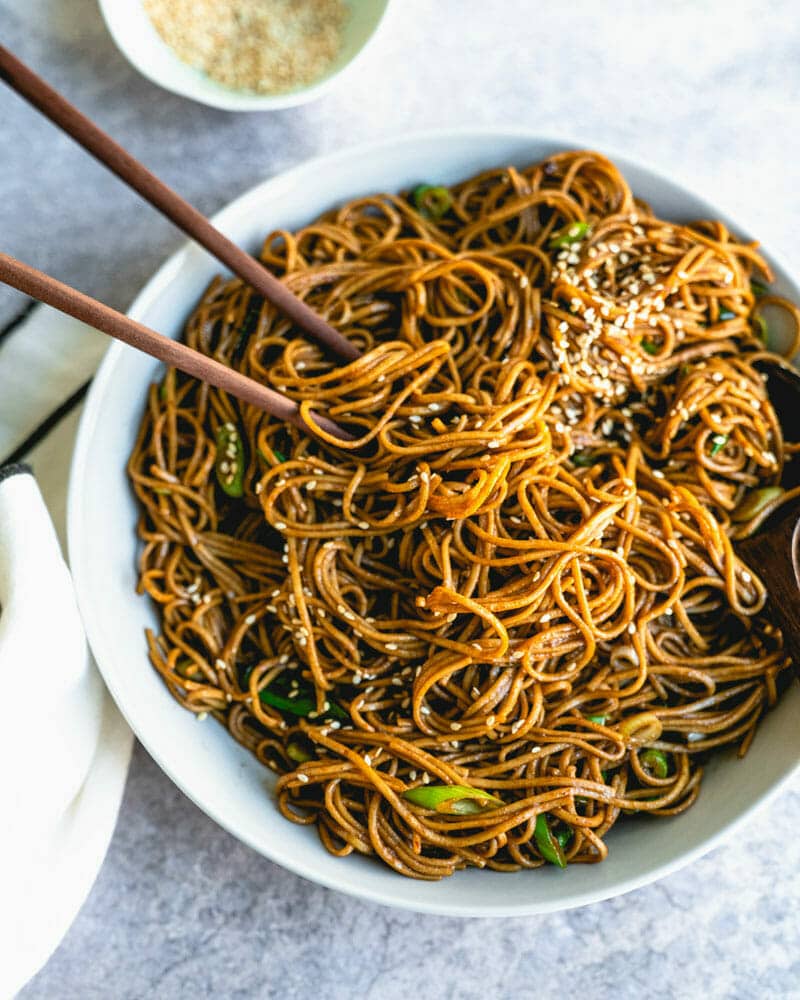
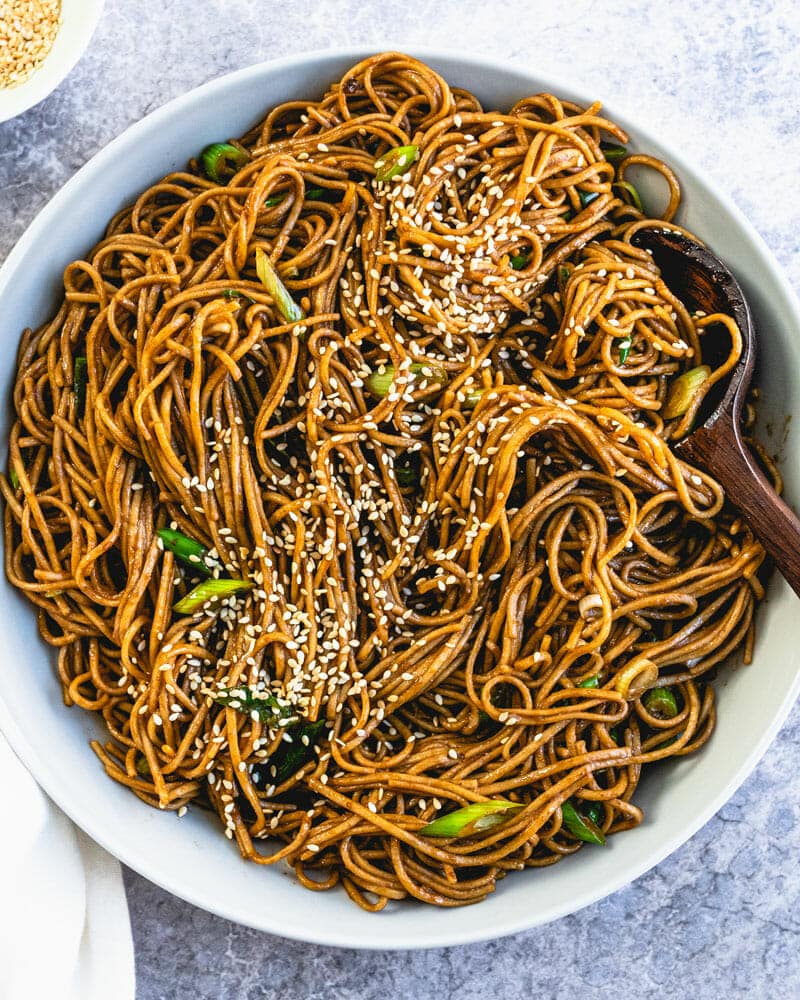
Learn how to make quick soba noodles with this 15-minute recipe featuring a savory sesame-soy sauce. These Japanese buckwheat noodles are great for easy weeknight dinners and can be topped with eggs, tofu, or shrimp for a complete meal.
When I’m craving something satisfying but don’t have much time to cook, this quick soba noodles recipe has become a go-to! There’s something so comforting about these nutty buckwheat noodles tossed in a savory sesame-soy sauce. This recipe takes 15 minutes from start to finish, making it perfect for those busy weeknight dinners when you need something fast but flavorful.
This recipe started as just a simple pantry dinner, but it’s become one of my family’s most-requested dishes. My kids love noodles of all kinds (naturally!) and I love how versatile it is: great as a side dish or made into a complete meal with a sunny side up egg, sauteed shrimp or pan fried tofu.
5 Star Reader Reviews
“As a mom of 3 toddlers, this recipe is a life saver! Delicious, fast and unfuzzy! I will keep this recipe in my rotation.” -Eliana
“I’ve had a package of soba noodles in my pantry for a while. Pulled them out tonight and made your recipe to go with a piece of wild-caught salmon. Both were delicious. Thanks, will make this again soon!” -Temptd2
Ingredient Spotlight: Soba Noodles
Soba noodles are traditional Japanese noodles made from buckwheat flour, which gives them a slightly nutty flavor. Because they’re made from buckwheat, most soba noodles are naturally gluten-free. Some brands do add wheat flour, so I’d always check the package if you’re following a strict gluten-free diet.
I’ve tested dozens of soba noodle brands over the years, and I’ve found that quality varies based on the brand. Some are very thin and tend to break easily during cooking. I typically look for soba noodles that are slightly thicker and hold up better to boiling and rinsing. My go-to brands are usually found in the Asian section of the grocery store, and I recommend experimenting with a few different ones to find your preference.
A key difference between soba and regular pasta is that soba requires rinsing after cooking – this removes excess starch that would otherwise make the noodles gummy and prevent them from properly absorbing the sauce.
Essential Sauce Ingredients
This soba noodles recipe is fast and easy to make, and most of the ingredients are pantry staples! It’s essentially a pantry meal, aside from the green onion. You can even leave out the green onions if you don’t have them on hand! Here’s what’s in this soba noodles recipe:
Soy sauce adds a savory flavor. I prefer regular soy sauce (not low sodium); or you can use tamari or liquid aminos as substitutes.
Toasted sesame oil is crucial here. Make sure you’re using toasted sesame oil, not regular sesame oil. Toasted sesame oil has a strong flavor intended for finishing dishes; regular sesame oil is neutral and meant for cooking.
Rice vinegar adds a touch of acidity to brighten the entire dish.
Honey or maple syrup provides just a hint of sweetness that rounds out the flavors without making the dish sweet.
Miso is my secret ingredient here. It’s a fermented soybean paste that adds incredible depth in flavor (umami). You can find miso at most major grocery stores near the other Japanese ingredients. There are many different types of miso, all with different flavors: red, yellow, and brown. I recommend using white or light miso here.
Expert Tip: Rinsing Technique
Rinsing pasta is not required for something like Italian spaghetti or penne. But for soba, rinsing is necessary to remove the starch that builds up during cooking. If you don’t rinse, the soba becomes very gummy and mushy. It also absorbs the sauce and becomes dry instead of saucy.
Here’s how I rinse soba noodles: as soon as they’re done cooking, I drain them in a fine-mesh strainer and immediately run cool water over them while gently tossing with my hands or tongs. I continue rinsing until the water runs clear – usually about 30 seconds. Then I shake the strainer to remove excess water. If I want to serve them warm, I quickly run warm water over them for just a few seconds before adding the sauce.
Why To Toast Sesame Seeds
For the best flavor, garnish these soba noodles with toasted sesame seeds! Of course, you can just use straight up sesame seeds. But toasting your sesame seeds in a pan heightens the nutty flavor considerably.
It’s almost like using salt on food: it brings out the existing flavor and takes it to new heights! It only takes 3 minutes to toast sesame seeds, and you can store leftovers in a sealed container for months. Go to How to Toast Sesame Seeds.
Storage and Reheating Info
These soba noodles are best enjoyed fresh, but leftovers store well. Store leftover noodles in the refrigerator for up to 3 days in an airtight container. I actually prefer them cold or at room temperature for lunch – they make an excellent cold noodle salad.
Serving Suggestions For Soba Noodles
One of the reasons I love this recipe so much is how easily it transforms from a simple side dish into a complete meal. Here are my favorite ways to serve these soba noodles:
Add protein with tofu. This pan fried tofu is our favorite method for weeknights, and our baked tofu gets rave reviews. Or try marinaded tofu, which is simple with no cooking required.
Include seafood. Try this quick and healthy sauteed shrimp! Use plain sesame oil for cooking and add a drizzle of rice vinegar and soy sauce at the end (instead of the lemon). Or, serve alongside teriyaki salmon or shrimp and broccoli.
Make a noodle bowl. Combine with fresh cucumber slices, shredded carrots, and avocado for a refreshing cold noodle salad.
Dietary Notes
This soba noodles recipe is vegetarian, vegan, plant-based, dairy-free and gluten-free.
Frequently Asked Questions
Can I make this ahead of time?
The sauce can be made up to 3 days in advance and stored in the refrigerator. However, I recommend cooking and assembling the noodles just before serving for the best texture.
What’s the difference between soba and regular pasta?
Soba noodles are made from buckwheat flour and have a nuttier flavor than wheat pasta. They also require rinsing after cooking and have a slightly different texture.
Can I substitute the miso paste?
While miso adds incredible depth, you can omit it if you don’t have any. The noodles will still be delicious, just with a slightly less complex flavor profile. You may want to add a pinch extra salt as well.
Are all soba noodles gluten-free?
Not all soba noodles are gluten-free. Look for packages labeled “100% buckwheat” if you need to avoid gluten, as some brands include wheat flour.
Learn how to make quick soba noodles with this 15-minute recipe featuring a savory sesame-soy sauce. These Japanese buckwheat noodles are great for easy weeknight dinners and can be topped with eggs, tofu, or shrimp for a complete meal.
Cook the noodles: Cook the soba noodles according to the package instructions: it should take about 4 to 5 minutes. Important: when the noodles are done cooking, rinse them under cool running water in a strainer, tossing them to remove the starch. Then shake off excess water. If you’d like the noodles to be warm when serving, run them under warm water for a few seconds; you can also serve room temperature or cold. (If you skip this step, the noodles soak up the sauce and become too dry.)
Whisk the sauce: Meanwhile, in a medium bowl whisk together the soy sauce, toasted sesame oil, rice vinegar, honey or maple syrup, miso (if using), and grated garlic.
Combine and serve: Return the rinsed and shaken dry noodles to the pan or a bowl; stir in the sauce and green onions. Place in serving bowls, top with sesame seeds and serve.
Notes
Toasting seeds: Toasting the sesame seeds really brings out the nutty flavor! It takes only 3 minutes and you can taste the difference. Store toasted sesame seeds for months in a sealed container in the pantry.
from A Couple Cooks https://ift.tt/FwnMfOI
This Blue Long Island Iced Tea is an ocean-blue cocktail with tangy, citrusy flavor and less alcohol than you’d expect: ready in just 5 minutes! Learn the ingredients, substitution tips, and how to make a pitcher version for a crowd.
There’s something almost magnetic about a blue drink: do you feel it too? For some reason I’ve always been attracted to drinks this color, and this one tastes surprisingly fresh and sweet tart: the Blue Long Island, aka Blue Long Island Iced Tea! Of course, the traditional Long Island Iced Tea has a bit of a reputation for being a low-brow, high alcohol drink.
But this recipe actually has refreshing, nuanced flavor and less alcohol than most cocktails! It uses blue curacao for its ocean-hued color, and it adds a lovely citrusy flavor. It’s one of my favorite blue drinks!
Ingredients for a Blue Long Island Iced Tea
The Long Island Iced Tea is a highball cocktail that mixes cola with five different liquors: vodka, tequila, rum, gin and orange liqueur. The name comes from its color: the drink is brown when mixed together and looks like iced tea. It was likely invented in 1972 by a bartender in Long Island, New York, and went on to become a popular cocktail on the list of the International Bartender Association’s IBA official cocktails.
A Blue Long Island Iced Tea, aka Blue Long Island for short, swaps out the orange liqueur for blue curacao. Blue curacao is a type of orange liqueur with a bright blue color, made on the island of Curacao. This recipe also swaps cola for ginger ale, which is lighter in color. For this recipe, you’ll need:
Vodka
Tequila
White rum
Gin
Blue curacao
Lemon juice
Ginger ale
Tip: The most important ingredient, of course, is the blue curacao. If you don’t have all the others, that’s ok! Keep reading for more about this signature alcohol and what you can substitute for the others.
Spotlight on Blue Curacao
The most important part of any blue drink, including the Blue Long Island? Blue curacao! This is what gives the drink its bright blue color. Here’s what to know:
Blue curacao is an artificially-colored orange liqueur invented by Dutch settlers on the island of Curaçao. There are several colors of Curaçao: the most popular today are clear and blue. Blue curacao has been sold since 1912. It’s flavored with the Laraha orange peel, a type of orange that grows on the island.
How to pronounce Curaçao? Say it Cure-ah-souw.
What does blue curacao taste like? It has a sweet orange peel flavor, with subtle bitter finish.
How much does it cost? Blue curacao is inexpensive; a 750 ml bottle costs about $10. Try to buy a mid-range bottle; we like Drillaud brand (avoid DeKuyper).
Once you’ve assembled all of the ingredients, the Blue Long Island comes together in a flash! The flavors come out incredibly fresh and delicious. This drink has only 2.5 ounces alcohol, so it’s not as boozy as you think! It’s similar to many of my 300+ cocktails, especially the other highball cocktails. Here’s what to do (or scroll down to the recipe):
Combine: Pour the vodka, tequila, white rum, gin, blue curacao, and lemon juice into a highball glass.
Ice and stir: Fill the glass with ice and stir to combine.
Top and garnish: Add ginger ale and finish with a lemon wedge.
Can You Substitute the Liquors?
The Blue Long Island Iced Tea is a bit of a kitchen sink style drink. It uses just about everything in the liquor cabinet! Luckily, you don’t have to have all of the ingredients to make a tasty BLIIT. Here are a few tips on substitutions:
Vodka, tequila, or gin: Leave one of these out and double one of the other liquors. For example, if you don’t have gin double the tequila. Try to have at least three of the four main liquors if you can. Two of the four may also work.
White rum: Use aged rum if you don’t have white. You could use dark rum: just note that the color of the drink will be darker!
The Best Ginger Ale to Use
The ginger ale makes for a deliciously fresh Blue Long Island Iced Tea. In fact, I like it better than the standard version of the drink! (Especially because I don’t often buy cola.) You can use any brand you like, but here are some favorites:
Q Ginger Ale: This is my top choice! It comes in small cans so you only have to use a little at a time.
Fever Tree Ginger Ale: Fever Tree is made with real ginger and has no artificial sweeteners.
This cocktail scales up well for parties. To make a pitcher (8 servings): combine ½ cup each of vodka, tequila, white rum, gin, and blue curacao with 1 cup of fresh lemon juice. Add 2½ cups ginger ale. Pour into ice-filled highball glasses to serve.
Variations on the Long Island Iced Tea
There are a few other ways to make this classic cocktail! Here are a couple other variations to add on to the Blue Long Island:
Combine all ingredients in highball glass. Fill it with ice and stir. Garnish with a lemon wedge and serve.
Pitcher variation (8 servings): Combine ½ cup each vodka, tequila, white rum, gin, and blue curacao, and 1 cup lemon juice. Add 2 ½ cups ginger ale. Pour into ice filled highball glasses.
from A Couple Cooks https://ift.tt/BXIvuPF
This vegan pizza recipe is loaded with savory vegetables and a crispy homemade crust. A flavorful dairy-free pizza that’s perfect for pizza nights!
Pizza without cheese? Yes, this vegan pizza recipe—good news—tastes incredible, no cheese needed! The umami of mushrooms and artichokes, my favorite pizza sauce, and little fresh basil make an explosion of flavor.
Skeptics (including me, once upon a time) think a plant-based pizza will feel sad or flat. Instead you’ll find this pizza is pizza that’s bold, satisfying, and surprisingly easy to pull off at home.
5 Star Reader Review
“I made this pizza a few weeks ago and it was so good. So. So. good. I am not by any means a great cook, but I do cook almost every night for my family of three toddlers. We went vegan/vegetarian 6 months ago and have been struggling to find dinners that aren’t just eating tofu every night. I loved this pizza! The crust was flavorful and the pizza was super flavorful and tasty.” — Saryn
Watch the Video!
Watch this step-by-step video to see exactly how to knead, stretch, and top this vegan pizza from start to finish:
Why You’ll Love This Recipe
No cheese needed: Savory mushrooms, artichoke hearts, and fire-roasted tomato sauce provide all the flavor you need
Crispy crust, chewy interior: Baking on a hot pizza stone makes the perfect crust texture
Works with homemade or store-bought pizza dough: You can make it easier depending on what you have time for
Naturally dairy-free and plant-based: No vegan cheese required (though you can add some if you like!)
Ingredients Needed
Here’s what goes into this vegan pizza recipe, along with a few notes on why each ingredient matters:
Pizza dough: I use my Best Homemade Pizza Dough for a classic flavor, but you can also use my Easy Thin Crust Pizza Dough (which is easier and lighter). Store-bought pizza dough is a great substitute to save time.
Homemade pizza sauce: Fire-roasted tomatoes add a subtle sweetness and smokiness: try my 5-Minute Pizza Sauce Recipe.
Veggies: Sauteed mushrooms add a meaty flavor and canned artichoke hearts bring tangy flavor (don’t omit!). Spinach, red onion, and jarred peppers add color and nutrition. Sauté everything with garlic and olive oil. Add chickpeas for more protein if desired.
Fresh basil: Added after baking, chiffonade-cut basil leaves bring a fragrant brightness that finishes the pizza beautifully.
How to Make This Vegan Pizza Recipe
Here’s a summary of how to make my favorite vegan pizza:
1. Preheat the oven with a pizza stone. Place your pizza stone in the oven and preheat to 500°F. A pizza stone is one of the best ways to make the most delicious, authentic crust texture: it essentially mimics a brick oven. See my guide on How to Use a Pizza Stone for more.
2. Sauté the veggies. In a large skillet, heat olive oil over medium-high heat and sauté the vegetables for about 5 minutes, until the mushrooms are tender and the spinach is fully wilted. This step is very important: raw vegetables release too much moisture on the pizza and make the crust soggy.
3. Stretch the pizza dough. Dust a pizza peel with cornmeal or semolina flour to prevent sticking. Stretch your pizza dough by hand into a circle: check out my guide on How to Stretch Pizza Dough.
4. Assemble the pizza quickly. Spread a thin layer of tomato sauce (or marinara sauce), then the sautéed vegetables, roasted red pepper strips and artichoke hearts.
5. Bake until golden brown. Slide the pizza onto the hot stone and bake for 5 to 7 minutes, until the pizza crust is golden brown. Cool slightly, then scatter the basil leaves on top.
Topping Ideas
Of course, you can put any toppings you’d like on a dairy-free pizza! The veggie toppings below all work well: you can mix and match based on what’s in your fridge:
Roasted sweet potatoes or squash: For a heartier, sweeter pizza — try my air fryer sweet potatoes for a quick fix
Red pepper flakes: Sprinkle on after baking for heat
Jalapeños: Thinly sliced, for a spicy kick
Quick Serving Tip
The one caveat is that vegan pizza doesn’t stick together quite as easily as with the glue of cheese-ladden pizza, so watch for sliding toppings when you grab a slice. But it’s a small price to pay.
Though it’s a no cheese pizza, our best vegan pizza recipe has been a hit with my friends and family! Vegan comfort food, at its finest. What do you think of pizza without cheese — would you try it? Let me know in the comments below.
How to Serve It
This vegan pizza recipe makes a complete meal with a few simple sides. Here are my top ideas:
A simple arugula salad with lemon and olive oil is my personal favorite. Check out my Ultimate Arugula Pizza.
A big green salad rounds out the meal with fiber and freshness. Try my Favorite Chopped Salad.
A grain salad like this Quinoa Salad is another fun and filling choice.
A light Italian wine: A Barbera d’Asti or Montepulciano would work well!
Sparkling water with citrus for a non-alcoholic pairing
Store leftover pizza slices in the fridge for up to 3 days. To reheat, place in a 375°F oven for 5 to 8 minutes, or in a dry skillet over medium heat with a lid on for 3 to 4 minutes. Or, the best way to reheat pizza is in an air fryer for a few minutes, if you have one.
Freezing pizza dough: If you want to get ahead, you can freeze the pizza dough before using it. See my guide to How to Freeze Pizza Dough for the full method.
Dietary Notes
This vegan pizza recipe is vegetarian, vegan, plant-based, dairy-free, naturally sweet, and refined sugar-free.
Prepare the dough using the Best Homemade Pizza Dough Recipe (follow this video instruction for more). Follow the preparation instructions in the dough recipe if prepared in advance.
Place a pizza stone in the oven and preheat to 500°F. OR preheat your pizza oven (here’s the pizza oven we use).
Prepare the toppings: Slice the jarred red pepper into thin strips and set aside. Mince 3 cloves garlic. Slice the mushrooms and red onion. Drain and rinse the chickpeas. In a large skillet, heat 2 tablespoons olive oil. Add the garlic, mushrooms, onion, chickpeas, and spinach and ½ teaspoon kosher salt; saute until the mushrooms are tender and the spinach is wilted, about 5 minutes.
When the oven is ready, dust a pizza peel with cornmeal or semolina flour. (If you don’t have a pizza peel, you can use a rimless baking sheet or the back of a rimmed baking sheet. But a pizza peel is well worth the investment!) Stretch the dough into a circle; see How to Stretch Pizza Dough for instructions. Then gently place the dough onto the pizza peel.
Quickly assemble the pizza: Spread a thin layer of pizza sauce across the dough and sprinkle with a few pinches kosher salt. Add the sauteed vegetables, then top with red pepper strips and artichoke quarters.
Transfer the pizza to the oven on the pizza peel, and bake until the crust is browned, about 5 to 7 minutes. While the pizza bakes, cut the basil into thin strips (chiffonade). Allow to cool slightly, then top with basil and serve.
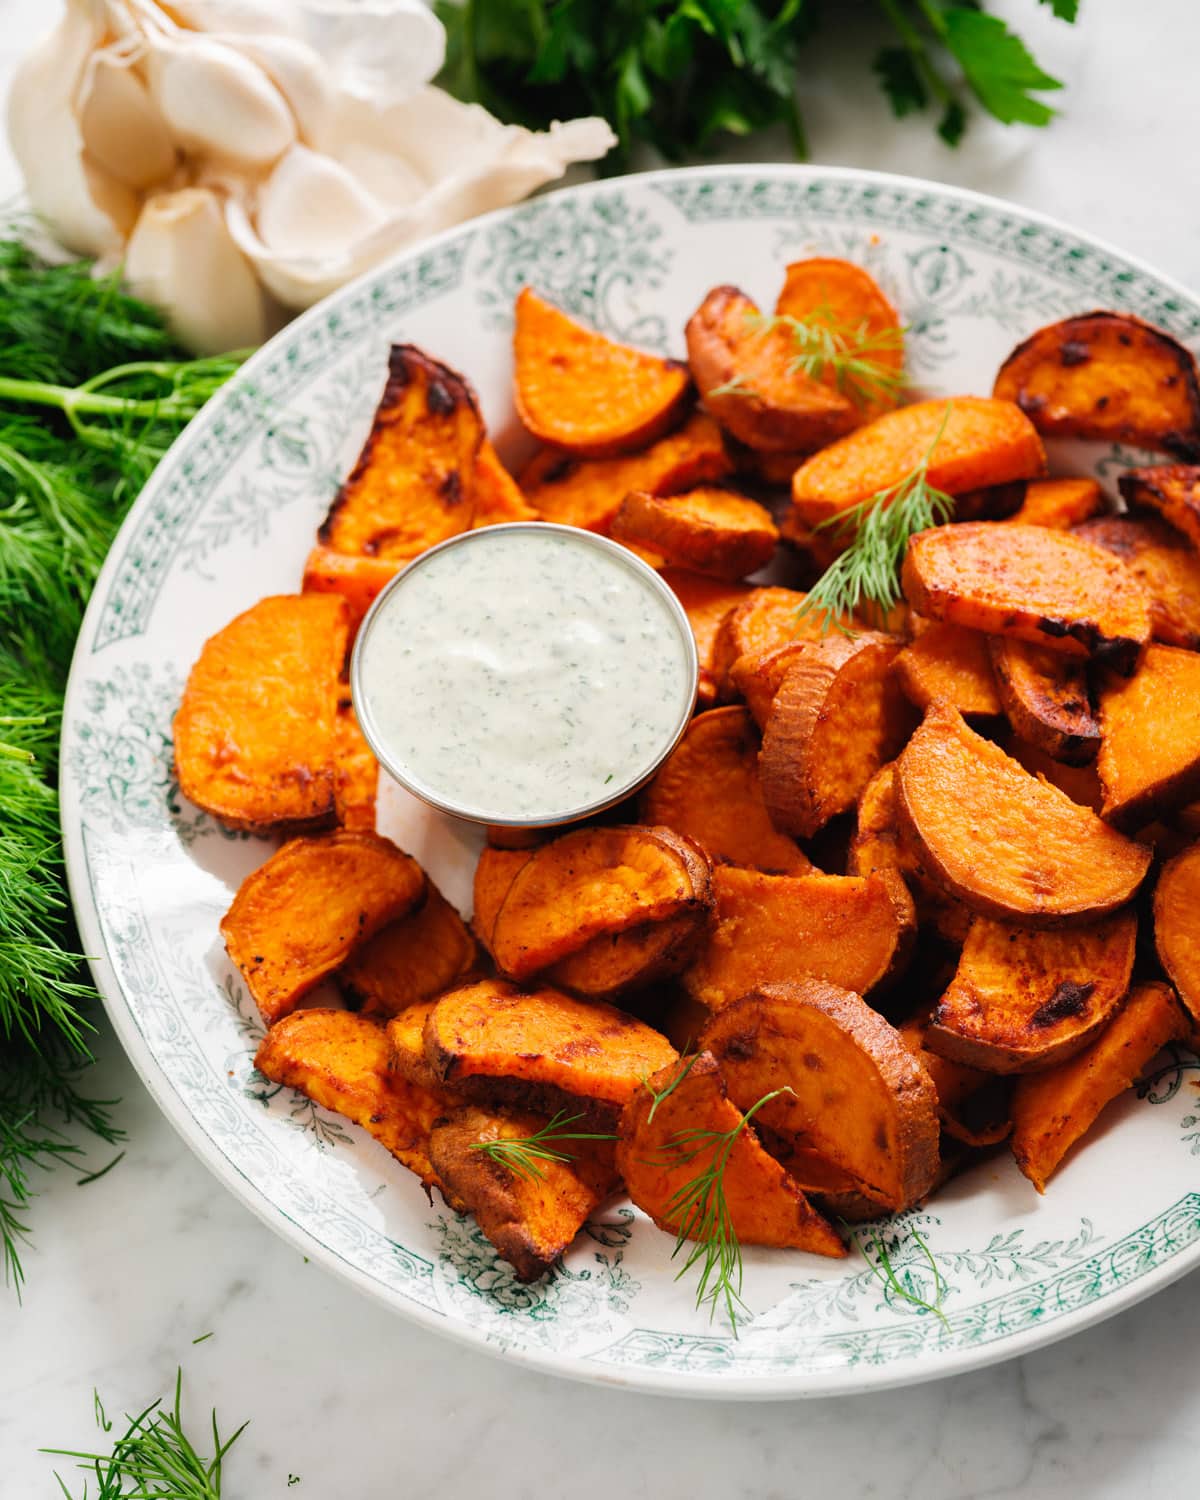
These air fryer sweet potatoes are perfectly cooked and ready in just 15 minutes with a few ingredients! The fastest, easiest sweet potato side dish you’ll make all week.
It’s funny that after years of resisting buying an air fryer, I use mine almost every night. (Really!) What I once thought was a waste of counter space is now my very favorite appliance. Aside from air fryer salmon bites and air fryer chicken, one of my favorite ways to use it is these air fryer sweet potatoes!
I love making roasted sweet potatoes, but they cook in 25 minutes plus my oven pre-heat time of 10 minutes. These sweet potatoes cook in only 12 minutes with a 3 minute preheat time, making them so much faster. I have been adding them to bowl meals on repeat lately. Here are my tips to perfect sweet potatoes in the air fryer!
Why You’ll Love This Recipe
Faster than oven roasting: They’re ready in 15 minutes (instead of 35 minutes)
Perfectly cooked with a tender interior and slightly crispy outsides
Simple ingredients: All you need are sweet potatoes, olive oil, and a few seasonings
Naturally vegan, gluten-free, and dairy-free: It’s a healthy side dish that fits many diets
Ingredients You Need
Interestingly, I’ve found that all you need for the perfect seasoning for sweet potatoes are salt and one specific pantry staple: garlic powder! Just trust me. Here’s everything you’ll need:
Sweet potatoes: I always leave the skin on for added nutrients, and it makes fast because there’s no need to peel! Slice them into ¼-inch half moons for the best balance of slightly crisp exterior and tender interior. I also find that leftovers stay better in these larger thin shape then diced, which can become shriveled.
Garlic powder: This is my not-so-secret weapon for savory sweet potato recipes. It doesn’t taste overtly garlicky, it just adds a savory note that compliments the potatoes. I use this in my fan favorite baked sweet potato slices and there’s no need for any other seasonings.
Olive oil: You don’t need much for browning: the air fryer does most of the work.
Kosher salt: I always use kosher salt in all my recipes: it seasons more gently and evenly than table salt.
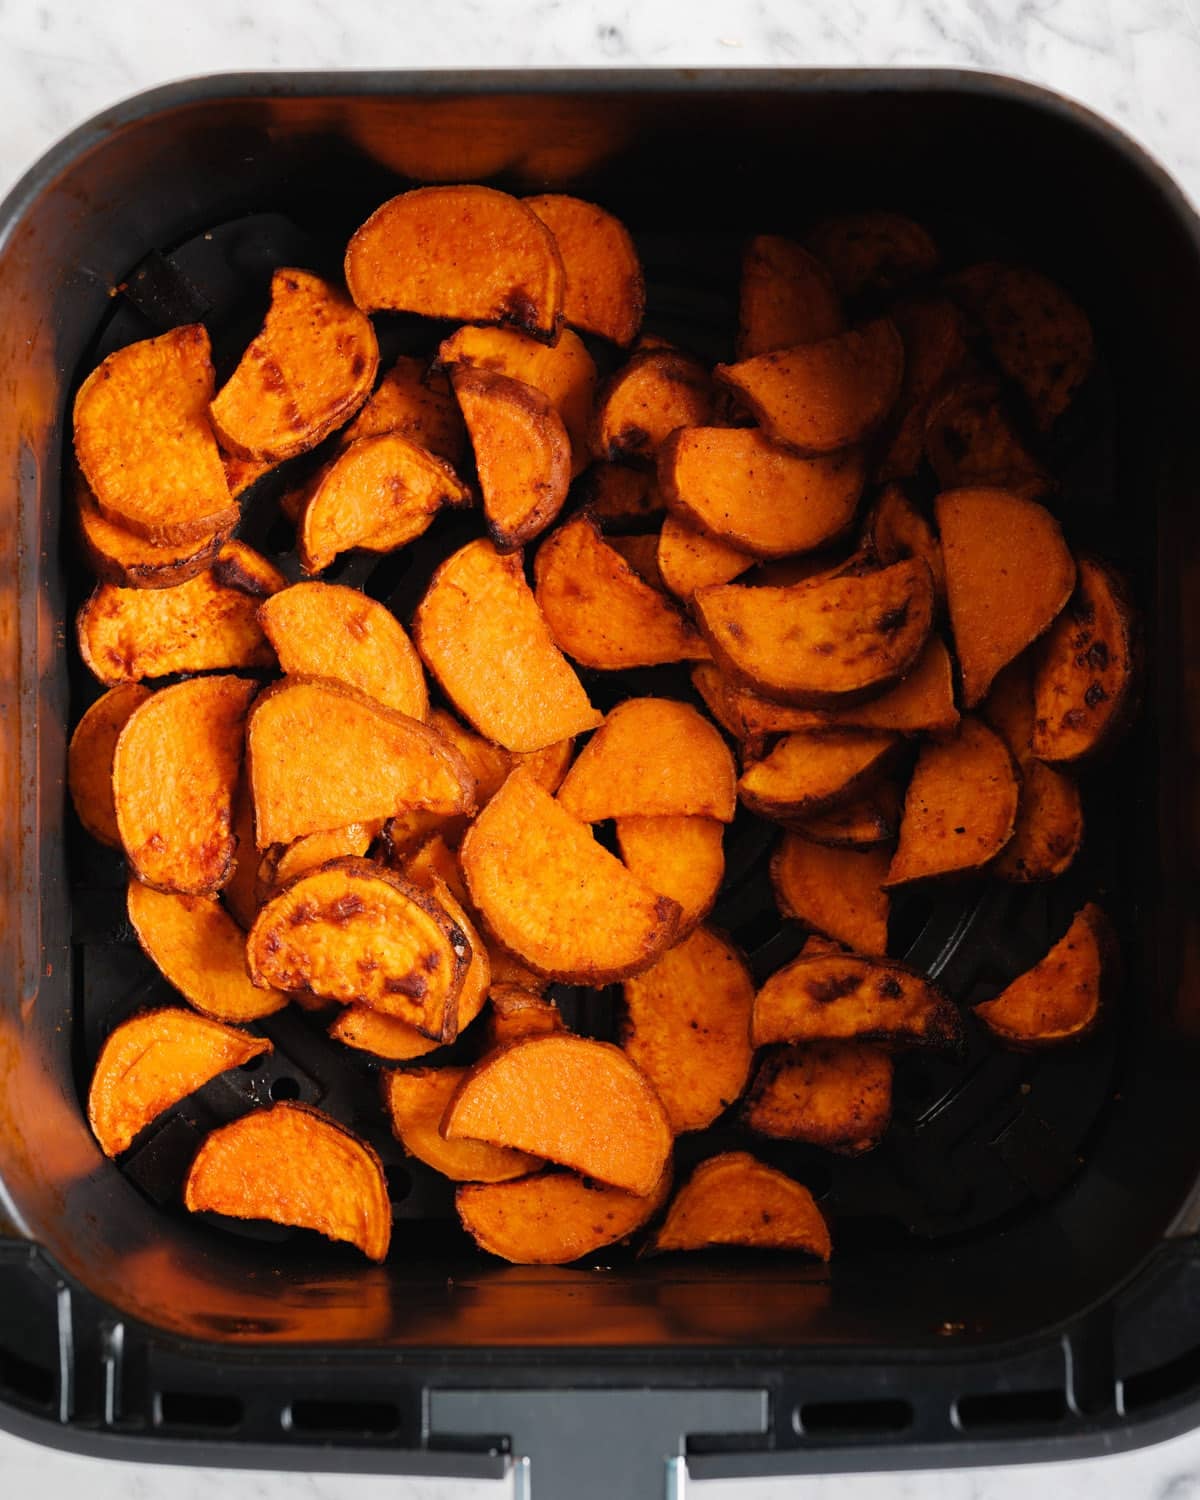
How to Make Air Fryer Sweet Potatoes
Though I love making roasted sweet potatoes, air fryer sweet potatoes are so much faster! They’re done in about 15 minutes, which I’ve found makes me tend to want to make them more often than firing up my oven. Here’s what to do:
Preheat the air fryer to 400°F for 5 minutes.
Slice the sweet potatoes into ¼-inch half moons, leaving the skin on. No peeling needed!
Season in a bowl. Toss the slices with garlic powder, kosher salt, and olive oil until evenly coated.
Air fry in a single layer for 12 to 15 minutes, shaking the basket at the 6-minute mark. It’s important not to overcrowd the air fryer, so if you want to make more than 1 ½ pounds of sweet potatoes, you’ll want to work in batches.
Check for doneness. A fork should slide easily into the thickest piece. If not, add 2 to 3 more minutes.
Ways to Serve
I am a huge sweet potato fan, so I can think of hundreds of ways to eat them! These are great in bowl meals or salad bowls, and you can also just use them as a super simple side dish. Here are some of my favorite ways:
In a grain bowl: Layer them over rice or quinoa with a drizzle of tahini for a satisfying Mediterranean bowl, or I originally made them for these flavorful and fun chicken and rice bowls
Inside tacos: Throw them tortillas with these easy black beans and avocado
As a breakfast base: Eat them with eggs like a sweet potato hash
Leftovers store refrigerated for up to 4 days. To reheat, the air fryer is the best bet: just add them for a few minutes until warmed through again. I don’t recommend freezing these because they become pretty mushy after thawing.
Dietary Notes
This air fryer sweet potatoes recipe is vegetarian, vegan, gluten-free, and dairy-free.
Frequently Asked Questions
Do I need to peel sweet potatoes for the air fryer?
Nope! The skin on sweet potatoes is edible and actually crisps up nicely in the air fryer. I always leave it on for this recipe: it saves time and adds texture.
What temperature should I use for air fryer sweet potatoes?
400°F. It’s hot enough to caramelize the edges and cook the sweet potatoes through in 12 to 15 minutes.
Can I use a different shape instead of half moons?
Yes! Cubes work well too! I just like the surface area of this shape and it saves better for leftovers.
Can I add other seasonings?
Absolutely. Smoked paprika, cumin, and a pinch of cayenne are all great variations. The garlic powder base is simple but pairs well with other spices.
These air fryer sweet potatoes are perfectly cooked and ready in just 15 minutes with a few ingredients! The fastest, easiest sweet potato side dish you’ll make all week.
Place the diced sweet potatoes in a large bowl. Mix the potatoes with the garlic powder, kosher salt and olive oil
Cook for 12 to 15 minutes, shaking at 6 minutes, until tender. Serve as a simple side, in bowl meals, or dipped in a sauce (like my Green Goddess Ranch).
Notes
Leftover storage: Leftovers store refrigerated up to 4 days; reheat in the air fryer for 1 or 2 minutes until warmed through.