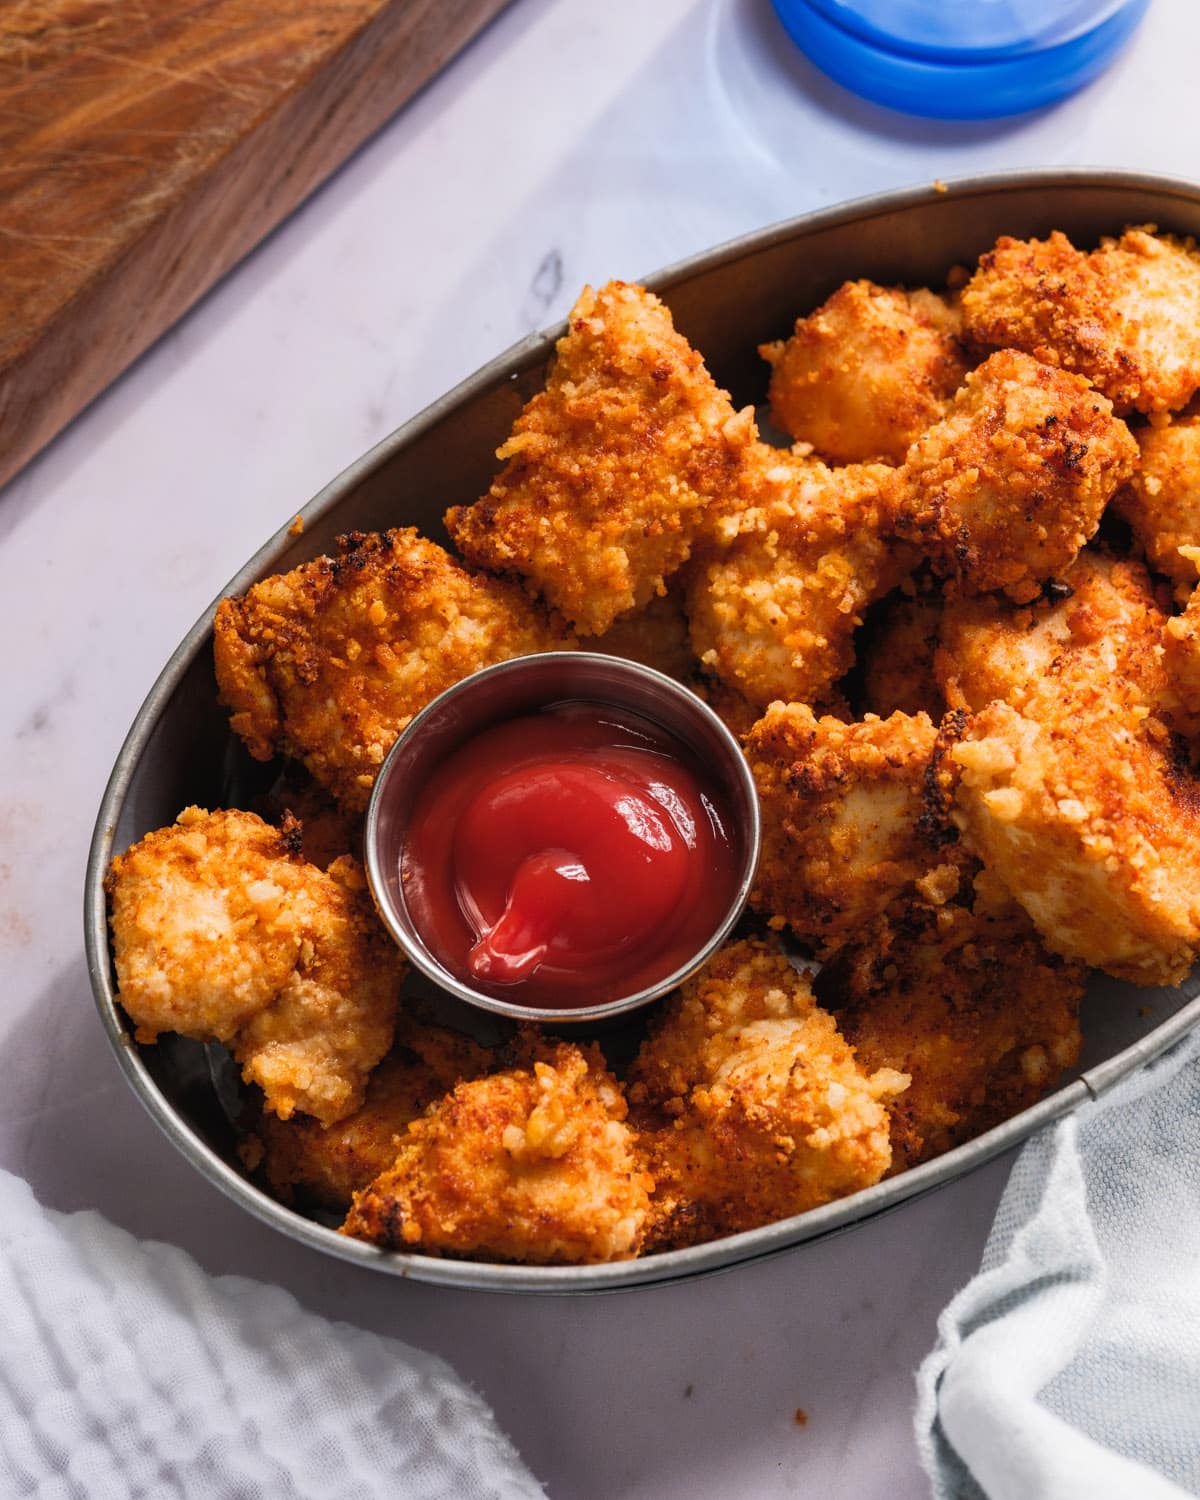
These homemade air fryer chicken nuggets are golden, juicy, ready in 15 minutes, and made with real chicken! Perfect as a healthy easy dinner served with a sauce or over salads.
There’s something so satisfying about a crunchy chicken nugget, no matter what your age. Here’s a recipe I developed as a quick way to get that cozy feeling as an easy weeknight dinner: air fryer chicken nuggets!
This method is SO quick and easy: I adapted it from my baked chicken nuggets and this way is even simpler! There’s no egg, no messy breading: just a toss with panko and seasonings before you throw it in. I love these in chicken rice bowls or tossed over a Caesar salad, and my kids love them with honey mustard!
Why You’ll Love This Recipe
An easy healthy dinner: It’s so fast and easy to make these nuggets, and they’re a healthy dinner made with real whole food ingredients
No breading stations, no egg, no mess: The panko gets tossed right in the bowl with everything else
Made with real chicken breast: No fillers or weird ingredients like the frozen kind
Adult and kid-approved: My kids love them with with a sauce and I love them on a salad
5 Star Reader Review
“I made these chicken nuggets and I love them! Such an easy recipe and took so little time. I did have to cook the nuggets in two batches. These will be great over salads, sides for carby meals, or just with a dipping sauce. I actually might not make your baked nuggets as often because this recipe is so easy!” -Tanvee
Ingredients You’ll Need
Here’s what you’ll need, or you can jump to the recipe below to get started:
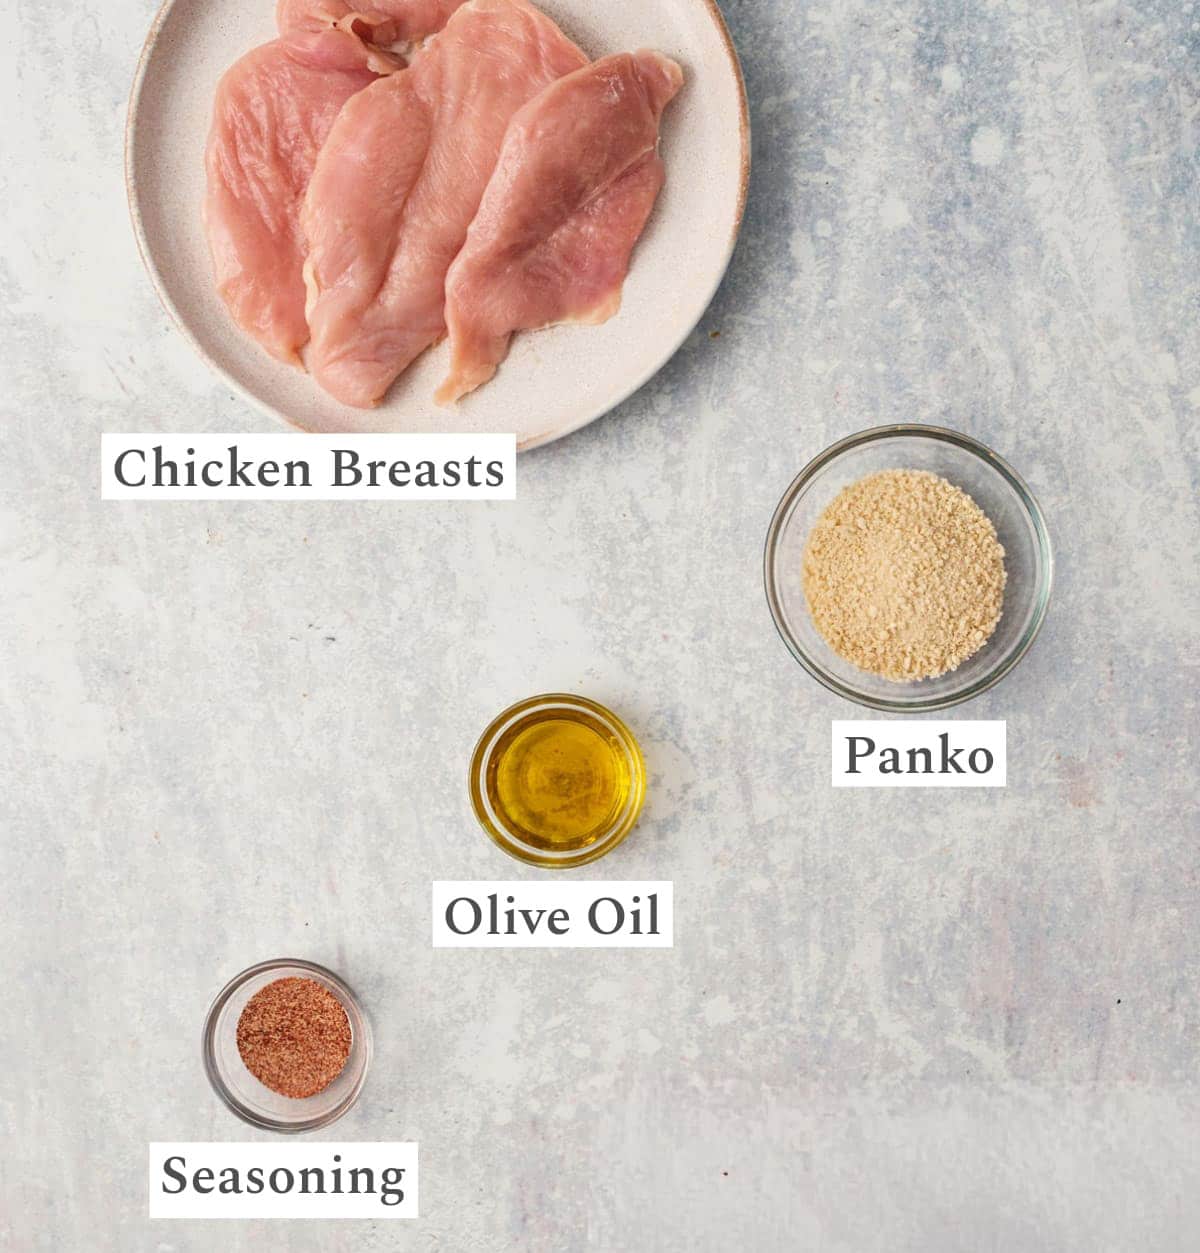
Chicken: For the best nuggets, I like using real chicken breast (versus whatever is in the frozen kind)!
The spice blend: Smoked paprika, cumin, onion powder, and garlic powder are my signature savory move: it makes the perfect seasoning that’s just flavorful enough!
Cornstarch: A small amount helps the panko stick and makes a crispy exterior (I have not tried it, but you can likely substitute arrowroot powder for similar results)
Panko breadcrumbs: Either regular or gluten-free works. You toss them in and then leave the excess behind in the bowl.
Olive oil: You’ll use just enough to get everything to crisp up.
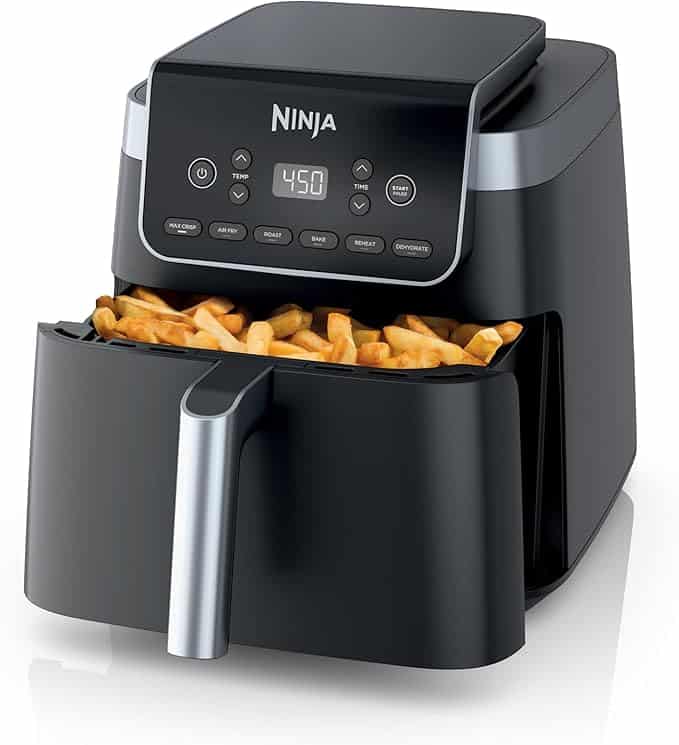
Air Fryer Options
I cook with this large-basket air fryer(at least 6.5 qt capacity), which fits the chicken in this recipe in a single layer. You can also use a full-size oven with air fryer function: if so, you can make a double batch!
How to Make Air Fryer Chicken Nuggets
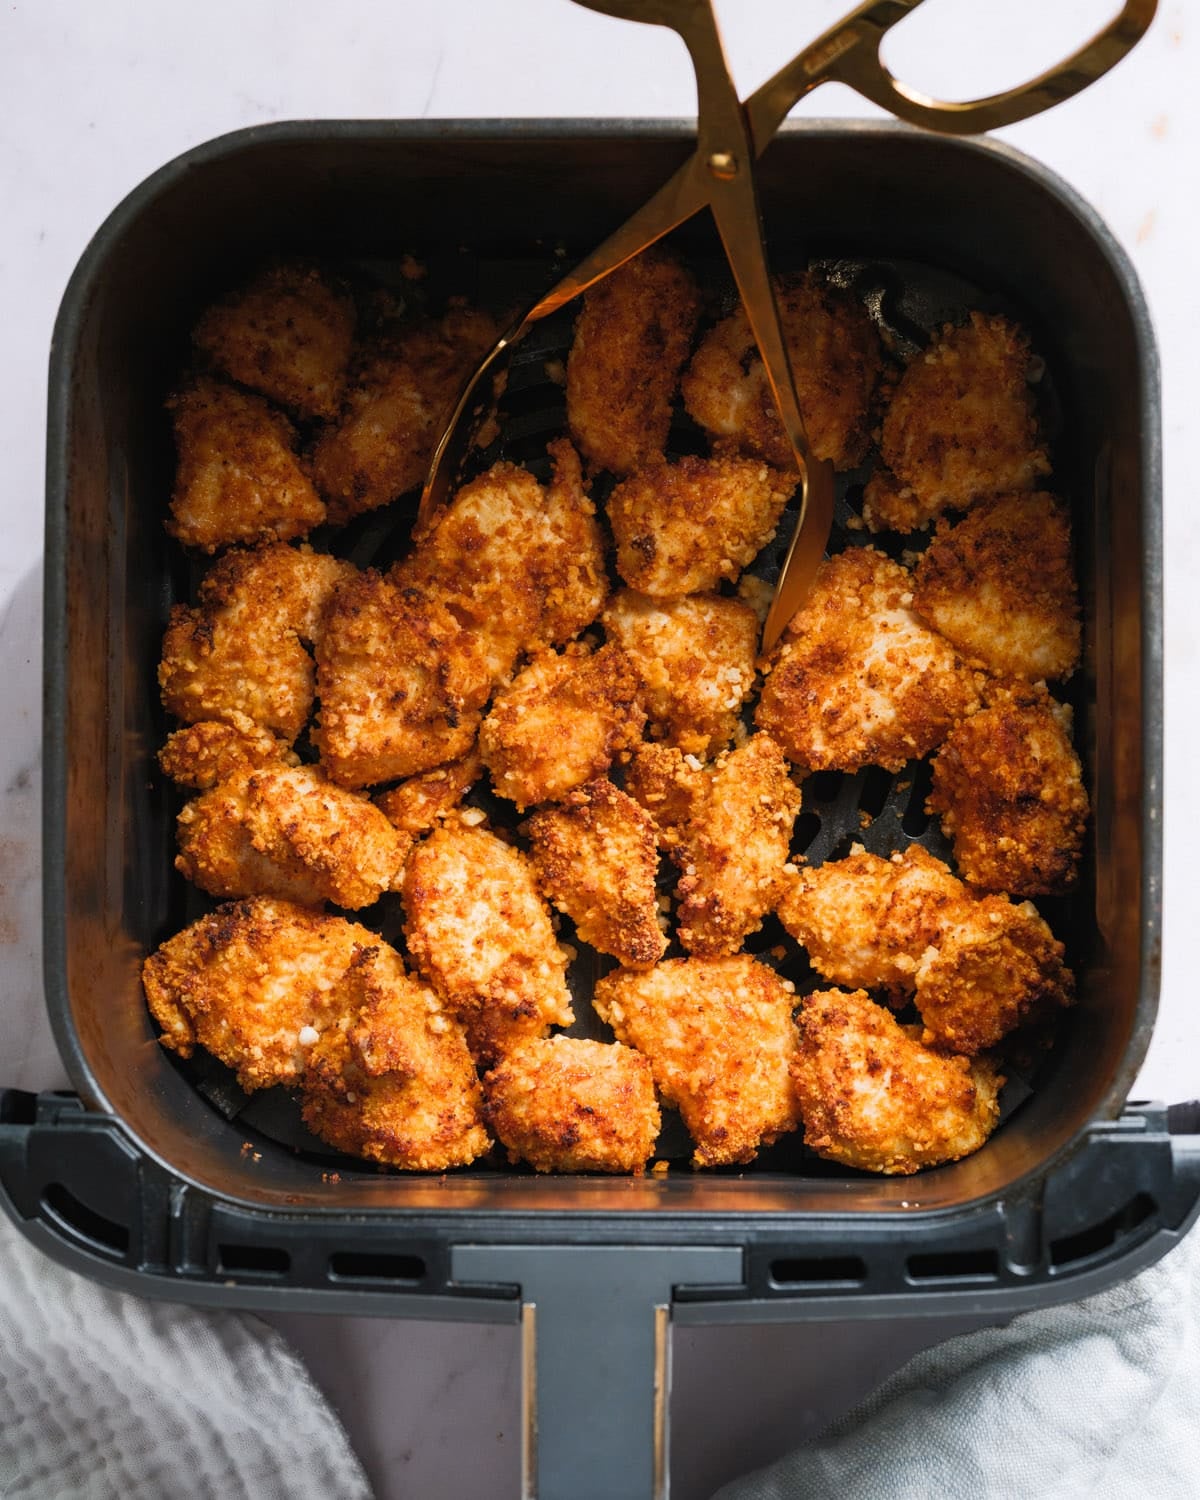
This most important thing about this recipe is for the crispiest results, cook in two batches rather than overcrowding the basket. However, a lot of times I cook in one batch for the quickest result. They just get slightly softer as they sit: and that’s ok! Here’s what to do:
Step 1: Cut the chicken. Slice each breast into roughly 1½-inch pieces.
Step 2: Toss with seasoning. In a large bowl, toss the chicken with olive oil, cornstarch, all the spices, and salt.
Step 3: Add the panko. Stir in the panko breadcrumbs. Some will remain in the bowl after you take out the pieces.
Step 4: Air fry. Place the nuggets in a single layer in the air fryer basket. Cook at 400°F for 9 to 10 minutes, until golden brown with an internal temperature of at least 165°F. Tip: For the crispiest results, cook in two batches rather than overcrowding the basket!
Step 5: Rest before serving. Allow the nuggets to cool in the air fryer for 3 minutes before digging in.
Tips for the Best AF Nuggets
Cook in batches for the crispiest result. I said it already, but I like cooking in one batch and I don’t mind that they get a little soft. But you can do two batches to get them extra crispy.
Embrace the ease. Again these get a little softer as they sit — and that’s okay. You’re trading peak crispiness for the massive convenience of homemade nuggets from whole chicken in under 15 minutes.
Check your air fryer model. Times can vary slightly depending on your machine. Basket-style air fryers and oven-style air fryers behave a bit differently. Start checking at 9 minutes.
What To Serve Alongside
As I mentioned, I love these nuggets in a bowl meal or over a salad, and my kids love them as dinner with some carrot sticks! Here are some great ways to serve these nuggets:
Vegetarian / vegan: If you’re also cooking for plant-based diets, try my veggie nuggets alongside.
No air fryer? I have a similar recipe that you can bake at 425°F for about 18–20 minutes, flipping halfway. See my homemade chicken nuggets post.
Storage and Reheating
Store leftover nuggets in an airtight container in the refrigerator for up to 3 days. To reheat, pop them back in the air fryer for 3–4 minutes at 375°F — they’ll crisp back up nicely. Avoid the microwave if you can; it’ll make them rubbery.
Dietary Notes
This recipe is dairy free and Mediterranean diet friendly as written, andgluten-free when made with gluten-free panko. If you’re looking for a plant-based nugget, check out my veggie nuggets.
These homemade air fryer chicken nuggets are golden, juicy, ready in 15 minutes, and made with real chicken! Perfect as a healthy easy dinner served with a sauce or over salads.
In a large bowl, gently toss the chicken pieces with the olive oil, cornstarch, spices and kosher salt. Then stir in the panko until evenly coated: some will remain in the bowl which you don’t need to use.
Place each piece of chicken in a single layer in the air fryer basket (leave behind the extra panko in the bowl). Important: Cook the chicken in 2 batches for the crispiest result, or one batch for the fastest result that can get a little softer as they sit.
Air fry at 400°F for 9 to 10 minutes, until golden brown and cooked through, until golden brown and at least 165°F, shaking once at 5 minutes. Allow to cool in the air fryer for 3 minutes before serving. (The one batch version can get softer as they sit but I personally feel like it is worth it for the ease of this recipe and using real chicken.) Store leftovers refrigerated for 3 days; reheat in the air fryer.
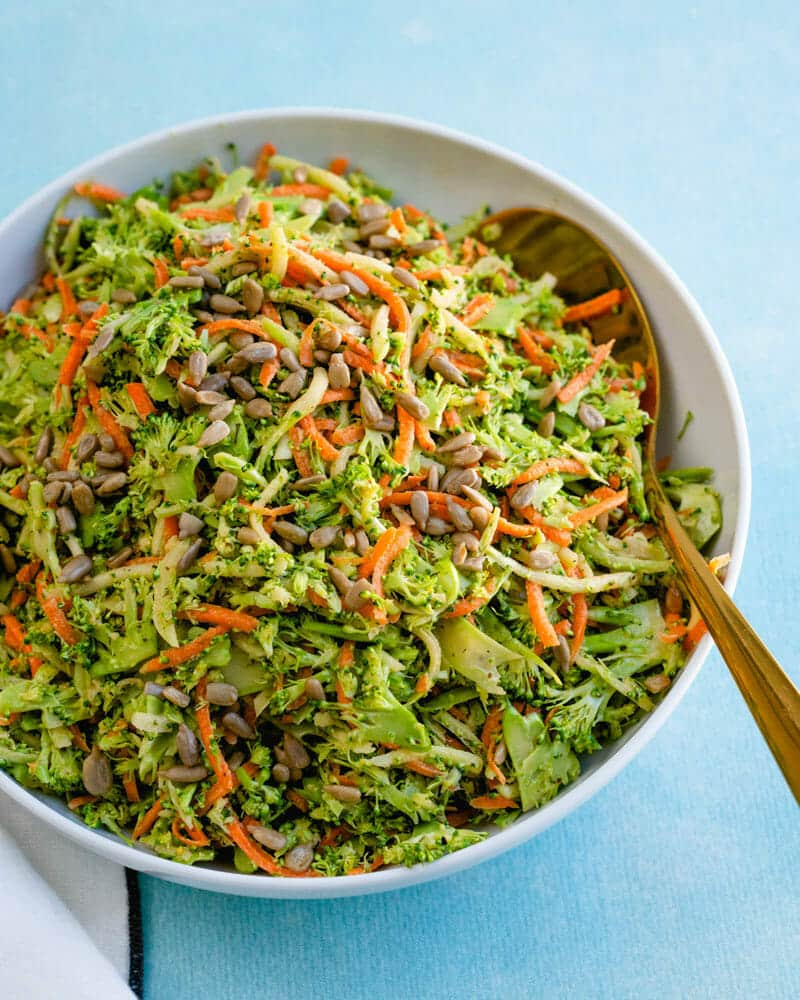
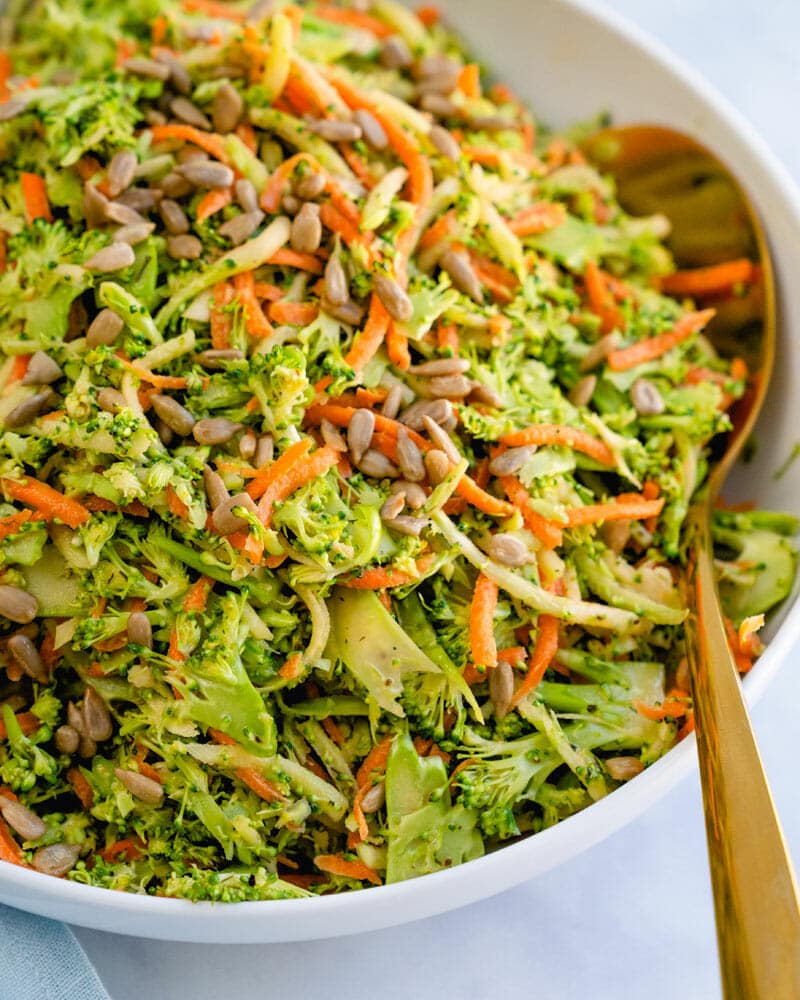
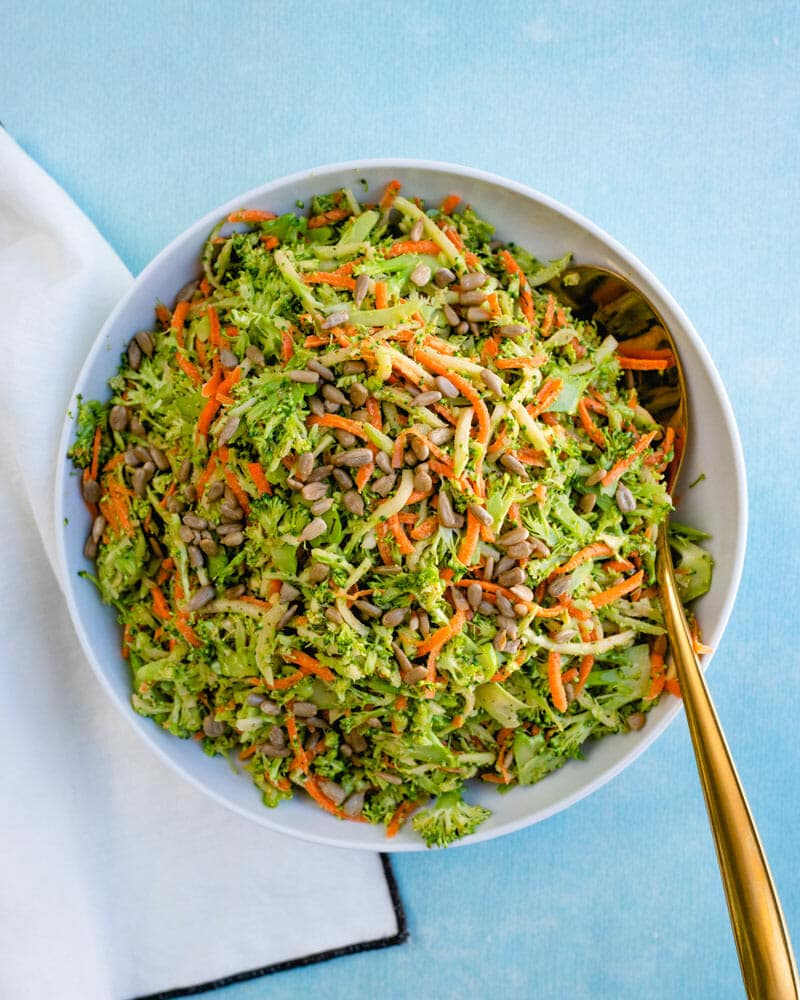
This crunchy, tangy-sweet broccoli slaw makes broccoli stems into the side dish everyone fights over! It’s easy to make with fresh broccoli or with store-bought mix.
Who knew raw broccoli could be so irresistibly tasty? When Alex and I created this broccoli slaw recipe, we nearly polished off the entire bowl in one sitting. Now it’s become a family favorite that everyone requests for summer cookouts.
The combination of crunchy broccoli, creamy-tangy dressing, and optional sweet-savory add-ins creates something that’s both healthy and indulgent. You can make it with fresh broccoli (using those stems), or grab a bag of pre-shredded mix for convenience. Either way, this is the slaw that converts coleslaw haters and makes broccoli the star of your meal!
5 Star Reader Review
“So easy and delicious. I used packaged broccoli slaw. It is very tasty!” -N
Ingredients You’ll Need
Broccoli slaw is a spin on the traditional coleslaw using thinly sliced broccoli stems instead of cabbage, coated in a mayo-based coleslaw dressing. Broccoli slaw has become so popular that the mix is sold pre-packaged in grocery stores in the US. But you can also make it with fresh veggies!
Other things you’ll find in broccoli slaw recipes: a sweet element like sliced apple, dried cranberries or raisins, and a crunchy element like sunflower seeds, sliced almonds, or even dried ramen noodles. Here’s what I use in my broccoli slaw (or jump to the recipe):
Broccoli and carrots for crunch, color, and natural sweetness (you can also use broccoli slaw mix; see below)
Mayonnaise for that creamy backbone: you can also use vegan mayo for sweetness
Apple cider vinegar for a bright, tangy flavor
Sugar or maple syrup to balance the tang
Dried dill and celery seed: My secret seasonings that make it taste more complex!
Salt and fresh black pepper to season
Fresh Vegetables vs Broccoli Slaw Mix
This broccoli slaw recipe is customizable based on your preferences and the ingredients you have access to, You can use either store-bought mix, or use fresh broccoli and carrots. Here are the pros and cons:
Fresh broccoli and carrots: I highly recommend using fresh veggies for the freshest flavor. It’s fastest and easiest with a food processor: you’d need a slicing blade and a grating blade. Or, you can use a knife to thinly slice the florets and then a box grater to grate the broccoli stems and carrots. It’s worth it for the flavor!
Bagged broccoli slaw mix: It’s usually easy to find broccoli slaw mix at the grocery store, sold in 12 ounce bags (you’ll need 24 ounces). The premade mix makes this method very quick and easy, but you lose some of that fresh, beautiful veggie flavor and it can also have a dry texture.
Broccoli Slaw Add-ins
This broccoli slaw is incredibly good with just veggies and dressing. But you can also add sweet or crunchy elements to make it even better. Here are some options:
Sunflower seeds: we added these for a crunchy topping
Sliced almonds: this would also add a crunch
Dried cranberries or currants: for savory + sweet fans! Alex is not, so we left them out in our version
Julienned green apple: for another sweet element
What to Serve With Broccoli Slaw
This slaw is perfect for any summer occasion: I’ve served it at many cookouts, barbecues and picnics over the year. Here are some ideas:
You can eat the slaw immediately (it tastes great right away!), or make 1-2 hours and refrigerate before serving for flavors to meld. Store leftovers covered for up to 2 to 3 days.
If making the day before, prep the vegetables and make the dressing separately, then combine them the day of serving.
Dietary Notes
This broccoli slaw recipe is vegetarian, dairy-free, and gluten-free. For vegan and plant-based, use vegan mayo (should be relatively easy to find at your grocery or online).
This crunchy, tangy-sweet broccoli slaw makes broccoli stems into the side dish everyone fights over! It’s easy to make with fresh broccoli or with store-bought mix.
1 1/2 pounds broccoli on the stem* (or 24 ounces packaged broccoli slaw and skip carrots)
2 medium carrots
½ cup mayonnaise (or vegan mayo)
2 tablespoons apple cider vinegar
2 tablespoons sugar or maple syrup
½ teaspoon dried dill
½ teaspoon celery seed
1 teaspoonkosher salt
Fresh black ground pepper
¼ cup sunflower seeds (optional)
¼ cup dried cranberries (optional)
Instructions
For fresh broccoli & carrots: Fit a food processor with the slicing blade. Cut the florets off of the broccoli, then feed them into the food processor to thinly slice them. Peel the stems of the broccoli and the carrots, then cut them into pieces to fit into the food processor. Change the blade to the grating blade and feed them through the food processor. Alternate method: Thinly slice the florets with a knife. Then use a box grater to large grate the peeled broccoli stems and carrots.
Place the sliced vegetables (or bags of broccoli slaw) into a large bowl. In a small bowl, mix together the mayonnaise, apple cider vinegar, sugar, dill, celery seed, kosher salt, and several grinds fresh ground pepper.
Add the dressing to the vegetables and stir until coated. If desired, stir in sunflower seeds or dried cranberries. Eat immediately or refrigerate up to 2 days.
Notes
*For a potluck or cookout, we’d recommend multiplying this recipe by 1.5 to make 12 servings.
More Slaw Recipes to Try
This creamy coleslaw is the absolute best, covered in a zingy coleslaw dressing.
Try vinegar coleslaw, a spin with a vinaigrette dressing: no mayo.
This red cabbage slaw requires just red cabbage and red onion, plus a zingy dressing.
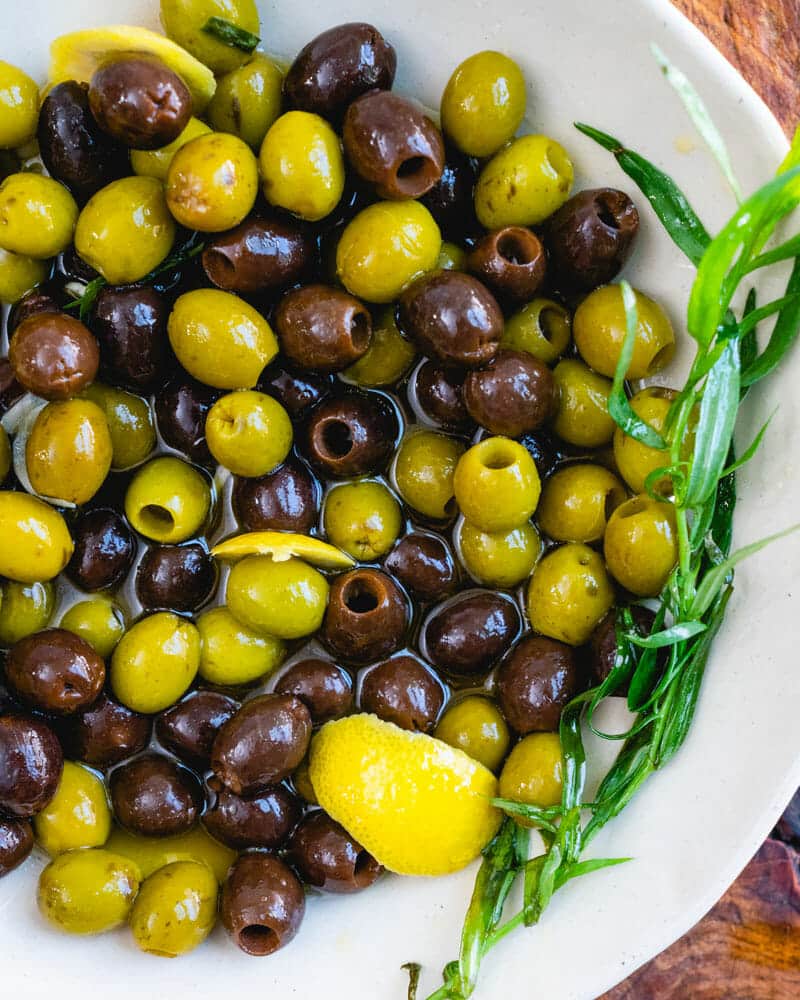
These marinated olives are an easy appetizer with huge flavor: garlicky, lemony, herby, and perfect for cheese boards or parties. A simple, make-ahead recipe!
Here’s a favorite party trick of mine that makes a tasty and healthy appetizer in just 5 minutes of hands on time: marinated olives! This dish will make an olive lover out of anyone. Using the right olives here results in smooth, rich flavor: not briny or overly salty. The garlic, lemon and herbs make a symphony of flavor!
Every time I make these and set them out on the table, people go crazy for them! They’re also great for an appetizer dinner at home: bread, cheese, marinated olives and wine. Here are a few tricks to the tastiest homemade marinated olives you’ll find (in my humble opinion).
5 Star Reader Review
“These are incredible! I bought a large jar of Castelvetrano olives and was looking for something interesting to do with them. I can’t wait to share them with others.” -J
The Secret Ingredient: Water-Packed Olives
Here’s our secret to these marinated olives. Use ripe olives packed in water. They have a rich and buttery flavor, nothing like a martini olive. These olives aren’t packed in brine, they’re simply packed in salt water. It makes for a clean, straightforward flavor: not too tangy, briny or salty. Exactly what kind of olives are we talking about?
Use medium to large ripe olives that are pitted. Here’s a list of olives to buy for marinated olives: we like the Lindsay brand that you see listed. Look on the package to see if it says “packed in water” or if the ingredients specify. Castelvetrano olives are another great option.
Use a mix of green and black. This makes a great color contrast.
Avoid stuffed or flavored olives. You don’t want any competing flavors here.
Ingredients For Marinading
You can use lots of different flavors for making marinaded olives. Here’s what I use and some other options you can swap instead:
Lemon: Use the lemon rind and lemon juice. Variation: Use orange instead.
Garlic: Slice the garlic to infuse big flavors (no need to mince!). Do not omit.
Olive oil: Olive oil infuses the flavor perfectly.
Fresh herbs: Rosemary and tarragon are our favorites. Variation: Use thyme or oregano.
How to Make Marinated Olives (Basic Steps)
Want to make marinated olives? The hands on part is fast: it takes just about 5 minutes. The longest lead time item is the marinading. Make sure you set aside 2 to 4 hours for the marinading process. Here’s what to know:
Place all the ingredients in a large jar or container. We like using a large mason jar. Cover the top and shake to get everything coated.
Leave at room temperature for 2 to 4 hours. The wait time locks in the flavors.
How to Store
Once your marinaded olives are ready, you can save them for a few weeks. Leave them in the jar and refrigerate. But here’s a tip: the olive oil will solidify when it is chilled. So make sure to bring the olives to room temperature before serving.
Ways To Serve Marinaded Olives
Now for the fun part: ways to serve them! These marinaded olives are very versatile. They’re an easy side dish for a Mediterranean-style meal (like Italian or Spanish), or perfect for a gluten free appetizer spread. Here’s how I like to serve them:
On a cheese board. Add a baguette, sliced manchego cheese and marcona almonds, and you’ve got a simple cheese board that doubles as dinner for two.
This marinaded olives recipe is vegetarian, vegan, plant-based, dairy-free and gluten-free.
Frequently Asked Questions
Do I really need to wait 2 to 4 hours?
For the best flavor, yes. You can eat them sooner, but the garlic, lemon, and herbs need time to infuse the olives and the oil. Overnight is even better.
Can I make these ahead for a party?
Absolutely! Make them up to 1 week in advance and store in the fridge. Pull from the fridge at least 30 minutes before serving so the oil softens.
What’s the best way to serve them — warm or cold?
Always room temperature or gently warmed. Cold olives in solidified oil don’t show off their flavor.
These marinated olives are an easy appetizer with huge flavor: garlicky, lemony, herby, and perfect for cheese boards or parties. A simple, make-ahead recipe!
4 rosemary or tarragon sprigs, plus additional for serving if desired
Instructions
Drain the olives. Peel and thinly slice the garlic. Cut 4 strips from the lemon peel, then squeeze out 1 tablespoon of the juice.
In a 1 quart jar or covered container, combine all ingredients and shake gently to combine.
Marinate for 2 to 4 hours at room temperature, shaking occasionally. Serve immediately, garnishing with additional rosemary sprigs if desired. Stores refrigerated for several weeks; allow to come to room temperature prior to serving.
More Olive Recipes To Try
Kalamata Olive Spread or Tapenade: This olive spread (also called tapenade), is used in Italian cuisine to add big flavor to crostini and sandwiches.
Olive Salad: This tangy condiment is perfect for sandwiches and as a dip.
from A Couple Cooks https://ift.tt/wNH3MFP
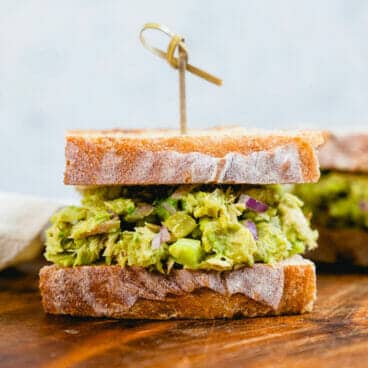
This fresh and healthy avocado tuna salad swaps the classic mayo for nutrient-rich avocado! It’s a fresh, no-cook lunch or fast dinner that comes together in 10 minutes.
Here’s a healthy lunch or dinner idea to spice up your routine: avocado tuna salad! This spin swaps out the classic mayonnaise for nutrient-rich avocado. The flavor is so fresh and delicious, you may give up the mayo version altogether.
I might like this even better than a classic tuna salad (except my creamy recipe is really delicious so it’s a hard call). It takes only a handful of ingredients and 10 minutes to put together. It’s easy to forget about tuna salad, but this one is now solidly part of my healthy meal repertoire!
5 Star Reader Reviews
“I used an avocado that wasn’t ripe enough to mash, but it was still amazing! I doubled the recipe and it turned out delicious and filling for both my sister and me. I would 10/10 recommend.” -Katie
“This goes into the favorites, great combo of additions to the tuna making it very flavorful. Great as is and good as a melt with a touch of cheese too. Thank you!” -Frances
Ingredients You’ll Need
The best part about tuna salad is that you can make it using mostly pantry ingredients. Of course, you’ll need a ripe avocado. But other than the celery and onion, it’s a pantry friendly meal. Here’s what you’ll need to make this healthy lunch idea:
Canned tuna: I usually use white meat (albacore), but light tuna works too. Water-packed makes it fresh and clean-tasting; oil-packed tastes a little richer. Both are great!
Ripe avocado: This is the star, so make sure it’s ripe so that it can form the creamy sauce. See my guide on how to cut an avocado for the safe way to cut it.
Celery: Needed for that signature tuna-salad crunch.
Red onion: Just enough for sharpness.
Dill pickles: My secret weapon! They bring that classic briny tang to the salad.
Lemon juice: keeps the avocado from browning.
Dijon mustard: Adds savory notes.
All you have to do is chop the veggies, then mash the ingredients together with a fork. This might just win the easiest meal ever award!
Variation: Try It Mexican Style
Avocado tuna salad is often served with Mexican-style flavors as well. This version is a classic, straightforward take. But you can mix it up and go with a Mexican style variation! Swap out the lemon for fresh lime juice and add a few tablespoons chopped cilantro.
Ways To Serve Avocado Tuna Salad
The most obvious way to serve this healthy tuna salad is the classic sandwich, but there are lots of other creative ways to serve it, including gluten-free and paleo options. Here are some ideas:
Avocado tuna salad is best the day it’s made. The lemon juice slows browning, but the avocado will start to dull within a few hours.
To make ahead, you can prep everything except the avocado and keep it covered in the fridge. Right before serving, mash in the fresh avocado and serve. If you do have leftovers with avocado mixed in, press plastic wrap directly onto the surface before refrigerating and eat within a day.
Avocado Beneftis
I’m not against a good tuna salad with mayo, like my classic tuna salad or tuna salad with egg. But it’s fun to have a variation that maximizes the nutrition of this healthy fruit! Here are some facts about avocado nutrition (source):
Rich in fiber. Avocados have lots of fiber; one serving has 7 grams or about 25% your daily value.
Full of heart healthy “good” fats. Avocados are full of monounsaturated oleic acid, a heart-healthy fatty acid.
Loaded with vitamins and nutrients. They’re also filled with a long list of vitamins.
Dietary Notes
This avocado tuna salad recipe is pescatarian, gluten-free and dairy-free.
This fresh and healthy avocado tuna salad swaps the classic mayo for nutrient-rich avocado! It’s a fresh, no-cook lunch or fast dinner that comes together in 10 minutes.